Tất cả các chương trình xử lý dữ liệu ở dạng này hay dạng khác, và nhiều chương trình cần có khả năng lưu và truy xuất dữ liệu đó từ lệnh gọi này sang lệnh tiếp theo. Python, SQLite và SQLAlchemy cung cấp cho chương trình của bạn chức năng cơ sở dữ liệu, cho phép bạn lưu trữ dữ liệu trong một tệp duy nhất mà không cần máy chủ cơ sở dữ liệu.
Bạn có thể đạt được kết quả tương tự bằng cách sử dụng tệp phẳng ở bất kỳ định dạng nào, bao gồm CSV, JSON, XML và thậm chí cả định dạng tùy chỉnh. Tệp phẳng thường là tệp văn bản mà con người có thể đọc được — mặc dù chúng cũng có thể là dữ liệu nhị phân — với cấu trúc có thể được phân tích cú pháp bằng chương trình máy tính. Dưới đây, bạn sẽ khám phá cách sử dụng cơ sở dữ liệu SQL và tệp phẳng để lưu trữ và thao tác dữ liệu, đồng thời tìm hiểu cách quyết định cách tiếp cận nào phù hợp với chương trình của bạn.
Trong hướng dẫn này, bạn sẽ học cách sử dụng:
- Tệp phẳng để lưu trữ dữ liệu
- SQL để cải thiện quyền truy cập vào dữ liệu liên tục
- SQLite để lưu trữ dữ liệu
- SQLAlchemy để làm việc với dữ liệu dưới dạng các đối tượng Python
Bạn có thể lấy tất cả mã và dữ liệu mà bạn sẽ thấy trong hướng dẫn này bằng cách nhấp vào liên kết bên dưới:
Tải xuống mã mẫu: Nhấp vào đây để nhận mã mà bạn sẽ sử dụng để tìm hiểu về quản lý dữ liệu với SQLite và SQLAlchemy trong hướng dẫn này.
Sử dụng tệp phẳng để lưu trữ dữ liệu
Một tệp phẳng là tệp chứa dữ liệu không có phân cấp bên trong và thường không có tham chiếu đến tệp bên ngoài. Các tệp phẳng chứa các ký tự mà con người có thể đọc được và rất hữu ích để tạo và đọc dữ liệu. Bởi vì chúng không phải sử dụng độ rộng trường cố định, các tệp phẳng thường sử dụng các cấu trúc khác để giúp chương trình có thể phân tích cú pháp văn bản.
Ví dụ:các tệp giá trị được phân tách bằng dấu phẩy (CSV) là các dòng văn bản thuần túy, trong đó ký tự dấu phẩy phân tách các phần tử dữ liệu. Mỗi dòng văn bản đại diện cho một hàng dữ liệu và mỗi giá trị được phân tách bằng dấu phẩy là một trường trong hàng đó. Dấu phân cách ký tự dấu phẩy cho biết ranh giới giữa các giá trị dữ liệu.
Python vượt trội trong việc đọc và lưu vào tệp. Khả năng đọc các tệp dữ liệu bằng Python cho phép bạn khôi phục ứng dụng về trạng thái hữu ích khi bạn chạy lại ứng dụng sau đó. Khả năng lưu dữ liệu trong một tệp cho phép bạn chia sẻ thông tin từ chương trình giữa người dùng và các trang web nơi ứng dụng chạy.
Trước khi một chương trình có thể đọc một tệp dữ liệu, nó phải có khả năng hiểu dữ liệu. Thông thường, điều này có nghĩa là tệp dữ liệu cần có một số cấu trúc mà ứng dụng có thể sử dụng để đọc và phân tích cú pháp văn bản trong tệp.
Dưới đây là tệp CSV có tên author_book_publisher.csv , được sử dụng bởi chương trình ví dụ đầu tiên trong hướng dẫn này:
first_name,last_name,title,publisher
Isaac,Asimov,Foundation,Random House
Pearl,Buck,The Good Earth,Random House
Pearl,Buck,The Good Earth,Simon & Schuster
Tom,Clancy,The Hunt For Red October,Berkley
Tom,Clancy,Patriot Games,Simon & Schuster
Stephen,King,It,Random House
Stephen,King,It,Penguin Random House
Stephen,King,Dead Zone,Random House
Stephen,King,The Shining,Penguin Random House
John,Le Carre,"Tinker, Tailor, Soldier, Spy: A George Smiley Novel",Berkley
Alex,Michaelides,The Silent Patient,Simon & Schuster
Carol,Shaben,Into The Abyss,Simon & Schuster
Dòng đầu tiên cung cấp danh sách các trường được phân tách bằng dấu phẩy, là tên cột cho dữ liệu theo sau trong các dòng còn lại. Các dòng còn lại chứa dữ liệu, mỗi dòng đại diện cho một bản ghi.
Lưu ý: Mặc dù các tác giả, sách và nhà xuất bản đều là thật, mối quan hệ giữa sách và nhà xuất bản là hư cấu và được tạo ra cho các mục đích của hướng dẫn này.
Tiếp theo, bạn sẽ xem xét một số ưu điểm và nhược điểm của việc sử dụng các tệp phẳng như CSV ở trên để làm việc với dữ liệu của bạn.
Ưu điểm của tập tin phẳng
Làm việc với dữ liệu trong các tệp phẳng có thể quản lý và dễ thực hiện. Việc có dữ liệu ở định dạng con người có thể đọc được không chỉ hữu ích cho việc tạo tệp dữ liệu bằng trình soạn thảo văn bản mà còn giúp kiểm tra dữ liệu và tìm kiếm bất kỳ sự mâu thuẫn hoặc vấn đề nào.
Nhiều ứng dụng có thể xuất các phiên bản tệp phẳng của dữ liệu do tệp tạo ra. Ví dụ:Excel có thể nhập hoặc xuất tệp CSV đến và từ một bảng tính. Tệp phẳng cũng có ưu điểm là độc lập và có thể chuyển nhượng nếu bạn muốn chia sẻ dữ liệu.
Hầu hết mọi ngôn ngữ lập trình đều có các công cụ và thư viện giúp làm việc với tệp CSV dễ dàng hơn. Python có csv tích hợp sẵn mô-đun và mô-đun gấu trúc mạnh mẽ có sẵn, làm cho việc làm việc với tệp CSV trở thành một giải pháp hiệu quả.
Nhược điểm của tệp phẳng
Lợi thế của việc làm việc với các tệp phẳng bắt đầu giảm đi khi dữ liệu trở nên lớn hơn. Con người vẫn có thể đọc được các tệp lớn, nhưng việc chỉnh sửa chúng để tạo dữ liệu hoặc tìm kiếm các vấn đề trở thành một nhiệm vụ khó khăn hơn. Nếu ứng dụng của bạn thay đổi dữ liệu trong tệp, thì một giải pháp sẽ là đọc toàn bộ tệp vào bộ nhớ, thực hiện các thay đổi và ghi dữ liệu ra một tệp khác.
Một vấn đề khác khi sử dụng tệp phẳng là bạn cần phải tạo và duy trì rõ ràng bất kỳ mối quan hệ nào giữa các phần dữ liệu của bạn và chương trình ứng dụng trong cú pháp tệp. Ngoài ra, bạn sẽ cần tạo mã trong ứng dụng của mình để sử dụng các mối quan hệ đó.
Một điều phức tạp cuối cùng là những người mà bạn muốn chia sẻ tệp dữ liệu của mình cũng sẽ cần biết và hành động trên các cấu trúc và mối quan hệ mà bạn đã tạo trong dữ liệu. Để truy cập thông tin, những người dùng đó không chỉ cần hiểu cấu trúc của dữ liệu mà còn phải hiểu các công cụ lập trình cần thiết để truy cập thông tin đó.
Ví dụ về tệp phẳng
Chương trình mẫu examples/example_1/main.py sử dụng author_book_publisher.csv để lấy dữ liệu và các mối quan hệ trong đó. Tệp CSV này lưu giữ danh sách các tác giả, sách họ đã xuất bản và nhà xuất bản cho từng cuốn sách.
Lưu ý: Tệp dữ liệu được sử dụng trong các ví dụ có sẵn trong project/data danh mục. Ngoài ra còn có một tệp chương trình trong project/build_data thư mục tạo dữ liệu. Ứng dụng đó rất hữu ích nếu bạn thay đổi dữ liệu và muốn quay lại trạng thái đã biết.
Để có quyền truy cập vào các tệp dữ liệu được sử dụng trong phần này và trong suốt hướng dẫn, hãy nhấp vào liên kết bên dưới:
Tải xuống mã mẫu: Nhấp vào đây để nhận mã mà bạn sẽ sử dụng để tìm hiểu về quản lý dữ liệu với SQLite và SQLAlchemy trong hướng dẫn này.
Tệp CSV được trình bày ở trên là một tệp dữ liệu khá nhỏ chỉ chứa một số tác giả, sách và nhà xuất bản. Bạn cũng nên lưu ý một số điều về dữ liệu:
-
Các tác giả Stephen King và Tom Clancy xuất hiện nhiều lần vì nhiều cuốn sách họ đã xuất bản được thể hiện trong dữ liệu.
-
Các tác giả Stephen King và Pearl Buck có cùng một cuốn sách do nhiều nhà xuất bản xuất bản.
Các trường dữ liệu trùng lặp này tạo ra mối quan hệ giữa các phần khác của dữ liệu. Một tác giả có thể viết nhiều sách và một nhà xuất bản có thể làm việc với nhiều tác giả. Các tác giả và nhà xuất bản chia sẻ mối quan hệ với từng cuốn sách.
Các mối quan hệ trong author_book_publisher.csv tệp được đại diện bởi các trường xuất hiện nhiều lần trong các hàng khác nhau của tệp dữ liệu. Do dư thừa dữ liệu này, dữ liệu đại diện cho nhiều hơn một bảng hai chiều. Bạn sẽ thấy thêm điều này khi bạn sử dụng tệp để tạo tệp cơ sở dữ liệu SQLite.
Chương trình mẫu examples/example_1/main.py sử dụng các mối quan hệ được nhúng trong author_book_publisher.csv tệp để tạo một số dữ liệu. Đầu tiên, nó trình bày danh sách các tác giả và số lượng sách từng được viết. Sau đó, nó hiển thị danh sách các nhà xuất bản và số lượng tác giả mà mỗi nhà xuất bản đã xuất bản sách.
Nó cũng sử dụng treelib để hiển thị hệ thống phân cấp dạng cây gồm các tác giả, sách và nhà xuất bản.
Cuối cùng, nó thêm một cuốn sách mới vào dữ liệu và hiển thị lại hệ thống phân cấp cây với cuốn sách mới tại chỗ. Đây là main() hàm entry-point cho chương trình này:
 1def main():
 2    """The main entry point of the program"""
 3    # Get the resources for the program
 4    with resources.path(
 5        "project.data", "author_book_publisher.csv"
 6    ) as filepath:
 7        data = get_data(filepath)
 8
 9    # Get the number of books printed by each publisher
10    books_by_publisher = get_books_by_publisher(data, ascending=False)
11    for publisher, total_books in books_by_publisher.items():
12        print(f"Publisher: {publisher}, total books: {total_books}")
13    print()
14
15    # Get the number of authors each publisher publishes
16    authors_by_publisher = get_authors_by_publisher(data, ascending=False)
17    for publisher, total_authors in authors_by_publisher.items():
18        print(f"Publisher: {publisher}, total authors: {total_authors}")
19    print()
20
21    # Output hierarchical authors data
22    output_author_hierarchy(data)
23
24    # Add a new book to the data structure
25    data = add_new_book(
26        data,
27        author_name="Stephen King",
28        book_title="The Stand",
29        publisher_name="Random House",
30    )
31
32    # Output the updated hierarchical authors data
33    output_author_hierarchy(data)
Mã Python ở trên thực hiện các bước sau:
- Dòng 4 đến 7 đọc
author_book_publisher.csvtệp vào DataFrame của gấu trúc. - Dòng 10 đến 13 in số lượng sách đã xuất bản của mỗi nhà xuất bản.
- Dòng 16 đến 19 in số lượng tác giả được liên kết với mỗi nhà xuất bản.
- Dòng 22 xuất dữ liệu sách dưới dạng thứ bậc được các tác giả sắp xếp.
- Dòng 25 đến 30 thêm sách mới vào cấu trúc trong bộ nhớ.
- Dòng 33 xuất dữ liệu sách dưới dạng thứ bậc được sắp xếp theo tác giả, bao gồm cả sách mới được thêm vào.
Chạy chương trình này sẽ tạo ra kết quả sau:
$ python main.py
Publisher: Simon & Schuster, total books: 4
Publisher: Random House, total books: 4
Publisher: Penguin Random House, total books: 2
Publisher: Berkley, total books: 2

Publisher: Simon & Schuster, total authors: 4
Publisher: Random House, total authors: 3
Publisher: Berkley, total authors: 2
Publisher: Penguin Random House, total authors: 1

Authors
├── Alex Michaelides
│   └── The Silent Patient
│       └── Simon & Schuster
├── Carol Shaben
│   └── Into The Abyss
│       └── Simon & Schuster
├── Isaac Asimov
│   └── Foundation
│       └── Random House
├── John Le Carre
│   └── Tinker, Tailor, Soldier, Spy: A George Smiley Novel
│       └── Berkley
├── Pearl Buck
│   └── The Good Earth
│       ├── Random House
│       └── Simon & Schuster
├── Stephen King
│   ├── Dead Zone
│   │   └── Random House
│   ├── It
│   │   ├── Penguin Random House
│   │   └── Random House
│   └── The Shining
│       └── Penguin Random House
└── Tom Clancy
    ├── Patriot Games
    │   └── Simon & Schuster
    └── The Hunt For Red October
        └── Berkley
Hệ thống phân cấp tác giả ở trên được trình bày hai lần trong đầu ra, với sự bổ sung của The Stand của Stephen King , được xuất bản bởi Random House. Đầu ra thực tế ở trên đã được chỉnh sửa và chỉ hiển thị đầu ra phân cấp đầu tiên để tiết kiệm dung lượng.
main() gọi các chức năng khác để thực hiện phần lớn công việc. Hàm đầu tiên nó gọi là get_data() :
def get_data(filepath):
    """Get book data from the csv file"""
    return pd.read_csv(filepath)
Hàm này nhận đường dẫn tệp đến tệp CSV và sử dụng gấu trúc để đọc nó thành DataFrame của gấu trúc, sau đó nó sẽ chuyển trở lại người gọi. Giá trị trả về của hàm này trở thành cấu trúc dữ liệu được truyền cho các hàm khác tạo nên chương trình.
get_books_by_publisher() tính số sách đã xuất bản của mỗi nhà xuất bản. Sê-ri gấu trúc kết quả sử dụng chức năng GroupBy của gấu trúc để nhóm theo nhà xuất bản và sau đó sắp xếp dựa trên ascending cờ:
def get_books_by_publisher(data, ascending=True):
    """Return the number of books by each publisher as a pandas series"""
    return data.groupby("publisher").size().sort_values(ascending=ascending)
get_authors_by_publisher() về cơ bản hoạt động tương tự như chức năng trước đó, nhưng đối với tác giả:
def get_authors_by_publisher(data, ascending=True):
    """Returns the number of authors by each publisher as a pandas series"""
    return (
        data.assign(name=data.first_name.str.cat(data.last_name, sep=" "))
        .groupby("publisher")
        .nunique()
        .loc[:, "name"]
        .sort_values(ascending=ascending)
    )
add_new_book() tạo một cuốn sách mới trong DataFrame của gấu trúc. Mã kiểm tra xem tác giả, sách hoặc nhà xuất bản đã tồn tại hay chưa. Nếu không, nó sẽ tạo một cuốn sách mới và gắn nó vào DataFrame của gấu trúc:
def add_new_book(data, author_name, book_title, publisher_name):
    """Adds a new book to the system"""
    # Does the book exist?
    first_name, _, last_name = author_name.partition(" ")
    if any(
        (data.first_name == first_name)
        & (data.last_name == last_name)
        & (data.title == book_title)
        & (data.publisher == publisher_name)
    ):
        return data
    # Add the new book
    return data.append(
        {
            "first_name": first_name,
            "last_name": last_name,
            "title": book_title,
            "publisher": publisher_name,
        },
        ignore_index=True,
    )
output_author_hierarchy() sử dụng for vòng lặp để lặp qua các cấp của cấu trúc dữ liệu. Sau đó, nó sử dụng treelib để xuất ra danh sách phân cấp các tác giả, sách họ đã xuất bản và nhà xuất bản đã xuất bản những sách đó:
def output_author_hierarchy(data):
    """Output the data as a hierarchy list of authors"""
    authors = data.assign(
        name=data.first_name.str.cat(data.last_name, sep=" ")
    )
    authors_tree = Tree()
    authors_tree.create_node("Authors", "authors")
    for author, books in authors.groupby("name"):
        authors_tree.create_node(author, author, parent="authors")
        for book, publishers in books.groupby("title")["publisher"]:
            book_id = f"{author}:{book}"
            authors_tree.create_node(book, book_id, parent=author)
            for publisher in publishers:
                authors_tree.create_node(publisher, parent=book_id)

    # Output the hierarchical authors data
    authors_tree.show()
Ứng dụng này hoạt động tốt và minh họa sức mạnh có sẵn cho bạn với mô-đun gấu trúc. Mô-đun cung cấp chức năng tuyệt vời để đọc tệp CSV và tương tác với dữ liệu.
Hãy tiếp tục và tạo một chương trình hoạt động giống hệt nhau bằng cách sử dụng Python, phiên bản cơ sở dữ liệu SQLite của tác giả và dữ liệu xuất bản cũng như SQLAlchemy để tương tác với dữ liệu đó.
Sử dụng SQLite để duy trì dữ liệu
Như bạn đã thấy trước đó, có dữ liệu thừa trong author_book_publisher.csv tập tin. Ví dụ:tất cả thông tin về Pearl Buck’s The Good Earth được liệt kê hai lần vì hai nhà xuất bản khác nhau đã xuất bản cuốn sách.
Hãy tưởng tượng nếu tệp dữ liệu này chứa nhiều dữ liệu liên quan hơn, như địa chỉ và số điện thoại của tác giả, ngày xuất bản và ISBN cho sách hoặc địa chỉ, số điện thoại và có thể là doanh thu hàng năm của nhà xuất bản. Dữ liệu này sẽ được sao chép cho từng mục dữ liệu gốc, chẳng hạn như tác giả, sách hoặc nhà xuất bản.
Có thể tạo dữ liệu theo cách này, nhưng nó sẽ đặc biệt khó sử dụng. Hãy suy nghĩ về các vấn đề giữ tệp dữ liệu này hiện tại. Nếu Stephen King muốn đổi tên thì sao? Bạn phải cập nhật nhiều bản ghi có tên của anh ấy và đảm bảo không có lỗi chính tả.
Tệ hơn việc trùng lặp dữ liệu sẽ là sự phức tạp của việc thêm các mối quan hệ khác vào dữ liệu. Điều gì sẽ xảy ra nếu bạn quyết định thêm số điện thoại của các tác giả và họ có số điện thoại nhà riêng, cơ quan, điện thoại di động, v.v.? Mỗi mối quan hệ mới mà bạn muốn thêm cho bất kỳ mục gốc nào sẽ nhân số bản ghi với số mục trong mối quan hệ mới đó.
Vấn đề này là một lý do mà các mối quan hệ tồn tại trong các hệ thống cơ sở dữ liệu. Một chủ đề quan trọng trong kỹ thuật cơ sở dữ liệu là chuẩn hóa cơ sở dữ liệu , hoặc quá trình chia nhỏ dữ liệu để giảm dư thừa và tăng tính toàn vẹn. Khi cấu trúc cơ sở dữ liệu được mở rộng với các loại dữ liệu mới, việc chuẩn hóa trước nó sẽ giữ các thay đổi đối với cấu trúc hiện có ở mức tối thiểu.
Cơ sở dữ liệu SQLite có sẵn bằng Python và theo trang chủ của SQLite, nó được sử dụng nhiều hơn tất cả các hệ thống cơ sở dữ liệu khác cộng lại. Nó cung cấp một hệ thống quản lý cơ sở dữ liệu quan hệ (RDBMS) đầy đủ tính năng hoạt động với một tệp duy nhất để duy trì tất cả các chức năng của cơ sở dữ liệu.
Nó cũng có lợi thế là không yêu cầu một máy chủ cơ sở dữ liệu riêng biệt để hoạt động. Định dạng tệp cơ sở dữ liệu là đa nền tảng và có thể truy cập vào bất kỳ ngôn ngữ lập trình nào hỗ trợ SQLite.
Tất cả những điều này là thông tin thú vị, nhưng nó có liên quan như thế nào đến việc sử dụng các tệp phẳng để lưu trữ dữ liệu? Bạn sẽ tìm hiểu bên dưới!
Tạo cấu trúc cơ sở dữ liệu
Cách tiếp cận bạo lực để nhận được author_book_publisher.csv dữ liệu vào cơ sở dữ liệu SQLite sẽ là để tạo một bảng duy nhất phù hợp với cấu trúc của tệp CSV. Làm điều này sẽ bỏ qua rất nhiều sức mạnh của SQLite.
Cơ sở dữ liệu quan hệ cung cấp một cách để lưu trữ dữ liệu có cấu trúc trong các bảng và thiết lập mối quan hệ giữa các bảng đó. Họ thường sử dụng Ngôn ngữ truy vấn có cấu trúc (SQL) làm cách chính để tương tác với dữ liệu. Đây là sự đơn giản hóa những gì RDBMS cung cấp, nhưng nó đủ cho các mục đích của hướng dẫn này.
Cơ sở dữ liệu SQLite cung cấp hỗ trợ để tương tác với bảng dữ liệu bằng SQL. Tệp cơ sở dữ liệu SQLite không chỉ chứa dữ liệu mà còn có một cách thức chuẩn hóa để tương tác với dữ liệu. Hỗ trợ này được nhúng trong tệp, có nghĩa là bất kỳ ngôn ngữ lập trình nào có thể sử dụng tệp SQLite cũng có thể sử dụng SQL để làm việc với nó.
Tương tác với cơ sở dữ liệu bằng SQL
SQL là một ngôn ngữ khai báo được sử dụng để tạo, quản lý và truy vấn dữ liệu có trong cơ sở dữ liệu. Ngôn ngữ khai báo mô tả cái gì là được hoàn thành chứ không phải là làm thế nào nó sẽ được hoàn thành. Bạn sẽ thấy các ví dụ về câu lệnh SQL sau này khi bạn bắt đầu tạo bảng cơ sở dữ liệu.
Cấu trúc cơ sở dữ liệu bằng SQL
Để tận dụng sức mạnh trong SQL, bạn sẽ cần áp dụng một số chuẩn hóa cơ sở dữ liệu cho dữ liệu trong author_book_publisher.csv tập tin. Để làm điều này, bạn sẽ tách các tác giả, sách và nhà xuất bản thành các bảng cơ sở dữ liệu riêng biệt.
Về mặt khái niệm, dữ liệu được lưu trữ trong cơ sở dữ liệu dưới dạng cấu trúc bảng hai chiều. Mỗi bảng bao gồm các hàng bản ghi và mỗi bản ghi bao gồm các cột hoặc trường , chứa dữ liệu.
Dữ liệu chứa trong các trường thuộc loại được xác định trước, bao gồm văn bản, số nguyên, số thực và hơn thế nữa. Tệp CSV khác vì tất cả các trường đều là văn bản và phải được chương trình phân tích cú pháp để gán kiểu dữ liệu cho chúng.
Mỗi bản ghi trong bảng có một khóa chính được xác định để cung cấp cho bản ghi một mã định danh duy nhất. Khóa chính tương tự như khóa trong từ điển Python. Bản thân công cụ cơ sở dữ liệu thường tạo khóa chính dưới dạng giá trị số nguyên tăng dần cho mọi bản ghi được chèn vào bảng cơ sở dữ liệu.
Mặc dù khóa chính thường được tạo tự động bởi công cụ cơ sở dữ liệu, nhưng không nhất thiết phải như vậy. Nếu dữ liệu được lưu trữ trong một trường là duy nhất trên tất cả các dữ liệu khác trong bảng trong trường đó, thì nó có thể là khóa chính. Ví dụ:một bảng chứa dữ liệu về sách có thể sử dụng ISBN của sách làm khóa chính.
Tạo bảng bằng SQL
Dưới đây là cách bạn có thể tạo ba bảng đại diện cho tác giả, sách và nhà xuất bản trong tệp CSV bằng cách sử dụng câu lệnh SQL:
CREATE TABLE author (
    author_id INTEGER NOT NULL PRIMARY KEY,
    first_name VARCHAR,
    last_name VARCHAR
);

CREATE TABLE book (
    book_id INTEGER NOT NULL PRIMARY KEY,
    author_id INTEGER REFERENCES author,
    title VARCHAR
);

CREATE TABLE publisher (
    publisher_id INTEGER NOT NULL PRIMARY KEY,
    name VARCHAR
);
Lưu ý rằng không có thao tác tệp nào, không có biến nào được tạo và không có cấu trúc nào để giữ chúng. Các câu lệnh chỉ mô tả kết quả mong muốn:tạo một bảng với các thuộc tính cụ thể. Công cụ cơ sở dữ liệu xác định cách thực hiện việc này.
Sau khi bạn đã tạo và điền bảng này với dữ liệu tác giả từ author_book_publisher.csv , bạn có thể truy cập nó bằng câu lệnh SQL. Câu lệnh sau (còn được gọi là truy vấn ) sử dụng ký tự đại diện (* ) để lấy tất cả dữ liệu trong author bảng và xuất nó:
SELECT * FROM author;
Bạn có thể sử dụng sqlite3 công cụ dòng lệnh để tương tác với author_book_publisher.db tệp cơ sở dữ liệu trong project/data thư mục:
$ sqlite3 author_book_publisher.db
Khi công cụ dòng lệnh SQLite đang chạy với cơ sở dữ liệu đang mở, bạn có thể nhập các lệnh SQL. Đây là lệnh SQL ở trên và đầu ra của nó, theo sau là .q lệnh thoát khỏi chương trình:
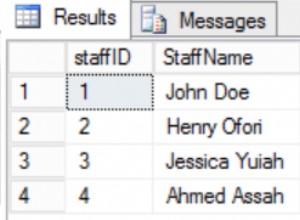
sqlite> SELECT * FROM author;
1|Isaac|Asimov
2|Pearl|Buck
3|Tom|Clancy
4|Stephen|King
5|John|Le Carre
6|Alex|Michaelides
7|Carol|Shaben

sqlite> .q
Lưu ý rằng mỗi tác giả chỉ tồn tại một lần trong bảng. Không giống như tệp CSV, có nhiều mục nhập cho một số tác giả, ở đây, chỉ cần một bản ghi duy nhất cho mỗi tác giả.
Duy trì cơ sở dữ liệu bằng SQL
SQL cung cấp các cách làm việc với cơ sở dữ liệu và bảng hiện có bằng cách chèn dữ liệu mới và cập nhật hoặc xóa dữ liệu hiện có. Đây là một câu lệnh SQL mẫu để chèn tác giả mới vào author bảng:
INSERT INTO author
    (first_name, last_name)
VALUES ('Paul', 'Mendez');
Câu lệnh SQL này chèn các giá trị ‘Paul ‘Và‘ Mendez ‘Vào các cột tương ứng first_name và last_name của author bàn.
Lưu ý rằng author_id cột không được chỉ định. Vì cột đó là khóa chính, công cụ cơ sở dữ liệu tạo ra giá trị và chèn nó như một phần của quá trình thực thi câu lệnh.
Cập nhật bản ghi trong bảng cơ sở dữ liệu là một quá trình không phức tạp. Ví dụ, giả sử Stephen King muốn được biết đến với bút danh Richard Bachman. Đây là câu lệnh SQL để cập nhật bản ghi cơ sở dữ liệu:
UPDATE author
SET first_name = 'Richard', last_name = 'Bachman'
WHERE first_name = 'Stephen' AND last_name = 'King';
Câu lệnh SQL định vị bản ghi duy nhất cho 'Stephen King' sử dụng câu lệnh điều kiện WHERE first_name = 'Stephen' AND last_name = 'King' và sau đó cập nhật first_name và last_name các trường với các giá trị mới. SQL sử dụng dấu bằng (= ) vừa là toán tử so sánh vừa là toán tử gán.
Bạn cũng có thể xóa các bản ghi khỏi cơ sở dữ liệu. Đây là một câu lệnh SQL mẫu để xóa bản ghi khỏi author bảng:
DELETE FROM author
WHERE first_name = 'Paul'
AND last_name = 'Mendez';
Câu lệnh SQL này xóa một hàng khỏi author bảng trong đó first_name bằng 'Paul' và last_name bằng 'Mendez' .
Hãy cẩn thận khi xóa hồ sơ! Các điều kiện bạn đặt phải càng cụ thể càng tốt. Một điều kiện quá rộng có thể dẫn đến việc xóa nhiều bản ghi hơn bạn dự định. Ví dụ:nếu điều kiện chỉ dựa trên dòng first_name = 'Paul' , sau đó tất cả các tác giả có tên của Paul sẽ bị xóa khỏi cơ sở dữ liệu.
Lưu ý: Để tránh việc vô tình xóa hồ sơ, nhiều ứng dụng hoàn toàn không cho phép xóa. Thay vào đó, bản ghi có một cột khác để cho biết nó có đang được sử dụng hay không. Cột này có thể được đặt tên là active và chứa một giá trị được đánh giá là Đúng hoặc Sai, cho biết liệu bản ghi có nên được đưa vào khi truy vấn cơ sở dữ liệu hay không.
Ví dụ:truy vấn SQL bên dưới sẽ lấy tất cả các cột cho tất cả các bản ghi đang hoạt động trong some_table :
SELECT
  *
FROM some_table
WHERE active = 1;
SQLite không có kiểu dữ liệu Boolean, vì vậy active cột được đại diện bởi một số nguyên có giá trị là 0 hoặc 1 để chỉ ra trạng thái của bản ghi. Các hệ thống cơ sở dữ liệu khác có thể có hoặc không có kiểu dữ liệu Boolean gốc.
Hoàn toàn có thể xây dựng các ứng dụng cơ sở dữ liệu bằng Python bằng cách sử dụng các câu lệnh SQL trực tiếp trong mã. Làm như vậy sẽ trả về dữ liệu cho ứng dụng dưới dạng một danh sách các danh sách hoặc danh sách các từ điển.
Sử dụng SQL thô là một cách hoàn toàn có thể chấp nhận được để làm việc với dữ liệu do các truy vấn trả về cơ sở dữ liệu. Tuy nhiên, thay vì làm điều đó, bạn sẽ chuyển thẳng sang sử dụng SQLAlchemy để làm việc với cơ sở dữ liệu.
Xây dựng mối quan hệ
Một tính năng khác của hệ thống cơ sở dữ liệu mà bạn có thể thấy thậm chí còn mạnh mẽ và hữu ích hơn tính bền bỉ và truy xuất dữ liệu là mối quan hệ . Cơ sở dữ liệu hỗ trợ các mối quan hệ cho phép bạn chia nhỏ dữ liệu thành nhiều bảng và thiết lập kết nối giữa chúng.
Dữ liệu trong author_book_publisher.csv tệp đại diện cho dữ liệu và các mối quan hệ bằng cách sao chép dữ liệu. Cơ sở dữ liệu xử lý điều này bằng cách chia dữ liệu thành ba bảng— author , book và publisher —Và thiết lập mối quan hệ giữa chúng.
Sau khi nhận được tất cả dữ liệu bạn muốn vào một nơi trong tệp CSV, tại sao bạn lại muốn chia nó thành nhiều bảng? Sẽ không vất vả hơn khi tạo và kết hợp lại với nhau phải không? Điều đó đúng ở một mức độ nào đó, nhưng lợi ích của việc chia nhỏ dữ liệu và tập hợp chúng lại với nhau bằng cách sử dụng SQL có thể giúp bạn chiến thắng!
Mối quan hệ một-nhiều
Đ một-nhiều mối quan hệ giống như mối quan hệ của một khách hàng đặt hàng trực tuyến. Một khách hàng có thể có nhiều đơn hàng, nhưng mỗi đơn hàng thuộc về một khách hàng. author_book_publisher.db cơ sở dữ liệu có mối quan hệ một-nhiều dưới dạng tác giả và sách. Mỗi tác giả có thể viết nhiều sách, nhưng mỗi cuốn do một tác giả viết.
Như bạn đã thấy trong phần tạo bảng ở trên, việc triển khai các thực thể riêng biệt này là đặt mỗi thực thể vào một bảng cơ sở dữ liệu, một cho tác giả và một cho sách. Nhưng làm thế nào để thực hiện mối quan hệ một-nhiều giữa hai bảng này?
Hãy nhớ rằng, mỗi bảng trong cơ sở dữ liệu có một trường được chỉ định làm khóa chính cho bảng đó. Mỗi bảng ở trên có một trường khóa chính được đặt tên bằng cách sử dụng mẫu này:<table name>_id .
Cuốn sách book bảng hiển thị ở trên chứa một trường, author_id , tham chiếu đến author bàn. author_id trường thiết lập mối quan hệ một-nhiều giữa tác giả và sách trông giống như sau:
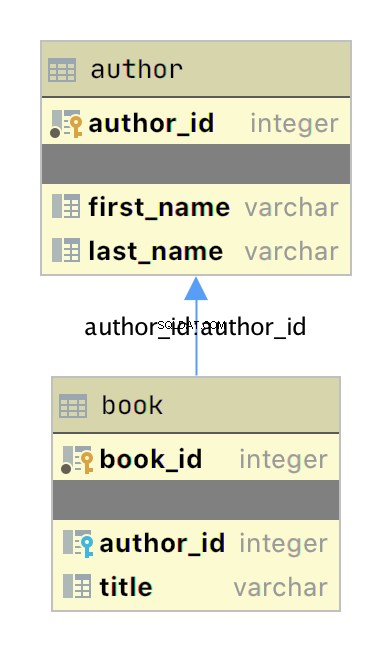
Sơ đồ trên là một sơ đồ mối quan hệ-thực thể đơn giản (ERD) được tạo bằng ứng dụng JetBrains DataGrip hiển thị các bảng author và book dưới dạng các hộp có khóa chính và trường dữ liệu tương ứng của chúng. Hai mục đồ họa thêm thông tin về mối quan hệ:
-
Các biểu tượng phím nhỏ màu vàng và xanh lam cho biết khóa chính và khóa ngoại tương ứng cho bảng.
-
Mũi tên kết nối
booktớiauthorcho biết mối quan hệ giữa các bảng dựa trênauthor_idkhóa ngoại trongbookbảng.
Khi bạn thêm một cuốn sách mới vào book bảng, dữ liệu bao gồm một author_id giá trị cho một tác giả hiện có trong author bàn. Theo cách này, tất cả các sách do một tác giả viết đều có mối quan hệ tra cứu ngược lại với tác giả duy nhất đó.
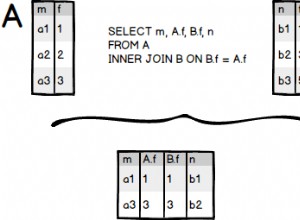
Bây giờ bạn đã có các bảng riêng biệt cho tác giả và sách, bạn sử dụng mối quan hệ giữa chúng như thế nào? SQL hỗ trợ cái được gọi là JOIN mà bạn có thể sử dụng để cho cơ sở dữ liệu biết cách kết nối hai hoặc nhiều bảng.
Truy vấn SQL bên dưới kết hợp với author và book bảng với nhau bằng ứng dụng dòng lệnh SQLite:
sqlite> SELECT
   ...> a.first_name || ' ' || a.last_name AS author_name,
   ...> b.title AS book_title
   ...> FROM author a
   ...> JOIN book b ON b.author_id = a.author_id
   ...> ORDER BY a.last_name ASC;
Isaac Asimov|Foundation
Pearl Buck|The Good Earth
Tom Clancy|The Hunt For Red October
Tom Clancy|Patriot Games
Stephen King|It
Stephen King|Dead Zone
Stephen King|The Shining
John Le Carre|Tinker, Tailor, Soldier, Spy: A George Smiley Novel
Alex Michaelides|The Silent Patient
Carol Shaben|Into The Abyss
Truy vấn SQL ở trên thu thập thông tin từ cả tác giả và bảng sách bằng cách nối các bảng bằng cách sử dụng mối quan hệ được thiết lập giữa hai bảng. Nối chuỗi trong SQL gán tên đầy đủ của tác giả cho bí danh author_name . Dữ liệu do truy vấn thu thập được sắp xếp theo thứ tự tăng dần theo last_name trường.
Có một số điều cần lưu ý trong câu lệnh SQL. Đầu tiên, các tác giả được trình bày bằng tên đầy đủ của họ trong một cột duy nhất và được sắp xếp theo họ của họ. Ngoài ra, các tác giả xuất hiện trong đầu ra nhiều lần vì mối quan hệ một-nhiều. Tên tác giả được sao chép cho mỗi cuốn sách mà họ đã viết trong cơ sở dữ liệu.
Bằng cách tạo các bảng riêng biệt cho tác giả và sách cũng như thiết lập mối quan hệ giữa chúng, bạn đã giảm bớt sự dư thừa trong dữ liệu. Giờ đây, bạn chỉ phải chỉnh sửa dữ liệu của tác giả ở một nơi và thay đổi đó xuất hiện trong bất kỳ truy vấn SQL nào truy cập dữ liệu.
Mối quan hệ Nhiều-Nhiều
Nhiều đến nhiều các mối quan hệ tồn tại trong author_book_publisher.db cơ sở dữ liệu giữa tác giả và nhà xuất bản cũng như giữa sách và nhà xuất bản. Một tác giả có thể làm việc với nhiều nhà xuất bản và một nhà xuất bản có thể làm việc với nhiều tác giả. Tương tự, một cuốn sách có thể được xuất bản bởi nhiều nhà xuất bản và một nhà xuất bản có thể xuất bản nhiều cuốn sách.
Xử lý tình huống này trong cơ sở dữ liệu có liên quan nhiều hơn mối quan hệ một-nhiều vì mối quan hệ đi theo cả hai chiều. Many-to-many relationships are created by an association table acting as a bridge between the two related tables.
The association table contains at least two foreign key fields, which are the primary keys of each of the two associated tables. This SQL statement creates the association table relating the author and publisher tables:
CREATE TABLE author_publisher (
    author_id INTEGER REFERENCES author,
    publisher_id INTEGER REFERENCES publisher
);
The SQL statements create a new author_publisher table referencing the primary keys of the existing author and publisher tables. The author_publisher table is an association table establishing relationships between an author and a publisher.
Because the relationship is between two primary keys, there’s no need to create a primary key for the association table itself. The combination of the two related keys creates a unique identifier for a row of data.
As before, you use the JOIN keyword to connect two tables together. Connecting the author table to the publisher table is a two-step process:
JOINtheauthortable with theauthor_publishertable.JOINtheauthor_publishertable with thepublishertable.
The author_publisher association table provides the bridge through which the JOIN connects the two tables. Here’s an example SQL query returning a list of authors and the publishers publishing their books:
 1sqlite> SELECT
 2   ...> a.first_name || ' ' || a.last_name AS author_name,
 3   ...> p.name AS publisher_name
 4   ...> FROM author a
 5   ...> JOIN author_publisher ap ON ap.author_id = a.author_id
 6   ...> JOIN publisher p ON p.publisher_id = ap.publisher_id
 7   ...> ORDER BY a.last_name ASC;
 8Isaac Asimov|Random House
 9Pearl Buck|Random House
10Pearl Buck|Simon & Schuster
11Tom Clancy|Berkley
12Tom Clancy|Simon & Schuster
13Stephen King|Random House
14Stephen King|Penguin Random House
15John Le Carre|Berkley
16Alex Michaelides|Simon & Schuster
17Carol Shaben|Simon & Schuster
The statements above perform the following actions:
-
Line 1 starts a
SELECTstatement to get data from the database. -
Line 2 selects the first and last name from the
authortable using theaalias for theauthortable and concatenates them together with a space character. -
Line 3 selects the publisher’s name aliased to
publisher_name. -
Line 4 uses the
authortable as the first source from which to retrieve data and assigns it to the aliasa. -
Line 5 is the first step of the process outlined above for connecting the
authortable to thepublishertable. It uses the aliasapfor theauthor_publisherassociation table and performs aJOINoperation to connect theap.author_idforeign key reference to thea.author_idprimary key in theauthortable. -
Line 6 is the second step in the two-step process mentioned above. It uses the alias
pfor thepublishertable and performs aJOINoperation to relate theap.publisher_idforeign key reference to thep.publisher_idprimary key in thepublishertable. -
Line 7 sorts the data by the author’s last name in ascending alphabetical order and ends the SQL query.
-
Lines 8 to 17 are the output of the SQL query.
Note that the data in the source author and publisher tables are normalized, with no data duplication. Yet the returned results have duplicated data where necessary to answer the SQL query.
The SQL query above demonstrates how to make use of a relationship using the SQL JOIN keyword, but the resulting data is a partial re-creation of the author_book_publisher.csv CSV data. What’s the win for having done the work of creating a database to separate the data?
Here’s another SQL query to show a little bit of the power of SQL and the database engine:
 1sqlite> SELECT
 2   ...> a.first_name || ' ' || a.last_name AS author_name,
 3   ...> COUNT(b.title) AS total_books
 4   ...> FROM author a
 5   ...> JOIN book b ON b.author_id = a.author_id
 6   ...> GROUP BY author_name
 7   ...> ORDER BY total_books DESC, a.last_name ASC;
 8Stephen King|3
 9Tom Clancy|2
10Isaac Asimov|1
11Pearl Buck|1
12John Le Carre|1
13Alex Michaelides|1
14Carol Shaben|1
The SQL query above returns the list of authors and the number of books they’ve written. The list is sorted first by the number of books in descending order, then by the author’s name in alphabetical order:
-
Line 1 begins the SQL query with the
SELECTkeyword. -
Line 2 selects the author’s first and last names, separated by a space character, and creates the alias
author_name. -
Line 3 counts the number of books written by each author, which will be used later by the
ORDER BYclause to sort the list. -
Line 4 selects the
authortable to get data from and creates theaalias. -
Line 5 connects to the related
booktable through aJOINto theauthor_idand creates thebalias for thebooktable. -
Line 6 generates the aggregated author and total number of books data by using the
GROUP BYtừ khóa.GROUP BYis what groups eachauthor_nameand controls what books are tallied byCOUNT()for that author. -
Line 7 sorts the output first by number of books in descending order, then by the author’s last name in ascending alphabetical order.
-
Lines 8 to 14 are the output of the SQL query.
In the above example, you take advantage of SQL to perform aggregation calculations and sort the results into a useful order. Having the database perform calculations based on its built-in data organization ability is usually faster than performing the same kinds of calculations on raw data sets in Python. SQL offers the advantages of using set theory embedded in RDBMS databases.
Entity Relationship Diagrams
An entity-relationship diagram (ERD) is a visual depiction of an entity-relationship model for a database or part of a database. The author_book_publisher.db SQLite database is small enough that the entire database can be visualized by the diagram shown below:
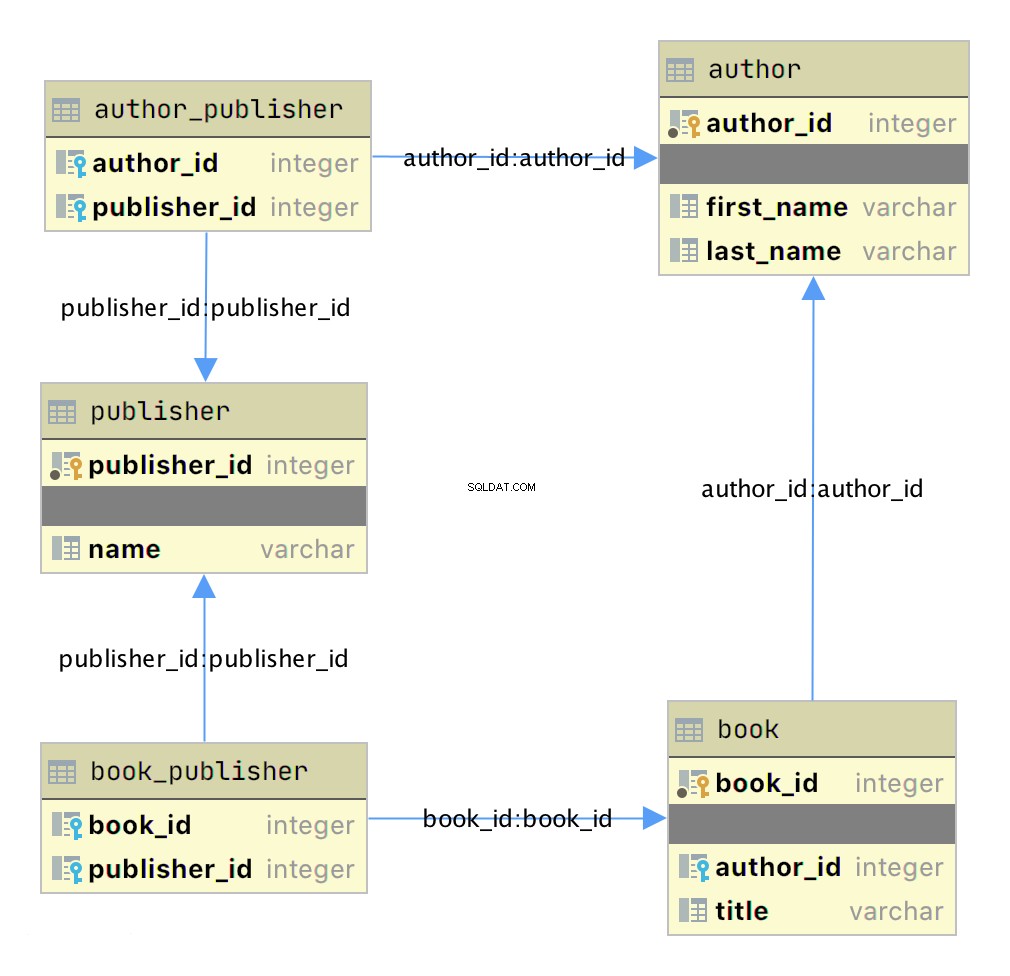
This diagram presents the table structures in the database and the relationships between them. Each box represents a table and contains the fields defined in the table, with the primary key indicated first if it exists.
The arrows show the relationships between the tables connecting a foreign key field in one table to a field, often the primary key, in another table. The table book_publisher has two arrows, one connecting it to the book table and another connecting it to the publisher table. The arrow indicates the many-to-many relationship between the book and publisher tables. The author_publisher table provides the same relationship between author and publisher .
Working With SQLAlchemy and Python Objects
SQLAlchemy is a powerful database access tool kit for Python, with its object-relational mapper (ORM) being one of its most famous components, and the one discussed and used here.
When you’re working in an object-oriented language like Python, it’s often useful to think in terms of objects. It’s possible to map the results returned by SQL queries to objects, but doing so works against the grain of how the database works. Sticking with the scalar results provided by SQL works against the grain of how Python developers work. This problem is known as object-relational impedance mismatch.
The ORM provided by SQLAlchemy sits between the SQLite database and your Python program and transforms the data flow between the database engine and Python objects. SQLAlchemy allows you to think in terms of objects and still retain the powerful features of a database engine.
The Model
One of the fundamental elements to enable connecting SQLAlchemy to a database is creating a model . The model is a Python class defining the data mapping between the Python objects returned as a result of a database query and the underlying database tables.
The entity-relationship diagram displayed earlier shows boxes connected with arrows. The boxes are the tables built with the SQL commands and are what the Python classes will model. The arrows are the relationships between the tables.
The models are Python classes inheriting from an SQLAlchemy Base lớp. The Base class provides the interface operations between instances of the model and the database table.
Below is the models.py file that creates the models to represent the author_book_publisher.db database:
 1from sqlalchemy import Column, Integer, String, ForeignKey, Table
 2from sqlalchemy.orm import relationship, backref
 3from sqlalchemy.ext.declarative import declarative_base
 4
 5Base = declarative_base()
 6
 7author_publisher = Table(
 8    "author_publisher",
 9    Base.metadata,
10    Column("author_id", Integer, ForeignKey("author.author_id")),
11    Column("publisher_id", Integer, ForeignKey("publisher.publisher_id")),
12)
13
14book_publisher = Table(
15    "book_publisher",
16    Base.metadata,
17    Column("book_id", Integer, ForeignKey("book.book_id")),
18    Column("publisher_id", Integer, ForeignKey("publisher.publisher_id")),
19)
20
21class Author(Base):
22    __tablename__ = "author"
23    author_id = Column(Integer, primary_key=True)
24    first_name = Column(String)
25    last_name = Column(String)
26    books = relationship("Book", backref=backref("author"))
27    publishers = relationship(
28        "Publisher", secondary=author_publisher, back_populates="authors"
29    )
30
31class Book(Base):
32    __tablename__ = "book"
33    book_id = Column(Integer, primary_key=True)
34    author_id = Column(Integer, ForeignKey("author.author_id"))
35    title = Column(String)
36    publishers = relationship(
37        "Publisher", secondary=book_publisher, back_populates="books"
38    )
39
40class Publisher(Base):
41    __tablename__ = "publisher"
42    publisher_id = Column(Integer, primary_key=True)
43    name = Column(String)
44    authors = relationship(
45        "Author", secondary=author_publisher, back_populates="publishers"
46    )
47    books = relationship(
48        "Book", secondary=book_publisher, back_populates="publishers"
49    )
Here’s what’s going on in this module:
-
Line 1 imports the
Column,Integer,String,ForeignKey, andTableclasses from SQLAlchemy, which are used to help define the model attributes. -
Line 2 imports the
relationship()andbackrefobjects, which are used to create the relationships between objects. -
Line 3 imports the
declarative_baseobject, which connects the database engine to the SQLAlchemy functionality of the models. -
Line 5 creates the
Baseclass, which is what all models inherit from and how they get SQLAlchemy ORM functionality. -
Lines 7 to 12 create the
author_publisherassociation table model. -
Lines 14 to 19 create the
book_publisherassociation table model. -
Lines 21 to 29 define the
Authorclass model to theauthordatabase table. -
Lines 31 to 38 define the
Bookclass model to thebookdatabase table. -
Lines 40 to 49 define the
Publisherclass model to thepublisherdatabase table.
The description above shows the mapping of the five tables in the author_book_publisher.db database. But it glosses over some SQLAlchemy ORM features, including Table , ForeignKey , relationship() , and backref . Let’s get into those now.
Table Creates Associations
author_publisher and book_publisher are both instances of the Table class that create the many-to-many association tables used between the author and publisher tables and the book and publisher tables, respectively.
The SQLAlchemy Table class creates a unique instance of an ORM mapped table within the database. The first parameter is the table name as defined in the database, and the second is Base.metadata , which provides the connection between the SQLAlchemy functionality and the database engine.
The rest of the parameters are instances of the Column class defining the table fields by name, their type, and in the example above, an instance of a ForeignKey .
ForeignKey Creates a Connection
The SQLAlchemy ForeignKey class defines a dependency between two Column fields in different tables. A ForeignKey is how you make SQLAlchemy aware of the relationships between tables. For example, this line from the author_publisher instance creation establishes a foreign key relationship:
Column("author_id", Integer, ForeignKey("author.author_id"))
The statement above tells SQLAlchemy that there’s a column in the author_publisher table named author_id . The type of that column is Integer , and author_id is a foreign key related to the primary key in the author table.
Having both author_id and publisher_id defined in the author_publisher Table instance creates the connection from the author table to the publisher table and vice versa, establishing a many-to-many relationship.
relationship() Establishes a Collection
Having a ForeignKey defines the existence of the relationship between tables but not the collection of books an author can have. Take a look at this line in the Author class definition:
books = relationship("Book", backref=backref("author"))
The code above defines a parent-child collection. The books attribute being plural (which is not a requirement, just a convention) is an indication that it’s a collection.
The first parameter to relationship() , the class name Book (which is not the table name book ), is the class to which the books attribute is related. The relationship informs SQLAlchemy that there’s a relationship between the Author and Book classes. SQLAlchemy will find the relationship in the Book class definition:
author_id = Column(Integer, ForeignKey("author.author_id"))
SQLAlchemy recognizes that this is the ForeignKey connection point between the two classes. You’ll get to the backref parameter in relationship() in a moment.
The other relationship in Author is to the Publisher lớp. This is created with the following statement in the Author class definition:
publishers = relationship(
    "Publisher", secondary=author_publisher, back_populates="authors"
)
Like books , the attribute publishers indicates a collection of publishers associated with an author. The first parameter, "Publisher" , informs SQLAlchemy what the related class is. The second and third parameters are secondary=author_publisher and back_populates="authors" :
-
secondarytells SQLAlchemy that the relationship to thePublisherclass is through a secondary table, which is theauthor_publisherassociation table created earlier inmodels.py. Thesecondaryparameter makes SQLAlchemy find thepublisher_idForeignKeydefined in theauthor_publisherassociation table. -
back_populatesis a convenience configuration telling SQLAlchemy that there’s a complementary collection in thePublisherclass calledauthors.
backref Mirrors Attributes
The backref parameter of the books collection relationship() creates an author attribute for each Book ví dụ. This attribute refers to the parent Author that the Book instance is related to.
For example, if you executed the following Python code, then a Book instance would be returned from the SQLAlchemy query. The Book instance has attributes that can be used to print out information about the book:
book = session.query(Book).filter_by(Book.title == "The Stand").one_or_none()
print(f"Authors name: {book.author.first_name} {book.author.last_name}")
The existence of the author attribute in the Book above is because of the backref definition. A backref can be very handy to have when you need to refer to the parent and all you have is a child instance.
Queries Answer Questions
You can make a basic query like SELECT * FROM author; in SQLAlchemy like this:
results = session.query(Author).all()
The session is an SQLAlchemy object used to communicate with SQLite in the Python example programs. Here, you tell the session you want to execute a query against the Author model and return all records.
At this point, the advantages of using SQLAlchemy instead of plain SQL might not be obvious, especially considering the setup required to create the models representing the database. The results returned by the query is where the magic happens. Instead of getting back a list of lists of scalar data, you’ll get back a list of instances of Author objects with attributes matching the column names you defined.
The books and publishers collections maintained by SQLAlchemy create a hierarchical list of authors and the books they’ve written as well as the publishers who’ve published them.
Behind the scenes, SQLAlchemy turns the object and method calls into SQL statements to execute against the SQLite database engine. SQLAlchemy transforms the data returned by SQL queries into Python objects.
With SQLAlchemy, you can perform the more complex aggregation query shown earlier for the list of authors and the number of books they’ve written like this:
author_book_totals = (
    session.query(
        Author.first_name,
        Author.last_name,
        func.count(Book.title).label("book_total")
    )
    .join(Book)
    .group_by(Author.last_name)
    .order_by(desc("book_total"))
    .all()
)
The query above gets the author’s first and last name, along with a count of the number of books that the author has written. The aggregating count used by the group_by clause is based on the author’s last name. Finally, the results are sorted in descending order based on the aggregated and aliased book_total .
Example Program
The example program examples/example_2/main.py has the same functionality as examples/example_1/main.py but uses SQLAlchemy exclusively to interface with the author_book_publisher.db SQLite database. The program is broken up into the main() function and the functions it calls:
 1def main():
 2    """Main entry point of program"""
 3    # Connect to the database using SQLAlchemy
 4    with resources.path(
 5        "project.data", "author_book_publisher.db"
 6    ) as sqlite_filepath:
 7        engine = create_engine(f"sqlite:///{sqlite_filepath}")
 8    Session = sessionmaker()
 9    Session.configure(bind=engine)
10    session = Session()
11
12    # Get the number of books printed by each publisher
13    books_by_publisher = get_books_by_publishers(session, ascending=False)
14    for row in books_by_publisher:
15        print(f"Publisher: {row.name}, total books: {row.total_books}")
16    print()
17
18    # Get the number of authors each publisher publishes
19    authors_by_publisher = get_authors_by_publishers(session)
20    for row in authors_by_publisher:
21        print(f"Publisher: {row.name}, total authors: {row.total_authors}")
22    print()
23
24    # Output hierarchical author data
25    authors = get_authors(session)
26    output_author_hierarchy(authors)
27
28    # Add a new book
29    add_new_book(
30        session,
31        author_name="Stephen King",
32        book_title="The Stand",
33        publisher_name="Random House",
34    )
35    # Output the updated hierarchical author data
36    authors = get_authors(session)
37    output_author_hierarchy(authors)
This program is a modified version of examples/example_1/main.py . Let’s go over the differences:
-
Lines 4 to 7 first initialize the
sqlite_filepathvariable to the database file path. Then they create theenginevariable to communicate with SQLite and theauthor_book_publisher.dbdatabase file, which is SQLAlchemy’s access point to the database. -
Line 8 creates the
Sessionclass from the SQLAlchemy’ssessionmaker(). -
Line 9 binds the
Sessionto the engine created in line 8. -
Line 10 creates the
sessioninstance, which is used by the program to communicate with SQLAlchemy.
The rest of the function is similar, except for the replacement of data with session as the first parameter to all the functions called by main() .
get_books_by_publisher() has been refactored to use SQLAlchemy and the models you defined earlier to get the data requested:
 1def get_books_by_publishers(session, ascending=True):
 2    """Get a list of publishers and the number of books they've published"""
 3    if not isinstance(ascending, bool):
 4        raise ValueError(f"Sorting value invalid: {ascending}")
 5
 6    direction = asc if ascending else desc
 7
 8    return (
 9        session.query(
10            Publisher.name, func.count(Book.title).label("total_books")
11        )
12        .join(Publisher.books)
13        .group_by(Publisher.name)
14        .order_by(direction("total_books"))
15    )
Here’s what the new function, get_books_by_publishers() , is doing:
-
Line 6 creates the
directionvariable and sets it equal to the SQLAlchemydescorascfunction depending on the value of theascendingtham số. -
Lines 9 to 11 query the
Publishertable for data to return, which in this case arePublisher.nameand the aggregate total ofBookobjects associated with an author, aliased tototal_books. -
Line 12 joins to the
Publisher.booksbộ sưu tập. -
Line 13 aggregates the book counts by the
Publisher.nameattribute. -
Line 14 sorts the output by the book counts according to the operator defined by
direction. -
Line 15 closes the object, executes the query, and returns the results to the caller.
All the above code expresses what is wanted rather than how it’s to be retrieved. Now instead of using SQL to describe what’s wanted, you’re using Python objects and methods. What’s returned is a list of Python objects instead of a list of tuples of data.
get_authors_by_publisher() has also been modified to work exclusively with SQLAlchemy. Its functionality is very similar to the previous function, so a function description is omitted:
def get_authors_by_publishers(session, ascending=True):
    """Get a list of publishers and the number of authors they've published"""
    if not isinstance(ascending, bool):
        raise ValueError(f"Sorting value invalid: {ascending}")

    direction = asc if ascending else desc

    return (
        session.query(
            Publisher.name,
            func.count(Author.first_name).label("total_authors"),
        )
        .join(Publisher.authors)
        .group_by(Publisher.name)
        .order_by(direction("total_authors"))
    )
get_authors() has been added to get a list of authors sorted by their last names. The result of this query is a list of Author objects containing a collection of books. The Author objects already contain hierarchical data, so the results don’t have to be reformatted:
def get_authors(session):
    """Get a list of author objects sorted by last name"""
    return session.query(Author).order_by(Author.last_name).all()
Like its previous version, add_new_book() is relatively complex but straightforward to understand. It determines if a book with the same title, author, and publisher exists in the database already.
If the search query finds an exact match, then the function returns. If no book matches the exact search criteria, then it searches to see if the author has written a book using the passed in title. This code exists to prevent duplicate books from being created in the database.
If no matching book exists, and the author hasn’t written one with the same title, then a new book is created. The function then retrieves or creates an author and publisher. Once instances of the Book , Author and Publisher exist, the relationships between them are created, and the resulting information is saved to the database:
 1def add_new_book(session, author_name, book_title, publisher_name):
 2    """Adds a new book to the system"""
 3    # Get the author's first and last names
 4    first_name, _, last_name = author_name.partition(" ")
 5
 6    # Check if book exists
 7    book = (
 8        session.query(Book)
 9        .join(Author)
10        .filter(Book.title == book_title)
11        .filter(
12            and_(
13                Author.first_name == first_name, Author.last_name == last_name
14            )
15        )
16        .filter(Book.publishers.any(Publisher.name == publisher_name))
17        .one_or_none()
18    )
19    # Does the book by the author and publisher already exist?
20    if book is not None:
21        return
22
23    # Get the book by the author
24    book = (
25        session.query(Book)
26        .join(Author)
27        .filter(Book.title == book_title)
28        .filter(
29            and_(
30                Author.first_name == first_name, Author.last_name == last_name
31            )
32        )
33        .one_or_none()
34    )
35    # Create the new book if needed
36    if book is None:
37        book = Book(title=book_title)
38
39    # Get the author
40    author = (
41        session.query(Author)
42        .filter(
43            and_(
44                Author.first_name == first_name, Author.last_name == last_name
45            )
46        )
47        .one_or_none()
48    )
49    # Do we need to create the author?
50    if author is None:
51        author = Author(first_name=first_name, last_name=last_name)
52        session.add(author)
53
54    # Get the publisher
55    publisher = (
56        session.query(Publisher)
57        .filter(Publisher.name == publisher_name)
58        .one_or_none()
59    )
60    # Do we need to create the publisher?
61    if publisher is None:
62        publisher = Publisher(name=publisher_name)
63        session.add(publisher)
64
65    # Initialize the book relationships
66    book.author = author
67    book.publishers.append(publisher)
68    session.add(book)
69
70    # Commit to the database
71    session.commit()
The code above is relatively long. Let’s break the functionality down to manageable sections:
-
Lines 7 to 18 set the
bookvariable to an instance of aBookif a book with the same title, author, and publisher is found. Otherwise, they setbooktoNone. -
Lines 20 and 21 determine if the book already exists and return if it does.
-
Lines 24 to 37 set the
bookvariable to an instance of aBookif a book with the same title and author is found. Otherwise, they create a newBookví dụ. -
Lines 40 to 52 set the
authorvariable to an existing author, if found, or create a newAuthorinstance based on the passed-in author name. -
Lines 55 to 63 set the
publishervariable to an existing publisher, if found, or create a newPublisherinstance based on the passed-in publisher name. -
Line 66 sets the
book.authorinstance to theauthorví dụ. This creates the relationship between the author and the book, which SQLAlchemy will create in the database when the session is committed. -
Line 67 adds the
publisherinstance to thebook.publishersthu thập. This creates the many-to-many relationship between thebookandpublishertables. SQLAlchemy will create references in the tables as well as in thebook_publisherassociation table that connects the two. -
Line 68 adds the
Bookinstance to the session, making it part of the session’s unit of work. -
Line 71 commits all the creations and updates to the database.
There are a few things to take note of here. First, there’s is no mention of the author_publisher or book_publisher association tables in either the queries or the creations and updates. Because of the work you did in models.py setting up the relationships, SQLAlchemy can handle connecting objects together and keeping those tables in sync during creations and updates.
Second, all the creations and updates happen within the context of the session vật. None of that activity is touching the database. Only when the session.commit() statement executes does the session then go through its unit of work and commit that work to the database.
For example, if a new Book instance is created (as in line 37 above), then the book has its attributes initialized except for the book_id primary key and author_id foreign key. Because no database activity has happened yet, the book_id is unknown, and nothing was done in the instantiation of book to give it an author_id .
When session.commit() is executed, one of the things it will do is insert book into the database, at which point the database will create the book_id primary key. The session will then initialize the book.book_id value with the primary key value created by the database engine.
session.commit() is also aware of the insertion of the Book instance in the author.books thu thập. The author object’s author_id primary key will be added to the Book instance appended to the author.books collection as the author_id foreign key.
Providing Access to Multiple Users
To this point, you’ve seen how to use pandas, SQLite, and SQLAlchemy to access the same data in different ways. For the relatively straightforward use case of the author, book, and publisher data, it could still be a toss-up whether you should use a database.
One deciding factor when choosing between using a flat file or a database is data and relationship complexity. If the data for each entity is complicated and contains many relationships between the entities, then creating and maintaining it in a flat file might become more difficult.
Another factor to consider is whether you want to share the data between multiple users. The solution to this problem might be as simple as using a sneakernet to physically move data between users. Moving data files around this way has the advantage of ease of use, but the data can quickly get out of sync when changes are made.
The problem of keeping the data consistent for all users becomes even more difficult if the users are remote and want to access the data across networks. Even when you’re limited to a single language like Python and using pandas to access the data, network file locking isn’t sufficient to ensure the data doesn’t get corrupted.
Providing the data through a server application and a user interface alleviates this problem. The server is the only application that needs file-level access to the database. By using a database, the server can take advantage of SQL to access the data using a consistent interface no matter what programming language the server uses.
The last example program demonstrates this by providing a web application and user interface to the Chinook sample SQLite database. Peter Stark generously maintains the Chinook database as part of the SQLite Tutorial site. If you’d like to learn more about SQLite and SQL in general, then the site is a great resource.
The Chinook database provides artist, music, and playlist information along the lines of a simplified Spotify. The database is part of the example code project in the project/data thư mục.
Using Flask With Python, SQLite, and SQLAlchemy
The examples/example_3/chinook_server.py program creates a Flask application that you can interact with using a browser. The application makes use of the following technologies:
-
Flask Blueprint is part of Flask and provides a good way to follow the separation of concerns design principle and create distinct modules to contain functionality.
-
Flask SQLAlchemy is an extension for Flask that adds support for SQLAlchemy in your web applications.
-
Flask_Bootstrap4 packages the Bootstrap front-end tool kit, integrating it with your Flask web applications.
-
Flask_WTF extends Flask with WTForms, giving your web applications a useful way to generate and validate web forms.
-
python_dotenv is a Python module that an application uses to read environment variables from a file and keep sensitive information out of program code.
Though not necessary for this example, a .env file holds the environment variables for the application. The .env file exists to contain sensitive information like passwords, which you should keep out of your code files. However, the content of the project .env file is shown below since it doesn’t contain any sensitive data:
SECRET_KEY = "you-will-never-guess"
SQLALCHEMY_TRACK_MODIFICATIONS = False
SQLAlCHEMY_ECHO = False
DEBUG = True
The example application is fairly large, and only some of it is relevant to this tutorial. For this reason, examining and learning from the code is left as an exercise for the reader. That said, you can take a look at an animated screen capture of the application below, followed by the HTML that renders the home page and the Python Flask route that provides the dynamic data.
Here’s the application in action, navigating through various menus and features:
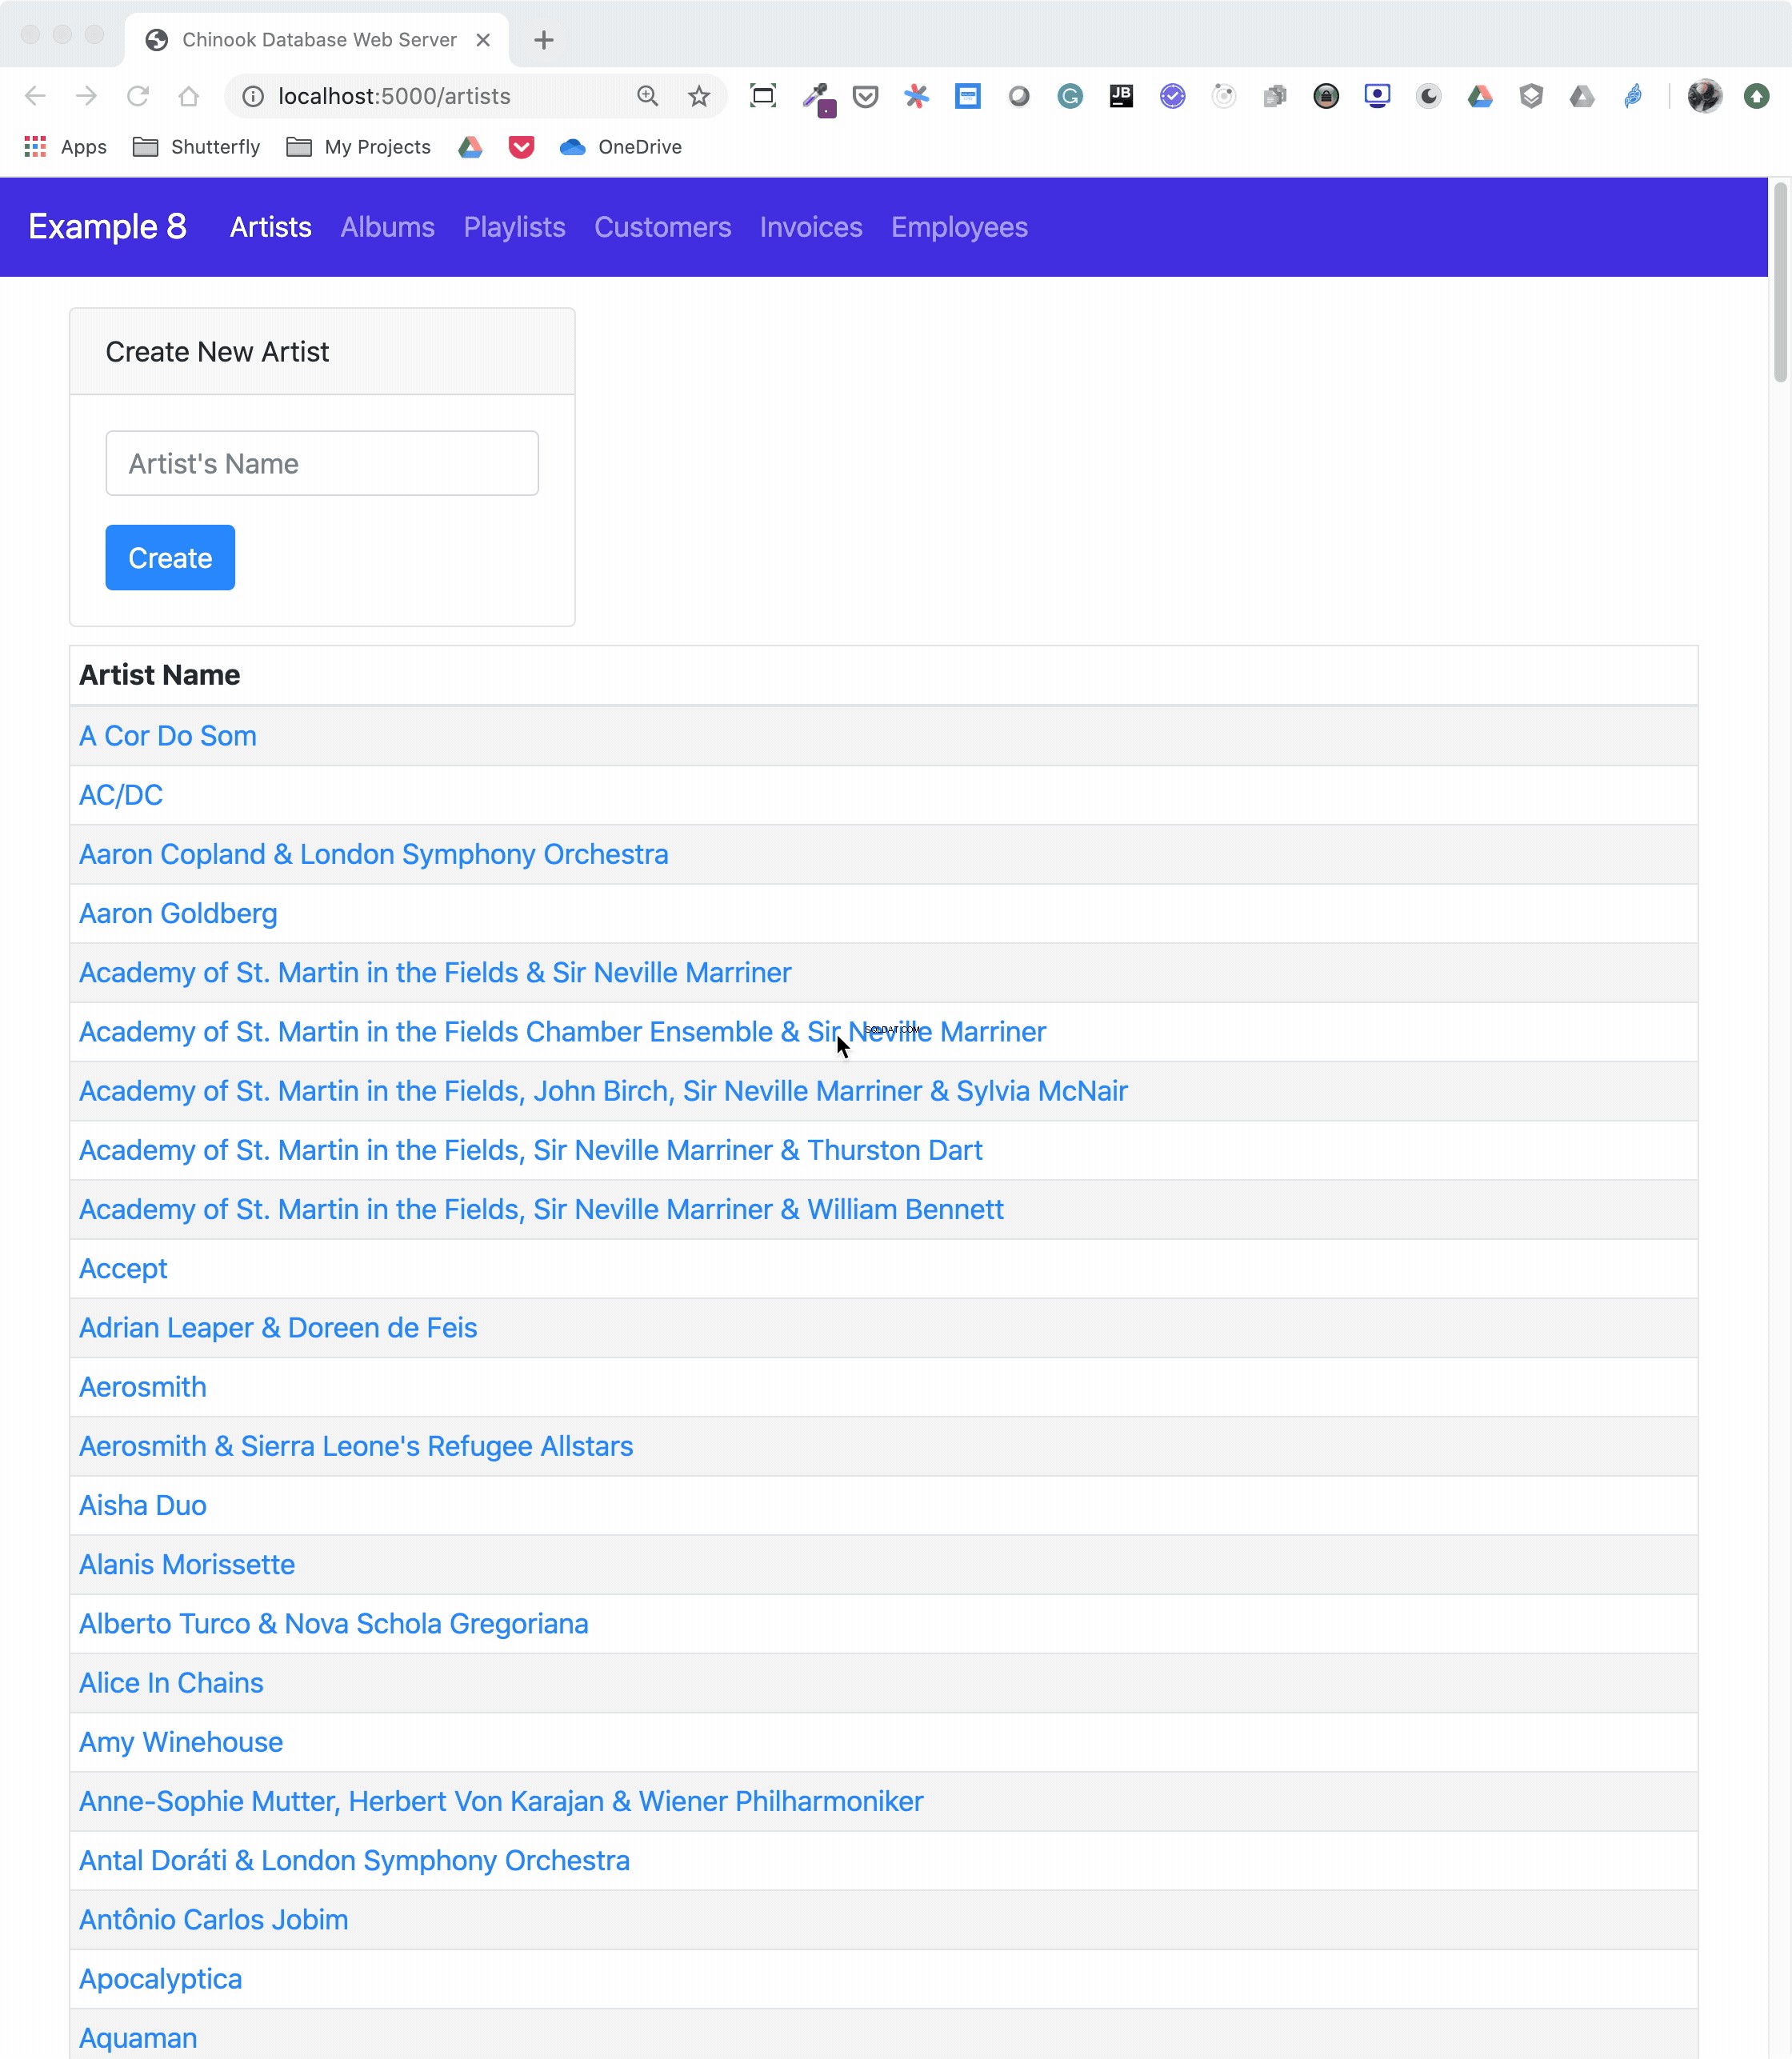
The animated screen capture starts on the application home page, styled using Bootstrap 4. The page displays the artists in the database, sorted in ascending order. The remainder of the screen capture presents the results of clicking on the displayed links or navigating around the application from the top-level menu.
Here’s the Jinja2 HTML template that generates the home page of the application:
 1{% extends "base.html" %}
 2
 3{% block content %}
 4<div class="container-fluid">
 5  <div class="m-4">
 6    <div class="card" style="width: 18rem;">
 7      <div class="card-header">Create New Artist</div>
 8      <div class="card-body">
 9        <form method="POST" action="{{url_for('artists_bp.artists')}}">
10          {{ form.csrf_token }}
11          {{ render_field(form.name, placeholder=form.name.label.text) }}
12          <button type="submit" class="btn btn-primary">Create</button>
13        </form>
14      </div>
15    </div>
16    <table class="table table-striped table-bordered table-hover table-sm">
17      <caption>List of Artists</caption>
18      <thead>
19        <tr>
20          <th>Artist Name</th>
21        </tr>
22      </thead>
23      <tbody>
24        {% for artist in artists %}
25        <tr>
26          <td>
27            <a href="{{url_for('albums_bp.albums', artist_id=artist.artist_id)}}">
28              {{ artist.name }}
29            </a>
30          </td>
31        </tr>
32        {% endfor %}
33      </tbody>
34    </table>
35  </div>
36</div>
37{% endblock %}
Here’s what’s going on in this Jinja2 template code:
-
Line 1 uses Jinja2 template inheritance to build this template from the
base.htmltemplate. Thebase.htmltemplate contains all the HTML5 boilerplate code as well as the Bootstrap navigation bar consistent across all pages of the site. -
Lines 3 to 37 contain the block content of the page, which is incorporated into the Jinja2 macro of the same name in the
base.htmlbase template. -
Lines 9 to 13 render the form to create a new artist. This uses the features of Flask-WTF to generate the form.
-
Lines 24 to 32 create a
forloop that renders the table of artist names. -
Lines 27 to 29 render the artist name as a link to the artist’s album page showing the songs associated with a particular artist.
Here’s the Python route that renders the page:
 1from flask import Blueprint, render_template, redirect, url_for
 2from flask_wtf import FlaskForm
 3from wtforms import StringField
 4from wtforms.validators import InputRequired, ValidationError
 5from app import db
 6from app.models import Artist
 7
 8# Set up the blueprint
 9artists_bp = Blueprint(
10    "artists_bp", __name__, template_folder="templates", static_folder="static"
11)
12
13def does_artist_exist(form, field):
14    artist = (
15        db.session.query(Artist)
16        .filter(Artist.name == field.data)
17        .one_or_none()
18    )
19    if artist is not None:
20        raise ValidationError("Artist already exists", field.data)
21
22class CreateArtistForm(FlaskForm):
23    name = StringField(
24        label="Artist's Name", validators=[InputRequired(), does_artist_exist]
25    )
26
27@artists_bp.route("/")
28@artists_bp.route("/artists", methods=["GET", "POST"])
29def artists():
30    form = CreateArtistForm()
31
32    # Is the form valid?
33    if form.validate_on_submit():
34        # Create new artist
35        artist = Artist(name=form.name.data)
36        db.session.add(artist)
37        db.session.commit()
38        return redirect(url_for("artists_bp.artists"))
39
40    artists = db.session.query(Artist).order_by(Artist.name).all()
41    return render_template("artists.html", artists=artists, form=form,)
Let’s go over what the above code is doing:
-
Lines 1 to 6 import all the modules necessary to render the page and initialize forms with data from the database.
-
Lines 9 to 11 create the blueprint for the artists page.
-
Lines 13 to 20 create a custom validator function for the Flask-WTF forms to make sure a request to create a new artist doesn’t conflict with an already existing artist.
-
Lines 22 to 25 create the form class to handle the artist form rendered in the browser and provide validation of the form field inputs.
-
Lines 27 to 28 connect two routes to the
artists()function they decorate. -
Line 30 creates an instance of the
CreateArtistForm()class. -
Line 33 determines if the page was requested through the HTTP methods GET or POST (submit). If it was a POST, then it also validates the fields of the form and informs the user if the fields are invalid.
-
Lines 35 to 37 create a new artist object, add it to the SQLAlchemy session, and commit the artist object to the database, persisting it.
-
Line 38 redirects back to the artists page, which will be rerendered with the newly created artist.
-
Line 40 runs an SQLAlchemy query to get all the artists in the database and sort them by
Artist.name. -
Line 41 renders the artists page if the HTTP request method was a GET.
You can see that a great deal of functionality is created by a reasonably small amount of code.
Creating a REST API Server
You can also create a web server providing a REST API. This kind of server offers URL endpoints responding with data, often in JSON format. A server providing REST API endpoints can be used by JavaScript single-page web applications through the use of AJAX HTTP requests.
Flask is an excellent tool for creating REST applications. For a multi-part series of tutorials about using Flask, Connexion, and SQLAlchemy to create REST applications, check out Python REST APIs With Flask, Connexion, and SQLAlchemy.
If you’re a fan of Django and are interested in creating REST APIs, then check out Django Rest Framework – An Introduction and Create a Super Basic REST API with Django Tastypie.
Lưu ý: It’s reasonable to ask if SQLite is the right choice as the database backend to a web application. The SQLite website states that SQLite is a good choice for sites that serve around 100,000 hits per day. If your site gets more daily hits, the first thing to say is congratulations!
Beyond that, if you’ve implemented your website with SQLAlchemy, then it’s possible to move the data from SQLite to another database such as MySQL or PostgreSQL. For a comparison of SQLite, MySQL, and PostgreSQL that will help you make decisions about which one will serve your application best, check out Introduction to Python SQL Libraries.
It’s well worth considering SQLite for your Python application, no matter what it is. Using a database gives your application versatility, and it might create surprising opportunities to add additional features.
Conclusion
You’ve covered a lot of ground in this tutorial about databases, SQLite, SQL, and SQLAlchemy! You’ve used these tools to move data contained in flat files to an SQLite database, access the data with SQL and SQLAlchemy, and provide that data through a web server.
In this tutorial, you’ve learned:
- Why an SQLite database can be a compelling alternative to flat-file data storage
- How to normalize data to reduce data redundancy and increase data integrity
- How to use SQLAlchemy to work with databases in an object-oriented manner
- How to build a web application to serve a database to multiple users
Working with databases is a powerful abstraction for working with data that adds significant functionality to your Python programs and allows you to ask interesting questions of your data.
You can get all of the code and data you saw in this tutorial at the link below:
Download the sample code: Click here to get the code you’ll use to learn about data management with SQLite and SQLAlchemy in this tutorial.
Further Reading
This tutorial is an introduction to using databases, SQL, and SQLAlchemy, but there’s much more to learn about these subjects. These are powerful, sophisticated tools that no single tutorial can cover adequately. Here are some resources for additional information to expand your skills:
-
If your application will expose the database to users, then avoiding SQL injection attacks is an important skill. For more information, check out Preventing SQL Injection Attacks With Python.
-
Providing web access to a database is common in web-based single-page applications. To learn how, check out Python REST APIs With Flask, Connexion, and SQLAlchemy – Part 2.
-
Preparing for data engineering job interviews gives you a leg up in your career. To get started, check out Data Engineer Interview Questions With Python.
-
Migrating data and being able to roll back using Flask with Postgres and SQLAlchemy is an integral part of the Software Development Life Cycle (SDLC). You can learn more about it by checking out Flask by Example – Setting up Postgres, SQLAlchemy, and Alembic.