Xây dựng dự án được cho là một trong những cách tiếp cận và hiệu quả hơn để học lập trình. Các dự án thực tế yêu cầu bạn áp dụng các kỹ năng viết mã đa dạng và khác nhau. Họ cũng khuyến khích bạn nghiên cứu các chủ đề xuất hiện khi bạn đang giải quyết các vấn đề trong quá trình phát triển. Trong hướng dẫn này, bạn sẽ tạo một ứng dụng sổ liên lạc bằng Python, PyQt và SQLite.
Trong hướng dẫn này, bạn sẽ học cách:
- Tạo giao diện người dùng đồ họa (GUI) cho ứng dụng sổ liên lạc của bạn bằng Python và PyQt
- Kết nối ứng dụng với cơ sở dữ liệu SQLite sử dụng hỗ trợ SQL của PyQt
- Quản lý dữ liệu liên hệ bằng kiến trúc Chế độ xem mô hình của PyQt
Khi kết thúc dự án này, bạn sẽ có một ứng dụng sổ liên lạc chức năng cho phép bạn lưu trữ và quản lý thông tin liên hệ của mình.
Để nhận mã nguồn hoàn chỉnh cho ứng dụng cũng như mã cho mọi bước bạn sẽ thực hiện trong hướng dẫn này, hãy nhấp vào liên kết bên dưới:
Lấy mã nguồn: Nhấp vào đây để lấy mã nguồn mà bạn sẽ sử dụng để tạo sổ liên lạc với Python, PyQt và SQLite trong hướng dẫn này.
Demo:Sổ liên lạc với Python
Sổ liên lạc là một loại ứng dụng hữu ích và được sử dụng rộng rãi. Họ ở khắp mọi nơi. Bạn có thể có một danh bạ trên điện thoại và trên máy tính của mình. Với sổ liên lạc, bạn có thể lưu trữ và quản lý thông tin liên hệ của các thành viên gia đình, bạn bè, đồng nghiệp, v.v. của mình.
Trong hướng dẫn này, bạn sẽ viết mã ứng dụng GUI sổ liên lạc bằng Python, SQLite và PyQt. Dưới đây là bản trình diễn về giao diện và hoạt động của sổ liên lạc của bạn sau khi bạn làm theo các bước trong hướng dẫn này:
Sổ liên lạc của bạn sẽ cung cấp bộ tính năng bắt buộc tối thiểu cho loại ứng dụng này. Bạn sẽ có thể hiển thị, tạo, cập nhật và xóa thông tin trong danh sách liên hệ của mình.
Tổng quan về dự án
Để xây dựng ứng dụng sổ liên lạc của bạn, bạn cần tổ chức mã thành các mô-đun và gói và tạo cho dự án của bạn một cấu trúc mạch lạc. Trong hướng dẫn này, bạn sẽ sử dụng cấu trúc tệp và thư mục sau:
rpcontacts_project/
│
├── rpcontacts/
│   ├── __init__.py
│   ├── views.py
│   ├── database.py
│   ├── main.py
│   └── model.py
│
├── requirements.txt
├── README.md
└── rpcontacts.py
Dưới đây là bản tóm tắt ngắn gọn về nội dung của thư mục dự án của bạn:
-
rpcontacts_project/là thư mục gốc của dự án. Nó sẽ chứa các tệp sau:-
requirements.txtcung cấp danh sách yêu cầu của dự án. -
README.mdcung cấp thông tin chung về dự án. -
rpcontacts.pycung cấp tập lệnh điểm vào để chạy ứng dụng.
-
-
rpcontacts/là một thư mục con cung cấp gói chính của ứng dụng. Nó cung cấp các mô-đun sau:-
__init__.py -
views.py -
database.py -
main.py -
model.py
-
Bạn sẽ trình bày từng bước trong số các tệp này trong hướng dẫn này. Tên của mỗi tệp cho biết vai trò của nó trong ứng dụng. Ví dụ:views.py sẽ chứa mã để tạo GUI của cửa sổ và hộp thoại, database.py sẽ chứa mã để làm việc với cơ sở dữ liệu và main.py sẽ tự lưu trữ ứng dụng. Cuối cùng, model.py sẽ triển khai mô hình để quản lý dữ liệu trong cơ sở dữ liệu của ứng dụng.
Nhìn chung, ứng dụng sẽ có một cửa sổ chính để hiển thị, thêm, bớt và cập nhật danh bạ. Nó cũng sẽ có một hộp thoại để thêm các liên hệ mới vào cơ sở dữ liệu.
Điều kiện tiên quyết
Để tận dụng tối đa dự án này, một số kiến thức trước đây về lập trình GUI với Python và PyQt sẽ hữu ích. Về vấn đề này, bạn sẽ cần biết những điều cơ bản về cách:
- Tạo các ứng dụng GUI bằng PyQt và Python
- Xây dựng và bố trí GUI với PyQt
- Quản lý cơ sở dữ liệu SQL bằng Python và PyQt
- Làm việc với cơ sở dữ liệu SQLite
Để tìm hiểu về các chủ đề này, bạn có thể xem các tài nguyên sau:
- Python và PyQt:Xây dựng Máy tính GUI trên Máy tính để bàn
- Python và PyQt:Tạo Menu, Thanh công cụ và Thanh trạng thái
- Bố cục PyQt:Tạo các ứng dụng GUI có giao diện chuyên nghiệp
- Xử lý cơ sở dữ liệu SQL với PyQt:Kiến thức cơ bản
- Giới thiệu về Thư viện SQL Python
- Quản lý dữ liệu với Python, SQLite và SQLAlchemy
Đừng lo lắng nếu bạn không phải là chuyên gia trong những lĩnh vực này trước khi bắt đầu hướng dẫn này. Bạn sẽ học qua quá trình bắt tay vào thực hiện một dự án thực tế. Nếu bạn gặp khó khăn, hãy dành thời gian và xem xét các tài nguyên được liên kết ở trên. Sau đó quay lại mã.
Ứng dụng sổ liên lạc mà bạn sẽ xây dựng trong hướng dẫn này có một phần phụ thuộc bên ngoài duy nhất:PyQt.
Lưu ý: Trong hướng dẫn này, bạn sẽ sử dụng PyQt phiên bản 5.15.2 để tạo ứng dụng sổ liên lạc của mình. Cần có phiên bản 5.15.2 để dự án hoạt động trên macOS Big Sur.
PyQt phiên bản 6.0 được phát hành vào ngày 4 tháng 1 năm 2021. Đây là bản phát hành đầu tiên của thư viện liên kết với phiên bản Qt 6. Tuy nhiên, dự án trong hướng dẫn này chưa được thử nghiệm với PyQt 6.0.
Nếu bạn cảm thấy cần phải chạy dự án với phiên bản PyQt mới này, hãy thử. Như một gợi ý, bạn nên pip install PyQt6 và sau đó cập nhật các lần nhập để sử dụng PyQt6 thay vì PyQt5 .
Để làm theo các phương pháp hay nhất trong quá trình phát triển của mình, bạn có thể bắt đầu bằng cách tạo một môi trường ảo và sau đó cài đặt PyQt bằng cách sử dụng pip . Sau khi cài đặt xong PyQt, bạn đã sẵn sàng bắt đầu viết mã!
Bước 1:Tạo ứng dụng Skeleton của Sổ liên lạc với PyQt
Trong bước đầu tiên này, bạn sẽ tạo một ứng dụng PyQt GUI tối thiểu nhưng đầy đủ chức năng để cung cấp nền tảng mà bạn sẽ bắt đầu xây dựng sổ liên lạc. Bạn cũng sẽ tạo cấu trúc dự án bắt buộc tối thiểu, bao gồm gói chính của dự án và một tập lệnh điểm đầu vào để chạy ứng dụng.
Tất cả mã và tệp bạn sẽ thêm vào dự án sổ liên lạc trong phần này được thu thập trong source_code_step_1/ danh mục. Bạn có thể tải chúng xuống bằng cách nhấp vào liên kết bên dưới:
Lấy mã nguồn: Nhấp vào đây để lấy mã nguồn mà bạn sẽ sử dụng để tạo sổ liên lạc với Python, PyQt và SQLite trong hướng dẫn này.
Đến cuối phần này, bạn sẽ có thể chạy ứng dụng GUI khung cho sổ liên lạc của mình lần đầu tiên.
Cấu trúc dự án Sổ liên lạc
Để bắt đầu viết mã ứng dụng, hãy tiếp tục và tạo một thư mục mới có tên rpcontacts_project/ . Đây sẽ là thư mục gốc của dự án. Bây giờ, hãy tạo một thư mục con mới có tên là rpcontacts/ bên trong rpcontacts_project/ . Thư mục con này sẽ chứa gói chính của ứng dụng. Cuối cùng, kích hoạt trình soạn thảo mã hoặc IDE của bạn trong thư mục gốc.
Để biến một thư mục thành một gói, Python cần một __init__.py để khởi tạo gói. Tạo tệp này trong rpcontacts/ và thêm mã sau vào nó:
# -*- coding: utf-8 -*-

"""This module provides the rpcontacts package."""

__version__ = "0.1.0"
Tệp này cho Python biết rằng rpcontacts là một gói. Mã trong tệp sẽ chạy khi bạn nhập gói hoặc một số mô-đun của nó.
Bạn không cần đặt bất kỳ mã nào vào __init__.py tệp để khởi tạo gói. __init__.py trống tệp sẽ thực hiện công việc. Tuy nhiên, trong trường hợp này, bạn xác định một hằng số cấp mô-đun được gọi là __version__ để giữ số phiên bản ứng dụng của bạn.
Tạo cửa sổ chính của ứng dụng
Bây giờ đã đến lúc tạo cửa sổ chính cho sổ liên lạc của bạn. Để làm điều đó, hãy tạo một mô-đun có tên là views.py trong rpcontacts của bạn bưu kiện. Sau đó, thêm mã sau vào mô-đun và lưu nó:
# -*- coding: utf-8 -*-

"""This module provides views to manage the contacts table."""

from PyQt5.QtWidgets import (
    QHBoxLayout,
    QMainWindow,
    QWidget,
)

class Window(QMainWindow):
    """Main Window."""
    def __init__(self, parent=None):
        """Initializer."""
        super().__init__(parent)
        self.setWindowTitle("RP Contacts")
        self.resize(550, 250)
        self.centralWidget = QWidget()
        self.setCentralWidget(self.centralWidget)
        self.layout = QHBoxLayout()
        self.centralWidget.setLayout(self.layout)
Đầu tiên, bạn nhập các lớp bắt buộc từ PyQt5.QtWidgets . Sau đó, bạn tạo Window . Lớp này kế thừa từ QMainWindow và cung cấp mã để tạo cửa sổ chính của ứng dụng. Trong phương pháp trình khởi tạo, bạn đặt tiêu đề của cửa sổ thành "RP Contacts" , thay đổi kích thước cửa sổ thành 550 bởi 250 pixel, xác định và đặt tiện ích con trung tâm bằng QWidget và cuối cùng xác định bố cục cho tiện ích con trung tâm bằng cách sử dụng bố cục hộp ngang.
Mã hóa và chạy ứng dụng
Vì bạn đã có cửa sổ chính cho sổ liên lạc, đã đến lúc viết mã để tạo một ứng dụng PyQt chức năng bằng cách sử dụng QApplication . Để làm điều đó, hãy tạo một mô-đun mới có tên là main.py trong rpcontacts của bạn đóng gói và thêm mã sau vào đó:
# -*- coding: utf-8 -*-
# rpcontacts/main.py

"""This module provides RP Contacts application."""

import sys

from PyQt5.QtWidgets import QApplication

from .views import Window

def main():
    """RP Contacts main function."""
    # Create the application
    app = QApplication(sys.argv)
    # Create the main window
    win = Window()
    win.show()
    # Run the event loop
    sys.exit(app.exec())
Trong mô-đun này, bạn nhập sys để có quyền truy cập vào exit() , cho phép bạn thoát khỏi ứng dụng một cách rõ ràng khi người dùng đóng cửa sổ chính. Sau đó, bạn nhập QApplication từ PyQt5.QtWidgets và Window từ views . Bước cuối cùng là xác định main() là chức năng chính của ứng dụng của bạn.
Bên trong main() , bạn khởi tạo QApplication và Window . Sau đó, bạn gọi .show() trên Window và cuối cùng bạn chạy vòng lặp chính của ứng dụng hoặc vòng lặp sự kiện , sử dụng .exec() .
Bây giờ chuyển đến thư mục gốc của dự án rpcontacts_project/ và tạo một tệp có tên rpcontacts.py . Tệp này cung cấp tập lệnh điểm vào để chạy ứng dụng. Thêm mã sau vào tệp và lưu nó:
#!/usr/bin/env python3
# -*- coding: utf-8 -*-
# rpcontacts_project/rpcontacts.py

"""This module provides RP Contacts entry point script."""

from rpcontacts.main import main

if __name__ == "__main__":
    main()
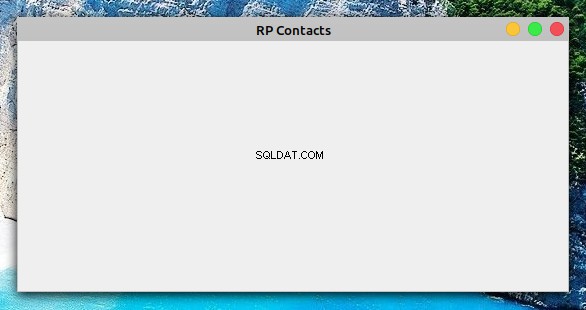
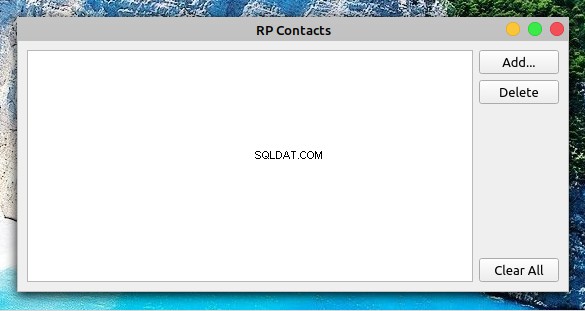
Tệp này nhập main() từ main.py của bạn mô-đun. Sau đó, bạn triển khai câu lệnh điều kiện truyền thống gọi main() nếu người dùng chạy mô-đun này dưới dạng tập lệnh Python. Bây giờ khởi chạy ứng dụng bằng cách chạy lệnh python rpcontacts.py trong môi trường Python của bạn. Bạn sẽ nhận được cửa sổ sau trên màn hình của mình:
Đó là nó! Bạn đã tạo một ứng dụng PyQt GUI tối thiểu nhưng đầy đủ chức năng mà bạn có thể sử dụng làm điểm khởi đầu để xây dựng sổ liên lạc của mình. Tại thời điểm này, dự án của bạn nên có cấu trúc sau:
./rpcontacts_project/
│
├── rpcontacts/
│   ├── __init__.py
│   ├── views.py
│   └── main.py
│
└── rpcontacts.py
Trong phần này, bạn đã tạo cấu trúc bắt buộc tối thiểu cho dự án sổ liên lạc của mình bằng cách sử dụng các gói và mô-đun Python. Bạn đã xây dựng cửa sổ chính của ứng dụng và ghép mã soạn sẵn để tạo ứng dụng PyQt GUI. Bạn cũng đã chạy ứng dụng lần đầu tiên. Tiếp theo, bạn sẽ bắt đầu thêm các tính năng vào GUI của mình.
Bước 2:Xây dựng GUI của Sổ liên lạc bằng Python
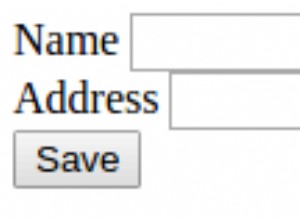
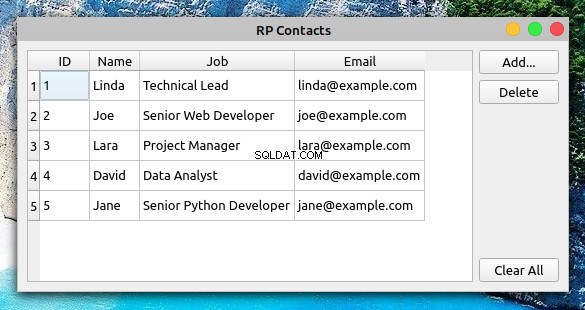
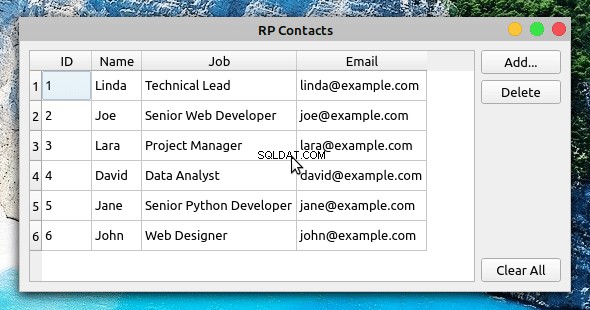
Bây giờ bạn đã tạo xong khung của ứng dụng sổ liên lạc của mình, bạn có thể bắt đầu mã hóa GUI của cửa sổ chính. Ở cuối phần này, bạn sẽ hoàn thành các bước bắt buộc để tạo GUI cho sổ liên lạc của mình bằng Python và PyQt. GUI sẽ giống như sau:
Ở giữa cửa sổ, bạn có dạng xem bảng để hiển thị danh sách liên hệ của mình. Ở phía bên phải của biểu mẫu, bạn có ba nút:
- Thêm để thêm một liên hệ mới vào danh sách
- Xóa để xóa một liên hệ đã chọn khỏi danh sách
- Xóa tất cả để xóa tất cả các địa chỉ liên hệ khỏi danh sách
Tất cả mã và tệp bạn sẽ thêm hoặc sửa đổi trong phần này được thu thập trong source_code_step_2/ danh mục. Bạn có thể tải chúng xuống bằng cách nhấp vào liên kết bên dưới:
Lấy mã nguồn: Nhấp vào đây để lấy mã nguồn mà bạn sẽ sử dụng để tạo sổ liên lạc với Python, PyQt và SQLite trong hướng dẫn này.
Quay lại views.py mô-đun và cập nhật mã của Window để tạo GUI ở trên:
 1# -*- coding: utf-8 -*-
 2# rpcontacts/views.py
 3
 4"""This module provides views to manage the contacts table."""
 5
 6from PyQt5.QtWidgets import (
 7    QAbstractItemView,
 8    QHBoxLayout,
 9    QMainWindow,
10    QPushButton,
11    QTableView,
12    QVBoxLayout,
13    QWidget,
14)
15
16class Window(QMainWindow):
17    """Main Window."""
18    def __init__(self, parent=None):
19        """Initializer."""
20        # Snip...
21
22        self.setupUI()
23
24    def setupUI(self):
25        """Setup the main window's GUI."""
26        # Create the table view widget
27        self.table = QTableView()
28        self.table.setSelectionBehavior(QAbstractItemView.SelectRows)
29        self.table.resizeColumnsToContents()
30        # Create buttons
31        self.addButton = QPushButton("Add...")
32        self.deleteButton = QPushButton("Delete")
33        self.clearAllButton = QPushButton("Clear All")
34        # Lay out the GUI
35        layout = QVBoxLayout()
36        layout.addWidget(self.addButton)
37        layout.addWidget(self.deleteButton)
38        layout.addStretch()
39        layout.addWidget(self.clearAllButton)
40        self.layout.addWidget(self.table)
41        self.layout.addLayout(layout)
Trước tiên, bạn nhập một số lớp PyQt bổ sung để sử dụng trong GUI. Dưới đây là một số trong số những cái có liên quan hơn:
-
QPushButtonđể tạo Thêm , Xóa và Xóa tất cả các nút -
QTableViewđể cung cấp chế độ xem dạng bảng hiển thị danh sách liên hệ -
QAbstractItemViewđể cung cấp quyền truy cập vào chính sách hành vi lựa chọn chế độ xem bảng
Trong mã này, phần bổ sung đầu tiên cho Window là lệnh gọi đến .setupUI() ở cuối __init__() . Lệnh gọi này tạo GUI của cửa sổ chính khi bạn chạy ứng dụng.
Đây là mã bên trong .setupUI() hiện:
- Dòng 27 tạo một
QTableViewví dụ để hiển thị danh sách liên hệ. - Dòng 28 đặt
.selectionBehaviorthuộc tính củaQAbstractItemView.SelectRows. Điều này đảm bảo rằng khi người dùng nhấp vào bất kỳ ô nào của chế độ xem bảng, hàng hoàn chỉnh sẽ được chọn. Các hàng trong chế độ xem bảng chứa tất cả thông tin liên quan đến một địa chỉ liên hệ trong danh sách địa chỉ liên hệ. - Dòng 31 đến 33 thêm ba nút vào GUI: Thêm , Xóa và Xóa tất cả . Các nút này chưa thực hiện bất kỳ hành động nào.
- Dòng 35 đến 41 tạo và thiết lập bố cục nhất quán cho tất cả các tiện ích con trong GUI.
Với những bổ sung này cho Window , bạn có thể chạy lại ứng dụng. Cửa sổ trên màn hình của bạn sẽ giống như cửa sổ bạn đã thấy ở đầu phần.
Lưu ý: Các số dòng trong đoạn mã trên và trong phần còn lại của các mẫu mã trong hướng dẫn này nhằm tạo điều kiện thuận lợi cho việc giải thích. Chúng không khớp với thứ tự các dòng trong mô-đun hoặc tập lệnh cuối cùng.
Trong phần này, bạn đã chạy tất cả các bước bắt buộc để tạo GUI của cửa sổ chính trong sổ liên lạc của mình. Bây giờ, bạn đã sẵn sàng để bắt đầu tìm hiểu cách ứng dụng sẽ quản lý và lưu trữ dữ liệu liên hệ của bạn.
Bước 3:Thiết lập Cơ sở dữ liệu của Sổ liên lạc
Tại thời điểm này, bạn đã tạo một ứng dụng PyQt và GUI của cửa sổ chính của nó để xây dựng dự án sổ liên lạc của bạn. Trong phần này, bạn sẽ viết mã để xác định cách ứng dụng kết nối với cơ sở dữ liệu liên hệ. Để hoàn thành bước này, bạn sẽ sử dụng SQLite để xử lý cơ sở dữ liệu và hỗ trợ PyQt’s SQL để kết nối ứng dụng với cơ sở dữ liệu và làm việc với dữ liệu liên hệ của bạn.
Mã nguồn và các tệp bạn sẽ thêm hoặc sửa đổi trong phần này được lưu trữ trong source_code_step_3/ danh mục. Bạn có thể tải chúng xuống bằng cách nhấp vào liên kết bên dưới:
Lấy mã nguồn: Nhấp vào đây để lấy mã nguồn mà bạn sẽ sử dụng để tạo sổ liên lạc với Python, PyQt và SQLite trong hướng dẫn này.
Đầu tiên, quay lại main.py trong rpcontacts/ thư mục và cập nhật mã để tạo kết nối với cơ sở dữ liệu:
# -*- coding: utf-8 -*-
# rpcontacts/main.py

"""This module provides RP Contacts application."""

import sys

from PyQt5.QtWidgets import QApplication

from .database import createConnection
from .views import Window

def main():
    """RP Contacts main function."""
    # Create the application
    app = QApplication(sys.argv)
    # Connect to the database before creating any window
    if not createConnection("contacts.sqlite"):
        sys.exit(1)
    # Create the main window if the connection succeeded
    win = Window()
    win.show()
    # Run the event loop
    sys.exit(app.exec_())
Trong trường hợp này, trước tiên bạn nhập createConnection() từ database.py . Hàm này sẽ chứa mã để tạo và mở kết nối với cơ sở dữ liệu liên hệ. Bạn sẽ tạo database.py và viết createConnection() trong phần tiếp theo.
Bên trong main() , dòng đầu tiên được đánh dấu là nỗ lực tạo kết nối với cơ sở dữ liệu bằng cách sử dụng createConnection() . Nếu vì lý do nào đó mà ứng dụng không thể tạo kết nối, thì lệnh gọi đến sys.exit(1) sẽ đóng ứng dụng mà không tạo phần tử đồ họa và sẽ cho biết rằng đã xảy ra lỗi.
Bạn phải xử lý kết nối theo cách này vì ứng dụng phụ thuộc vào cơ sở dữ liệu để hoạt động bình thường. Nếu bạn không có kết nối chức năng thì ứng dụng của bạn sẽ không hoạt động.
Thực hành này cho phép bạn xử lý lỗi và đóng ứng dụng sạch sẽ nếu sự cố xảy ra. Bạn cũng sẽ có thể cung cấp cho người dùng thông tin liên quan về lỗi ứng dụng gặp phải khi cố gắng kết nối với cơ sở dữ liệu.
Với những bổ sung này, đã đến lúc đi sâu vào mã của createConnection() .
Kết nối với Cơ sở dữ liệu bằng PyQt và SQLite
Kết nối ứng dụng sổ liên lạc của bạn với cơ sở dữ liệu liên quan của nó là một bước cơ bản trong việc phát triển ứng dụng. Để thực hiện việc này, bạn sẽ viết mã một hàm có tên là createConnection() , sẽ tạo và mở một kết nối đến cơ sở dữ liệu. Nếu kết nối thành công, thì hàm sẽ trả về True . Nếu không, nó sẽ cung cấp thông tin về nguyên nhân gây ra lỗi kết nối.
Quay lại rpcontacts/ thư mục và tạo một mô-đun mới có tên là database.py bên trong nó. Sau đó, thêm mã sau vào mô-đun đó:
 1# -*- coding: utf-8 -*-
 2# rpcontacts/database.py
 3
 4"""This module provides a database connection."""
 5
 6from PyQt5.QtWidgets import QMessageBox
 7from PyQt5.QtSql import QSqlDatabase
 8
 9def createConnection(databaseName):
10    """Create and open a database connection."""
11    connection = QSqlDatabase.addDatabase("QSQLITE")
12    connection.setDatabaseName(databaseName)
13
14    if not connection.open():
15        QMessageBox.warning(
16            None,
17            "RP Contact",
18            f"Database Error: {connection.lastError().text()}",
19        )
20        return False
21
22    return True
Tại đây, trước tiên bạn nhập một số lớp PyQt bắt buộc. Sau đó, bạn xác định createConnection() . Hàm này nhận một đối số: databaseName giữ tên hoặc đường dẫn đến tệp cơ sở dữ liệu SQLite vật lý trong hệ thống tệp của bạn.
Đây là mã bên trong createConnection() hiện:
- Dòng 11 tạo kết nối cơ sở dữ liệu bằng
QSQLITEtài xế. - Dòng 12 đặt tên tệp hoặc đường dẫn đến cơ sở dữ liệu.
- Dòng 14 cố gắng mở kết nối. Nếu sự cố xảy ra trong khi gọi đến
.open(), sau đó làifkhối mã hiển thị thông báo lỗi và sau đó trả vềFalseđể cho biết rằng nỗ lực kết nối không thành công. - Dòng 22 trả về
Truenếu nỗ lực kết nối thành công.
Bạn đã viết mã createConnection() . Bây giờ bạn có thể viết mã để tạo contacts bảng trong cơ sở dữ liệu.
Tạo contacts Bảng
Với chức năng tạo và mở kết nối với cơ sở dữ liệu tại chỗ, bạn có thể tiến hành viết mã hàm trợ giúp để tạo contacts bàn. Bạn sẽ sử dụng bảng này để lưu trữ thông tin về các địa chỉ liên hệ của mình.
Đây là mã triển khai _createContactsTable() :
# -*- coding: utf-8 -*-
# rpcontacts/database.py

# Snip...
from PyQt5.QtSql import QSqlDatabase, QSqlQuery

def _createContactsTable():
    """Create the contacts table in the database."""
    createTableQuery = QSqlQuery()
    return createTableQuery.exec(
        """
        CREATE TABLE IF NOT EXISTS contacts (
            id INTEGER PRIMARY KEY AUTOINCREMENT UNIQUE NOT NULL,
            name VARCHAR(40) NOT NULL,
            job VARCHAR(50),
            email VARCHAR(40) NOT NULL
        )
        """
    )

def createConnection(databaseName):
    # Snip...
    _createContactsTable()
    return True
Tại đây, trước tiên bạn hãy thêm một lần nhập mới. Bạn nhập QSqlQuery để thực thi và thao tác các câu lệnh SQL.
Bên trong _createContactsTable() , bạn tạo một QSqlQuery ví dụ. Sau đó, bạn gọi .exec() trên đối tượng truy vấn bằng SQL CREATE TABLE dựa trên chuỗi tuyên bố như một đối số. Câu lệnh này tạo một bảng mới có tên là contacts trong cơ sở dữ liệu của bạn. Bảng có các cột sau:
| Nội dung | |
|---|---|
id | Một số nguyên có khóa chính của bảng |
name | Một chuỗi có tên liên hệ |
job | Một chuỗi có tiêu đề công việc của một số liên lạc |
email | Một chuỗi chứa email của một liên hệ |
contacts bảng trong cơ sở dữ liệu của bạn sẽ lưu trữ thông tin liên quan về các địa chỉ liên hệ của bạn.
Bước cuối cùng để hoàn thành việc viết mã database.py là thêm lệnh gọi vào _createContactsTable() từ bên trong createConnection() , ngay trước return cuối cùng tuyên bố. Điều này đảm bảo rằng ứng dụng tạo ra các contacts bảng trước khi thực hiện bất kỳ thao tác nào trên cơ sở dữ liệu.
Khi bạn đã tạo contacts , bạn có thể chạy một số thử nghiệm trên cơ sở dữ liệu và cũng có thể thêm một số dữ liệu mẫu để thử nghiệm thêm.
Kiểm tra Cơ sở dữ liệu của Sổ liên lạc
Cho đến nay, bạn đã viết xong mã cần thiết để xử lý kết nối với cơ sở dữ liệu của sổ liên lạc. Trong phần này, bạn sẽ thực hiện một số kiểm tra để đảm bảo rằng mã này và bản thân cơ sở dữ liệu hoạt động bình thường. Bạn cũng sẽ thêm một số dữ liệu mẫu vào cơ sở dữ liệu để thực hiện kiểm tra thêm ở phần sau của hướng dẫn này.
Bây giờ, hãy mở một thiết bị đầu cuối hoặc dòng lệnh và chuyển đến thư mục gốc của dự án, rpcontacts_project/ . Khi đó, hãy khởi chạy một phiên tương tác Python và nhập mã sau:
>>> from rpcontacts.database import createConnection

>>> # Create a connection
>>> createConnection("contacts.sqlite")
True

>>> # Confirm that contacts table exists
>>> from PyQt5.QtSql import QSqlDatabase
>>> db = QSqlDatabase.database()
>>> db.tables()
['contacts', 'sqlite_sequence']
Tại đây, trước tiên bạn nhập createConnection() từ database.py mô-đun. Sau đó, bạn gọi hàm này để tạo và mở kết nối với cơ sở dữ liệu liên hệ. Tên tệp cơ sở dữ liệu là contacts.sqlite . Vì tệp này không tồn tại trong thư mục gốc của dự án, nên SQLite sẽ tạo nó cho bạn. Bạn có thể kiểm tra điều này bằng cách xem thư mục hiện tại của mình.
Tiếp theo, bạn xác nhận rằng cơ sở dữ liệu có chứa một bảng có tên là contacts . Để làm điều đó, bạn gọi .database() trên QSqlDatabase . Phương thức lớp này trả về một con trỏ đến kết nối cơ sở dữ liệu hiện tại. Với tham chiếu đến kết nối này, bạn có thể gọi .tables() để lấy danh sách các bảng trong cơ sở dữ liệu. Lưu ý rằng bảng đầu tiên trong danh sách là contacts , vì vậy, bây giờ bạn chắc chắn rằng mọi thứ đang hoạt động tốt.
Bây giờ bạn có thể chuẩn bị một truy vấn SQL để chèn dữ liệu mẫu vào contacts bảng:
>>> # Prepare a query to insert sample data
>>> from PyQt5.QtSql import QSqlQuery

>>> insertDataQuery = QSqlQuery()
>>> insertDataQuery.prepare(
...     """
...     INSERT INTO contacts (
...         name,
...         job,
...         email
...     )
...     VALUES (?, ?, ?)
...     """
... )
True
Truy vấn trên cho phép bạn chèn các giá trị cụ thể vào name , job và email và để lưu các giá trị đó vào cơ sở dữ liệu. Dưới đây là một ví dụ về cách thực hiện việc này:
>>> # Sample data
>>> data = [
...     ("Linda", "Technical Lead", "linda@example.com"),
...     ("Joe", "Senior Web Developer", "joe@example.com"),
...     ("Lara", "Project Manager", "lara@example.com"),
...     ("David", "Data Analyst", "david@example.com"),
...     ("Jane", "Senior Python Developer", "jane@example.com"),
... ]

>>> # Insert sample data
>>> for name, job, email in data:
...     insertDataQuery.addBindValue(name)
...     insertDataQuery.addBindValue(job)
...     insertDataQuery.addBindValue(email)
...     insertDataQuery.exec()
...
True
True
True
True
True
Trong đoạn mã này, trước tiên bạn xác định dữ liệu data để giữ thông tin liên hệ của một danh sách mọi người. Tiếp theo, bạn sử dụng for vòng lặp để chèn dữ liệu bằng cách gọi .addBindValue() . Sau đó, bạn gọi .exec() trên đối tượng truy vấn để chạy truy vấn SQL trên cơ sở dữ liệu một cách hiệu quả.
Vì tất cả các lệnh gọi đến .exec() trả về True , bạn có thể kết luận rằng dữ liệu đã được chèn thành công vào cơ sở dữ liệu. Nếu bạn muốn xác nhận điều này, hãy chạy mã sau:
>>> query = QSqlQuery()
>>> query.exec("SELECT name, job, email FROM contacts")
True

>>> while query.next():
...     print(query.value(0), query.value(1), query.value(2))
...
Linda Technical Lead linda@example.com
Joe Senior Web Developer joe@example.com
Lara Project Manager lara@example.com
David Data Analyst david@example.com
Jane Senior Python Developer jane@example.com
Đó là nó! Cơ sở dữ liệu của bạn hoạt động tốt! Bây giờ bạn có một số dữ liệu mẫu để kiểm tra ứng dụng và bạn có thể tập trung vào cách tải và hiển thị thông tin liên hệ trong cửa sổ chính của sổ liên hệ của bạn.
Bước 4:Hiển thị và Cập nhật Danh bạ Hiện có
Để hiển thị dữ liệu liên hệ của bạn trong cửa sổ chính của ứng dụng, bạn có thể sử dụng QTableView . Lớp này là một phần của kiến trúc Chế độ xem mô hình của PyQt và cung cấp một cách mạnh mẽ và hiệu quả để hiển thị các mục từ đối tượng mô hình PyQt.
Các tệp và mã bạn sẽ thêm hoặc sửa đổi trong phần này được lưu trữ trong source_code_step_4/ danh mục. Để tải chúng xuống, hãy nhấp vào liên kết bên dưới:
Lấy mã nguồn: Nhấp vào đây để lấy mã nguồn mà bạn sẽ sử dụng để tạo sổ liên lạc với Python, PyQt và SQLite trong hướng dẫn này.
Sau khi bạn hoàn thành bước này, sổ liên lạc của bạn sẽ trông giống như sau:
Đối tượng dạng xem bảng trong cửa sổ chính cung cấp chức năng cần thiết để cho phép bạn sửa đổi và cập nhật thông tin liên hệ một cách nhanh chóng.
Ví dụ:để cập nhật tên của một số liên lạc, bạn có thể bấm đúp vào ô chứa tên, cập nhật tên rồi nhấn Enter để tự động lưu các thay đổi vào cơ sở dữ liệu. Nhưng trước khi bạn có thể làm điều này, bạn cần tạo một mô hình và kết nối nó với chế độ xem bảng.
Tạo mô hình để xử lý dữ liệu liên hệ
PyQt cung cấp một tập hợp các lớp phong phú để làm việc với cơ sở dữ liệu SQL. Đối với ứng dụng sổ liên lạc của mình, bạn sẽ sử dụng QSqlTableModel , cung cấp một mô hình dữ liệu có thể chỉnh sửa cho một bảng cơ sở dữ liệu. Nó hoàn hảo cho công việc vì cơ sở dữ liệu của bạn có một bảng duy nhất, contacts .
Quay lại trình soạn thảo mã của bạn và tạo một mô-đun mới có tên là model.py bên trong rpcontacts/ danh mục. Thêm mã sau vào tệp và lưu nó:
 1# -*- coding: utf-8 -*-
 2# rpcontacts/model.py
 3
 4"""This module provides a model to manage the contacts table."""
 5
 6from PyQt5.QtCore import Qt
 7from PyQt5.QtSql import QSqlTableModel
 8
 9class ContactsModel:
10    def __init__(self):
11        self.model = self._createModel()
12
13    @staticmethod
14    def _createModel():
15        """Create and set up the model."""
16        tableModel = QSqlTableModel()
17        tableModel.setTable("contacts")
18        tableModel.setEditStrategy(QSqlTableModel.OnFieldChange)
19        tableModel.select()
20        headers = ("ID", "Name", "Job", "Email")
21        for columnIndex, header in enumerate(headers):
22            tableModel.setHeaderData(columnIndex, Qt.Horizontal, header)
23        return tableModel
Trong mã này, trước tiên bạn thực hiện một số thao tác nhập bắt buộc, sau đó bạn tạo ContactsModel . Trong trình khởi tạo lớp, bạn xác định một thuộc tính cá thể có tên là .model để giữ mô hình dữ liệu.
Next, you add a static method to create and set up the model object. Here’s what the code in ._createModel() does:
- Line 16 creates an instance of
QSqlTableModel()calledtableModel. - Line 17 associates the model object with the
contactstable in your database. - Line 18 sets the
.editStrategyproperty of the model toQSqlTableModel.OnFieldChange. With this, you ensure that the changes on the model get saved into the database immediately. - Line 19 loads the table into the model by calling
.select(). - Lines 20 to 22 define and set user-friendly headers for the
contactstable’s columns. - Line 23 returns the newly created model.
At this point, you have your data model ready to use. Now you need to connect the table view widget to the model so you can present your users with the contact information.
Connecting the Model to the View
To display contact data in your contact book’s main window, you need to connect the table view with the data model. To perform this connection, you need to call .setModel() on the table view object and pass the model as an argument:
# -*- coding: utf-8 -*-
# rpcontacts/views.py

# Snip...
from .model import ContactsModel

class Window(QMainWindow):
    """Main Window."""
    def __init__(self, parent=None):
        # Snip...
        self.contactsModel = ContactsModel()
        self.setupUI()

    def setupUI(self):
        """Setup the main window's GUI."""
        # Create the table view widget
        self.table = QTableView()
        self.table.setModel(self.contactsModel.model)
        self.table.setSelectionBehavior(QAbstractItemView.SelectRows)
        # Snip...
In this code, you first import ContactsModel from model.py . This class provides the model that manages the data in your contact database.
In the initializer of Window , you create an instance of ContactsModel . Then inside .setupUI() , you call .setModel() on .table to connect the model with the table view. If you run the application after this update, then you’ll get the window you saw at the beginning of step 4.
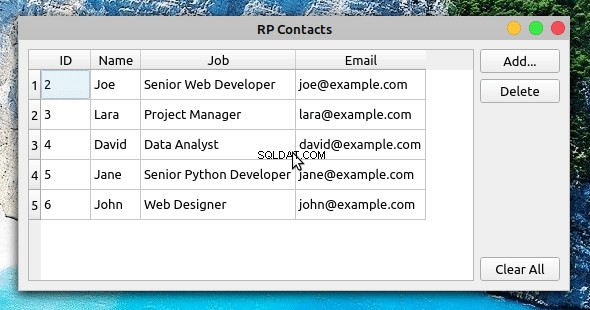
Displaying and Updating Contacts
PyQt’s Model-View architecture provides a robust and user-friendly way to create GUI applications that manage databases. Models communicate with and access the data in the database. Any change in a model updates the database immediately. Views are responsible for displaying the data to the user and also for providing editable widgets to allow the user to modify the data directly in the view.
If the user modifies the data through the view, then the view internally communicates with and updates the model, which saves the changes to the physical database:
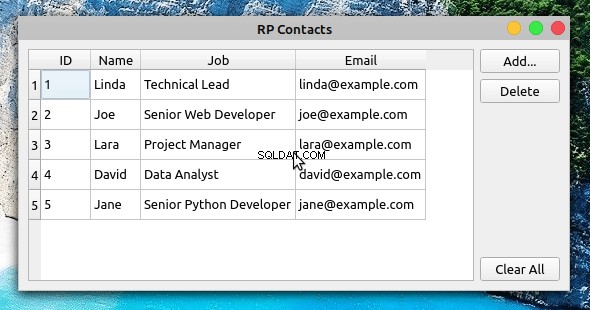
In this example, you double-click Joe’s Job đồng ruộng. This gives you access to an editable widget that allows you to modify the value in the cell. Then you update the job description from Senior Web Developer to Web Developer . When you hit Enter , the table view communicates the change to the model, and the model saves the change to the database immediately.
To confirm that the changes were successfully saved into the database, you can close the application and run it again. The table view should reflect your updates.
Step 5:Creating New Contacts
At this step, your contact book application provides functionality to load, display, and update the information about your contacts. Even though you’re able to modify and update the contact information, you can neither add nor remove contacts from the list.
All the files and the code you’ll add or modify in this section are collected in the source_code_step_5/ danh mục. To download them, click the link below:
Get the Source Code: Click here to get the source code you’ll use to build a contact book with Python, PyQt, and SQLite in this tutorial.
In this section, you’ll provide the required functionality to add new contacts to the database, using a pop-up dialog to enter the new information. The first step is to create the Add Contact dialog.
Creating the Add Contact Dialog
Dialogs are small windows that you can use to communicate with your users. In this section, you’ll code the contact book’s Add Contact dialog to allow your users add new contacts to their current list of contacts.
To code the Add Contact dialog, you’ll subclass QDialog . This class provides a blueprint to build dialogs for your GUI applications.
Now open the views.py module and update the import section like this:
# -*- coding: utf-8 -*-
# rpcontacts/views.py

# Snip...
from PyQt5.QtCore import Qt
from PyQt5.QtWidgets import (
    QAbstractItemView,
    QDialog,
    QDialogButtonBox,
    QFormLayout,
    QHBoxLayout,
    QLineEdit,
    QMainWindow,
    QMessageBox,
    QPushButton,
    QTableView,
    QVBoxLayout,
    QWidget,
)
The highlighted lines in the above code import the required classes to build the Add Contact dialog. With these classes in your namespace, add the following class at the end of views.py :
 1# -*- coding: utf-8 -*-
 2# rpcontacts/views.py
 3
 4# Snip...
 5class AddDialog(QDialog):
 6    """Add Contact dialog."""
 7    def __init__(self, parent=None):
 8        """Initializer."""
 9        super().__init__(parent=parent)
10        self.setWindowTitle("Add Contact")
11        self.layout = QVBoxLayout()
12        self.setLayout(self.layout)
13        self.data = None
14
15        self.setupUI()
16
17    def setupUI(self):
18        """Setup the Add Contact dialog's GUI."""
19        # Create line edits for data fields
20        self.nameField = QLineEdit()
21        self.nameField.setObjectName("Name")
22        self.jobField = QLineEdit()
23        self.jobField.setObjectName("Job")
24        self.emailField = QLineEdit()
25        self.emailField.setObjectName("Email")
26        # Lay out the data fields
27        layout = QFormLayout()
28        layout.addRow("Name:", self.nameField)
29        layout.addRow("Job:", self.jobField)
30        layout.addRow("Email:", self.emailField)
31        self.layout.addLayout(layout)
32        # Add standard buttons to the dialog and connect them
33        self.buttonsBox = QDialogButtonBox(self)
34        self.buttonsBox.setOrientation(Qt.Horizontal)
35        self.buttonsBox.setStandardButtons(
36            QDialogButtonBox.Ok | QDialogButtonBox.Cancel
37        )
38        self.buttonsBox.accepted.connect(self.accept)
39        self.buttonsBox.rejected.connect(self.reject)
40        self.layout.addWidget(self.buttonsBox)
There are a lot of things happening in this code. Here’s a summary:
- Line 5 defines a new class that inherits from
QDialog. - Lines 7 to 15 define the class initializer. In this case, the most relevant addition is
.data, which is an instance attribute that you’ll use to hold the data your users provide.
In .setupUI() , you define the dialog’s GUI:
- Lines 20 to 25 add three
QLineEditobjects:name,job, andemail. You’ll use these line edits to take the user’s input for the name, job description, and email of the contact to add. They represent the corresponding fields in the database. - Lines 27 to 30 create a
QFormLayoutinstance that arranges the line edits in a form. This layout manager also provides user-friendly labels for each line edit or field. - Lines 33 to 37 add a
QDialogButtonBoxobject that provides two standard buttons:OK and Cancel . The OK button accepts the user’s input and the Cancel button rejects it. - Lines 38 and 39 connect the dialog’s built-in
.accepted()and.rejected()signals with the.accept()andreject()slots, respectively. In this case, you’ll rely on the dialog’s built-in.reject()slot, which closes the dialog without processing the input. Other than that, you just need to code the.accept()slot.
To code the dialog’s .accept() slot, you need to consider that any user input needs validation to make sure that it’s correct and safe. This is especially true when you’re working with SQL databases because of the risk of an SQL injection attack.
In this example, you’ll add a minimal validation rule just to make sure that the user provides data for each input field in the dialog. However, adding your own, more robust validation rules would be a good exercise.
Without further ado, get back to AddDialog and add the following code for its .accept() slot:
 1# -*- coding: utf-8 -*-
 2# rpcontacts/views.py
 3
 4# Snip...
 5class AddDialog(QDialog):
 6    def __init__(self, parent=None):
 7        # Snip...
 8
 9    def setupUI(self):
10        # Snip...
11
12    def accept(self):
13        """Accept the data provided through the dialog."""
14        self.data = []
15        for field in (self.nameField, self.jobField, self.emailField):
16            if not field.text():
17                QMessageBox.critical(
18                    self,
19                    "Error!",
20                    f"You must provide a contact's {field.objectName()}",
21                )
22                self.data = None  # Reset .data
23                return
24
25            self.data.append(field.text())
26
27        if not self.data:
28            return
29
30        super().accept()
The code within .accept() does the following:
- Line 14 initializes
.datato an empty list ([]). This list will store the user’s input data. - Line 15 defines a
forloop that iterates over the three line edits, or fields, in the dialog. - Lines 16 to 23 define a conditional statement that checks if the user has provided data for each field in the dialog. If not, then the dialog shows an error message that warns the user about the missing data.
- Line 25 adds the user’s input for each field to
.data. - Line 30 calls the superclass’s
.accept()slot to provide the standard behavior that closes the dialog after the user clicks OK .
With this code, you’re ready to add a new slot to the contact book’s main window. This slot will launch the dialog, and if the user provides valid input, then the slot will use the model to save the newly added contact to the database.
Launching the Add Contact Dialog
Now that you’ve coded the Add Contact dialog, it’s time to add a new slot to Window so you can launch the dialog by clicking Add and process the user’s input once they click OK .
Go to the definition of Window and add the following code:
 1# -*- coding: utf-8 -*-
 2# rpcontacts/views.py
 3
 4# Snip...
 5class Window(QMainWindow):
 6    # Snip...
 7
 8    def setupUI(self):
 9        # Snip...
10        self.addButton = QPushButton("Add...")
11        self.addButton.clicked.connect(self.openAddDialog)
12        # Snip...
13
14    def openAddDialog(self):
15        """Open the Add Contact dialog."""
16        dialog = AddDialog(self)
17        if dialog.exec() == QDialog.Accepted:
18            self.contactsModel.addContact(dialog.data)
19            self.table.resizeColumnsToContents()
Here’s a summary of what’s happening in the above code:
- Line 11 connects the
.clicked()signal of the Add button to the newly created slot,.openAddDialog(). This way, a click on the button will automatically call the slot. - Line 14 defines the
.openAddDialog()slot. - Line 16 creates an instance of
AddDialog. - Lines 17 to 19 define a conditional statement to check if the dialog was accepted. If so, then line 14 calls
.addContact()on the data model with the dialog’s.dataattribute as an argument. The final statement in theifcode block resizes the table view to fit the size of its updated content.
Now that you have a way to launch the Add Contact dialog and to process its data, you need to provide the code for .addContact() in your data model. That’s a topic for the next section.
Processing the Add Dialog’s Data in the Model
In this section, you’ll add a method called .addContact() to your data model, ContactsModel . Open model.py in your code editor, go to the definition of ContactsModel , and add the following code:
 1# -*- coding: utf-8 -*-
 2# rpcontacts/model.py
 3
 4# Snip...
 5class ContactsModel:
 6    # Snip...
 7
 8    def addContact(self, data):
 9        """Add a contact to the database."""
10        rows = self.model.rowCount()
11        self.model.insertRows(rows, 1)
12        for column, field in enumerate(data):
13            self.model.setData(self.model.index(rows, column + 1), field)
14        self.model.submitAll()
15        self.model.select()
Inside .addContact() , the code does the following:
- Line 10 gets the current number of rows in the data model.
- Line 11 inserts a new row at the end of the data model.
- Lines 12 and 13 run a
forloop that inserts every item indatainto the corresponding cell in the data model. To do this, line 9 calls.setData()on the model, with the index of the cell and the current datafieldas arguments. - Line 14 submits the changes to the database by calling
.submitAll()on the model. - Line 15 reloads the data from the database into the model.
If you run the application with these new additions, then you’ll get the following behavior:
Now when you click Add , the Add Contact dialog appears on your screen. You can use the dialog to provide the required information for a new contact and to add the contact to the database by clicking OK .
Step 6:Deleting Existing Contacts
The final feature you’ll add to the contact book application is the ability to remove contacts from the database using the GUI.
Again, you’ll find all the files and the code added or modified in this section under the source_code_step_6/ danh mục. You can download them by clicking the link below:
Get the Source Code: Click here to get the source code you’ll use to build a contact book with Python, PyQt, and SQLite in this tutorial.
In this section, you’ll first add the capability to delete a single contact at a time. Then you’ll add code to remove all the contacts from the database.
Deleting Selected Contacts
To remove a single contact from the contact database, you need to select the desired contact in the table view on the contact book’s main window. Once you’ve selected the contact, you can click Delete to perform the operation on the database.
Go to the model.py module and add the following code to implement .deleteContact() inside ContactsModel :
# -*- coding: utf-8 -*-
# rpcontacts/model.py

# Snip...
class ContactsModel:
    # Snip...

    def deleteContact(self, row):
        """Remove a contact from the database."""
        self.model.removeRow(row)
        self.model.submitAll()
        self.model.select()
This method has three lines of code. The first line removes the selected row . The second line submits the change to the database. Finally, the third line reloads the data into the model.
Next, get back to the views.py module and add the code behind the Delete button in Window :
# -*- coding: utf-8 -*-
# rpcontacts/views.py

# Snip...
class Window(QMainWindow):
    # Snip...

    def setupUI(self):
        """Setup the main window's GUI."""
        # Snip...
        self.deleteButton = QPushButton("Delete")
        self.deleteButton.clicked.connect(self.deleteContact)
        # Snip...

    def deleteContact(self):
        """Delete the selected contact from the database."""
        row = self.table.currentIndex().row()
        if row < 0:
            return

        messageBox = QMessageBox.warning(
            self,
            "Warning!",
            "Do you want to remove the selected contact?",
            QMessageBox.Ok | QMessageBox.Cancel,
        )

        if messageBox == QMessageBox.Ok:
            self.contactsModel.deleteContact(row)
In the first highlighted line, you connect the .clicked() signal of the Delete button to the .deleteContact() slot. This connection triggers a call to .deleteContact() every time the user clicks the button.
In .deleteContact() , you first get the index of the currently selected row in the table view. The if statement checks if the index is lower than 0 , which would mean that there are no contacts in the table view. If so, then the method returns immediately without performing any further actions.
Then the method shows a warning message confirming that the user wants to delete the selected contact. If the user accepts the operation, then .deleteContact(row) gets called. In this case, row represents the index of the currently selected row in the table.
After these additions, you can run the application again to get the following behavior:
Now when you select a contact from the table view and click Delete , you’re presented with a warning message. If you click the message dialog’s OK button, then the application removes the selected contact from the database, updating the table view accordingly.
Clearing the Contact Database
To remove all the contacts from the database, you’ll start by adding a method called .clearContacts() to ContactsModel . Open your model.py module and add the following method at the end of the class:
 1# -*- coding: utf-8 -*-
 2# rpcontacts/model.py
 3
 4# Snip...
 5class ContactsModel:
 6    # Snip...
 7
 8    def clearContacts(self):
 9        """Remove all contacts in the database."""
10        self.model.setEditStrategy(QSqlTableModel.OnManualSubmit)
11        self.model.removeRows(0, self.model.rowCount())
12        self.model.submitAll()
13        self.model.setEditStrategy(QSqlTableModel.OnFieldChange)
14        self.model.select()
Here’s what each line of code does:
- Line 10 sets the data model’s
.editStrategyproperty toQSqlTableModel.OnManualSubmit. This allows you to cache all the changes until you call.submitAll()later on. You need to do this because you’re changing several rows at the same time. - Line 11 removes all the rows from the model.
- Line 12 saves changes to the database.
- Line 13 resets the model’s
.editStrategyproperty to its original value,QSqlTableModel.OnFieldChange. If you don’t reset this property to its original value, then you won’t be able to update the contacts directly in the table view. - Line 14 reloads the data into the model.
Once you’ve coded .clearContacts() , you can get back to the views.py file and update Window with the following code:
# -*- coding: utf-8 -*-
# rpcontacts/views.py

# Snip...
class Window(QMainWindow):
    # Snip...

    def setupUI(self):
        """Setup the main window's GUI."""
        # Snip...
        self.clearAllButton = QPushButton("Clear All")
        self.clearAllButton.clicked.connect(self.clearContacts)
        # Snip...

    def clearContacts(self):
        """Remove all contacts from the database."""
        messageBox = QMessageBox.warning(
            self,
            "Warning!",
            "Do you want to remove all your contacts?",
            QMessageBox.Ok | QMessageBox.Cancel,
        )

        if messageBox == QMessageBox.Ok:
            self.contactsModel.clearContacts()
The first highlighted line in this code connects the .clicked() signal of the Clear All button to the .clearContacts() slot below.
In .clearContacts() , you first create a message dialog, messageBox , to ask the user to confirm the removing operation. If the user confirms the operation by clicking OK , then .clearContacts() gets called on the model to remove all the contacts from the database:
Đó là nó! With this last piece of code, your contact book application is complete. The application provides features that allow your users to display, add, update, and remove contacts from the database.
Conclusion
Building a contact book GUI application with Python, PyQt, and SQLite is an excellent exercise for you to expand your skills with these tools and as a developer in general. Coding projects like this allows you to apply the knowledge and skills you already have and also pushes you to research and learn about new topics every time you encounter a new programming problem.
In this tutorial, you learned how to:
- Build the GUI for a contact book application using PyQt
- Use PyQt’s SQL support to connect the application to an SQLite database
- Use PyQt’s Model-View architecture to work with the application’s database
You can download the complete source code for the contact book application and also the code to complete each step in this tutorial by clicking the link below:
Get the Source Code: Click here to get the source code you’ll use to build a contact book with Python, PyQt, and SQLite in this tutorial.
Next Steps
At this point, you’ve completed a fully functional contact book project. The application provides minimal functionality, but it’s a good starting point to continue adding features and take your Python and PyQt skills to the next level. Here are some next step ideas that you can implement:
-
Add new data fields: Adding new data fields to store more information about your contacts would be great. For example, you can add the contact’s photo, phone number, web page, Twitter handle, and so on. To do this, you might need to create new tables and set up relations between them. PyQt provides the
QSqlRelationalTableModel, which defines an editable data model for a single table and provides foreign key support. -
Provide search capability: Giving your users a way to search for a contact in the database is arguably a must-have feature in this kind of application. To implement it, you can use PyQt’s
QSqlQueryandQSqlQueryModel. -
Add back-up capability: Providing a way of backing up contact information is another interesting feature. Users might face problems with their computers and lose their data. You can provide options to upload the data to a cloud service or to back it up to an external disk.
These are just a few ideas for how you can continue adding features to your contact book. Take the challenge and build something amazing on top of this!