TableView component là một trong những thành phần đa năng thường được sử dụng trong phát triển ứng dụng JavaFX. Nó cho phép người ta tổ chức dữ liệu trực quan một cách nhanh chóng. Người xem có thể nhanh chóng nắm bắt được ngay cả thông tin ngầm định của thông tin đó bằng cách trình bày dạng bảng của nó. Bài viết này khám phá thành phần này từ quan điểm tổ chức dữ liệu và cách nó có thể được sử dụng hiệu quả trong lập trình Java.
TableView
TableView kiểm soát cung cấp chức năng gần như tương đương với Swing’s Jtable thành phần. Nó được thiết kế để đại diện cho số lượng hàng dữ liệu không giới hạn, được phân đoạn thành các cột. Trong JavaFX, có một thành phần khác, được gọi là ListView , tương tự. Sự khác biệt duy nhất là TableView hỗ trợ nhiều cột trong khi ListView có một cột duy nhất. Các tính năng của TableView kiểm soát như sau:
- Bởi vì một bảng được tạo thành từ số lượng cột, mỗi cột được biểu thị bằng TableColumn lớp. Lớp này cung cấp quyền kiểm soát tốt hơn đối với cột. Một thể hiện của lớp này chịu trách nhiệm hiển thị và sửa đổi nội dung của cột đó. Do đó, nó chứa một số thuộc tính có thể điều chỉnh. Ví dụ,
- Nó có thể được thay đổi kích thước bằng thuộc tính width ( minWidth, maxWidth, prefWidth, width ).
- Khả năng hiển thị của cột có thể được chuyển đổi với khả năng hiển thị tài sản.
- Có các phương thức setter và getter cho các thuộc tính tiêu đề cột và văn bản.
- Có thể hiển thị các cột lồng nhau.
- Có một menu ngữ cảnh mà người dùng có thể nhấp chuột phải vào khu vực tiêu đề cột.
- Nội dung có thể sắp xếp (sử dụng trình so sánh , có thể sắp xếp , sortType ).
- Có các chính sách thay đổi kích thước cho bảng để xác định trạng thái của bảng khi người dùng thay đổi kích thước cột.
- Cung cấp hỗ trợ để sắp xếp nhiều cột.
Tạo TableView
Hãy để chúng tôi tạo một ứng dụng mẫu để minh họa cách TableView trong JavaFX có thể được sử dụng. Trước tiên, hãy để chúng tôi giới thiệu cơ bản về JavaFX TableView trong mã. Vì bảng hiển thị dữ liệu nên chúng tôi sẽ tạo một lớp chứa dữ liệu.
package sample;

import javafx.beans.property.IntegerProperty;
import javafx.beans.property.SimpleIntegerProperty;
import javafx.beans.property.SimpleStringProperty;
import javafx.beans.property.StringProperty;
public class Employee {
   private StringProperty name;
   private StringProperty phone;
   private StringProperty email;
   private IntegerProperty salary;
   public Employee(String name, String phone, String email,
         Integer salary) {
      setName(name);
      setPhone(phone);
      setEmail(email);
      setSalary(salary);
   }
   public StringProperty nameProperty(){
      if(name == null)
      name = new SimpleStringProperty();
      return name;
   }
   public StringProperty phoneProperty() {
      if(phone == null)
      phone = new SimpleStringProperty();
      return phone;
   }
   public StringProperty emailProperty() {
      if(email == null)
      email = new SimpleStringProperty();
      return email;
   }
   public IntegerProperty salaryProperty() {
      if(salary == null)
      salary = new SimpleIntegerProperty();
      return salary;
   }
   public void setName(String name)
         { nameProperty().setValue(name);  }
   public String getName()
         { return nameProperty().get();  }
   public void setPhone(String phone)
         {phoneProperty().setValue(phone);}
   public String getPhone()
         { return phoneProperty().get(); }
   public void setEmail(String email)
         { emailProperty().setValue(email);}
   public String getEmail()
         { return emailProperty().get(); }
   public void setSalary(Integer salary)
         { salaryProperty().setValue(salary);}
   public Integer getSalary()
         { return salaryProperty().get(); }
}
Bây giờ, chúng ta hãy tạo bố cục ứng dụng và đặt TableView là thành phần duy nhất trong cảnh.
package sample;
import javafx.application.Application;
import javafx.collections.FXCollections;
import javafx.collections.ObservableList;
import javafx.scene.Scene;
import javafx.scene.control.TableColumn;
import javafx.scene.control.TableView;
import javafx.scene.control.cell.PropertyValueFactory;
import javafx.scene.layout.BorderPane;
import javafx.stage.Stage;
public class AppMain extends Application {
   @Override
   public void start(Stage primaryStage)
         throws Exception {
      BorderPane root = new BorderPane();
      root.setPrefSize(600,400);

      final TableView<Employee> employeeTableView =
         new TableView<>();
      employeeTableView.setPrefWidth(500);
      employeeTableView.setItems(dummyEmployees());
      TableColumn<Employee, String> nameCol =
         new TableColumn<>("Name");
      nameCol.setCellValueFactory(
         new PropertyValueFactory<Employee,
            String>("Name"));

      TableColumn<Employee, String> phoneCol =
         new TableColumn<>("Phone");
      phoneCol.setCellValueFactory(
         new PropertyValueFactory<Employee,
            String>("Phone"));

      TableColumn<Employee, String> emailCol =
         new TableColumn<>("Email");
      emailCol.setCellValueFactory(
         new PropertyValueFactory<Employee,
            String>("Email"));

      TableColumn<Employee, Integer> salaryCol =
         new TableColumn<>("Salary");
      salaryCol.setCellValueFactory(
         new PropertyValueFactory<Employee,
            Integer>("Salary"));

      employeeTableView.getColumns().addAll(nameCol,phoneCol,
         emailCol,salaryCol);
      root.setCenter(employeeTableView);
      Scene scene = new Scene(root);
      primaryStage.setScene(scene);
      primaryStage.setTitle("JavaFX TableView Demonstration");
      primaryStage.show();
   }

   private static ObservableList<Employee> dummyEmployees() {
      ObservableList<Employee> employees =
         FXCollections.observableArrayList();
      employees.add(new Employee("Arko Bannerjee",
         "9876543210","example@sqldat.com", 5600));
      employees.add(new Employee("Subir Sha",
         "8109276354","example@sqldat.com",7200));
      employees.add(new Employee("Karoline Bhatt",
         "638374642","example@sqldat.com",3600));
      employees.add(new Employee("Vikas Verma",
         "425637772","example@sqldat.com",7800));
      employees.add(new Employee("Gurmeet Singh",
         "9876543210","example@sqldat.com",8900));
      employees.add(new Employee("Partho Goel",
         "837743636","example@sqldat.com",5644));
      employees.add(new Employee("Hanish Jaiswal",
         "826355343","example@sqldat.com",6500));
      employees.add(new Employee("Preety Ahuja",
         "9298366454","example@sqldat.com",7800));
      employees.add(new Employee("Sandip Paul",
         "82773554536","example@sqldat.com",8600));
      employees.add(new Employee("Sudipto Sarkar",
         "73664552542","example@sqldat.com",8200));
      employees.add(new Employee("Bikash Panda",
         "6365344245","example@sqldat.com",8400));
      employees.add(new Employee("Abhronil Sahu",
         "7829293663","example@sqldat.com",8000));
      employees.add(new Employee("Dilip Das",
         "9283665455","example@sqldat.com",8100));
      return employees;
   }

   public static void main(String[] args) {
      launch(args);
   }
}
Bảng được tạo bằng mã sau:
final TableView<Employee> employeeTableView =
   new TableView<>();
Nội dung của bảng được thể hiện bằng các cột được thêm vào. Mỗi cột cũng phải có một tiêu đề để chỉ định nội dung của cột một cách trực quan. Trong ví dụ này, chúng tôi đã đặt bốn cột (được chỉ định bởi thuộc tính được xác định trong Nhân viên lớp).
TableColumn<Employee, String> nameCol =
      new TableColumn<>("Name");
   nameCol.setEditable(true);
   nameCol.setCellValueFactory(
      new PropertyValueFactory<Employee,
         String>("Name"));
Đầu ra
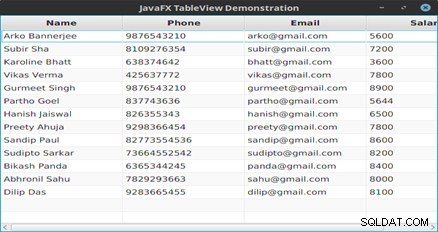
Hình 1: Nội dung của bảng
Tiếp theo, chúng tôi đã đặt điều này làm thành phần chính của bố cục. Đó là tất cả những gì chúng tôi cần làm để hiển thị một số nội dung trong TableView . Các chức năng như sắp xếp nội dung không yêu cầu bất kỳ xử lý đặc biệt / bổ sung nào vì chúng được thành phần cung cấp như một tính năng mặc định. Ngoài ra, có thể thực hiện nhiều phân loại bằng cách giữ phím SHIFT từ bàn phím trong khi chọn các cột bằng cách nhấp chuột.
Các cột có thể chỉnh sửa trong bảng
Nếu chúng ta muốn tạo một bảng có một cột có thể chỉnh sửa, chúng ta có thể làm như vậy rất dễ dàng. Khi chúng ta bấm đúp vào cột có thể chỉnh sửa, một hộp văn bản sẽ xuất hiện để chúng ta có thể chỉnh sửa giá trị. Để thực hiện thay đổi vĩnh viễn, chúng ta cần nhấn phím Enter từ bàn phím.
Đây là một ví dụ khác với các cột có thể chỉnh sửa.
package sample;
import javafx.beans.property.SimpleStringProperty;
import javafx.beans.property.StringProperty;
public class PhoneBook {
   private StringProperty name;
   private StringProperty phone;
   public PhoneBook(String name, String phone) {
      setName(name);
      setPhone(phone);
   }
   public StringProperty nameProperty(){
      if(name == null)
         name = new SimpleStringProperty();
      return name;
   }
   public StringProperty phoneProperty(){
      if(phone == null)
         phone = new SimpleStringProperty();
      return phone;
   }
   public void setName(String name)
      { nameProperty().setValue(name);  }
   public String getName()
      { return nameProperty().get();  }
   public void setPhone(String phone)
      { phoneProperty().setValue(phone);}
   public String getPhone()
      { return phoneProperty().get(); }
   @Override
   public String toString() {
      return getName()+" : "+getPhone();
   }
}

package sample;
import javafx.application.*;
import javafx.beans.value.*;
import javafx.collections.*;
import javafx.geometry.*;
import javafx.scene.Scene;
import javafx.scene.control.*;
import javafx.scene.control.cell.*;
import javafx.scene.layout.*;
import javafx.scene.text.*;
import javafx.stage.*;
public class PhoneBookTable extends Application {
   private TableView<PhoneBook> table;
   private ObservableList data;
   private Text txtStatus;
   @Override
   public void start(Stage primaryStage) {
      primaryStage.setTitle("Table View Demonstration.");
      HBox hb = new HBox();
      hb.setAlignment(Pos.CENTER);
      table = new TableView<>();
      data = dummyData();
      table.setItems(data);
      TableColumn<PhoneBook,String> nameCol = new
         TableColumn<>("Name");
      nameCol.setCellValueFactory(new
         PropertyValueFactory<>("name"));
      TableColumn<PhoneBook,String> phoneCol = new
         TableColumn("Phone");
      phoneCol.setCellValueFactory(new
         PropertyValueFactory<>("phone"));
      table.getColumns().setAll(nameCol, phoneCol);
      table.setPrefWidth(400);
      table.setPrefHeight(250);
      table.setColumnResizePolicy(TableView.
         CONSTRAINED_RESIZE_POLICY);
      table.getSelectionModel().selectedIndexProperty().
            addListener(
         new RowChangeHandler());
      table.setEditable(true);
      phoneCol.setCellFactory(TextFieldTableCell.
         forTableColumn());
      phoneCol.setOnEditCommit(event -> (event.getTableView().
         getItems().get(event.getTablePosition().getRow())).
         setPhone(event.getNewValue()));
      txtStatus = new Text();
      VBox vbox = new VBox(20);
      vbox.setPadding(new Insets(20, 20, 20, 20));;
      vbox.getChildren().addAll(hb, table, txtStatus);
      // W x H
      Scene scene = new Scene(vbox, 450, 375);
      primaryStage.setScene(scene);
      primaryStage.show();
      table.getSelectionModel().select(0);
      PhoneBook pb = table.getSelectionModel().
         getSelectedItem();
      txtStatus.setText(pb.toString());
   }
   private class RowChangeHandler implements
         ChangeListener {
      @Override
      public void changed(ObservableValue ov, Object oldVal,
            Object newVal) {
         int val = ((Number)newVal).intValue();
         if (data.size()<=0) {
            return;
         }
        PhoneBook pb= (PhoneBook) data.get(val);
        txtStatus.setText(pb.toString());
      }
   }
   public ObservableList<PhoneBook> dummyData() {
      ObservableList<PhoneBook> records =
         FXCollections.observableArrayList();
      records.add(new PhoneBook("Mickey Mouse",
         "7894561230"));
      records.add(new PhoneBook("Donald Duck",
         "1234567890"));
      records.add(new PhoneBook("Alladin",
         "7418529630"));
      records.add(new PhoneBook("Zairo",
         "9638527410"));
      records.add(new PhoneBook("Batman",
         "7894561230"));
      records.add(new PhoneBook("Spiderman",
         "852478930"));
      return records;
   }
   public static void main(String [] args) {
      Application.launch(args);
   }
}
Đầu ra
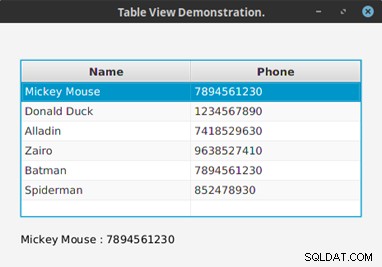
Hình 2: Một bản ghi được trích xuất từ bảng
Kết luận
TableView component khá hữu ích trong thiết kế giao diện người dùng, đặc biệt là khi chúng ta lập trình cơ sở dữ liệu. JavaFX đã làm cho thành phần này trở nên linh hoạt mặc dù có một số trục trặc trong việc triển khai các biểu diễn dạng bảng phức tạp. Tất nhiên, khả năng sử dụng được hiển thị ở đây chỉ là một vết xước. Có thể hoàn thành nhiều việc hơn với TableView , như chúng ta sẽ thấy trong các bài viết trong tương lai.