1 Giới thiệu Hướng dẫn MS Access 2010, 2013, 2016 và 2019
Chào mừng bạn đến với hướng dẫn MS Access. Hướng dẫn này được thiết kế để giúp người dùng thiết lập và chạy với MS Access (từ đó trở đi chỉ đơn giản là “Access”) một cách nhanh chóng. Bốn mô-đun cơ bản của Access được trình bày:Bảng, Biểu mẫu, Báo cáo và Truy vấn. Trước tiên chúng ta sẽ thảo luận về một ví dụ kinh doanh cung cấp nền tảng để phát triển một cơ sở dữ liệu đơn giản.
Người dùng của hướng dẫn này được giả định rằng làm việc thành thạo với Microsoft Windows XP / Vista / Win7 / Win10, v.v. và với MS Excel. Điều này bao gồm việc sử dụng bàn phím và chuột. Hướng dẫn này dựa trên Microsoft Access, một phần của bộ Microsoft Office Professional cũng bao gồm MS Excel, MS Word và MS Powerpoint.
Hướng dẫn này bao gồm MS Access 2007, 2010, 2013, 2016 và 2019 có giao diện chung (“thanh ribbon” ở trên cùng) khác với các phiên bản trước đó. Nếu bạn quan tâm đến việc làm việc với MS Access ’97 hoặc 2000, vui lòng truy cập Hướng dẫn Microsoft Access - Bao gồm trang web MS Access ’97 và 2000.
Hướng dẫn bắt đầu với tổng quan ngắn gọn về Cơ sở dữ liệu quan hệ . Phần lớn các hệ quản trị cơ sở dữ liệu đang được sử dụng ngày nay dựa trên cái được gọi là mô hình cơ sở dữ liệu quan hệ. Access là một hệ quản trị cơ sở dữ liệu quan hệ. Sau đó, chúng tôi mô tả một ví dụ kinh doanh và đưa ra một phác thảo cho cơ sở dữ liệu và các ứng dụng mà chúng tôi muốn phát triển. Trong các phần tiếp theo, chúng tôi đưa ra hướng dẫn từng bước để tạo bảng, biểu mẫu nhập dữ liệu, báo cáo và truy vấn cho ứng dụng.
1.1 Đối tượng Dự kiến
Hướng dẫn này dành cho sinh viên mới bắt đầu với hệ quản trị cơ sở dữ liệu MS Access.
1.2 Kiến thức tiên quyết
Hướng dẫn này giả định rằng sinh viên đã quen thuộc với hoạt động cơ bản của máy tính cá nhân và Windows 2000, Windows XP, Windows Vista hoặc Windows 7. Các kỹ năng cụ thể cần thiết cho hướng dẫn này là:
- Sử dụng chuột và bàn phím
- Ví dụ:mở và lưu tệp trên đĩa cứng và trên thẻ nhớ USB (ổ USB)
- Quản lý tệp nói chung bao gồm sự khác biệt giữa ký tự ổ đĩa, đĩa cứng, v.v.
- Đang chạy các chương trình từ menu Start của Windows
- Thu nhỏ, phóng to và thay đổi kích thước cửa sổ
Học sinh nên có sẵn thẻ nhớ USB (ổ USB) hoặc thiết bị nhớ di động khác để lưu trữ các tệp của họ sẽ được tạo trong bài hướng dẫn này.
1.3 Chạy Microsoft Access trên Apple Mac
Một vấn đề mà một số sinh viên có thể gặp phải là thực tế là MS Access chỉ chạy trong hệ điều hành Windows (chẳng hạn như Windows XP, Vista hoặc Windows 7). Nếu bạn có MacBook, iMac hoặc hệ thống Apple khác chạy MacOS sử dụng CPU Intel, bạn có thể thử một vài lựa chọn thay thế. Nhiều máy tính Apple hiện đại sử dụng CPU Intel có thể chạy hệ điều hành Windows. Lưu ý rằng bạn sẽ cần một bản sao hệ điều hành Windows được cấp phép hợp pháp để thực hiện việc này. Có hai cách chính để thực hiện điều này:
- Bạn có thể thiết lập máy Mac của mình thành “Khởi động kép” cả MacOS X và Windows. Một sản phẩm có thể kích hoạt tính năng này là phần mềm Apple BootCamp.
- Bạn có thể chạy Windows OS “song song” với Mac OS X bằng máy tính “ảo” như VirtualBox
Mục lục
- 1 Giới thiệu về Hướng dẫn MS Access
- 1.1 Đối tượng Dự kiến
- 1.2 Kiến thức Tiên quyết
- 1.3 Chạy Microsoft Access trên Apple Mac
- 2 Tổng quan ngắn gọn về Cơ sở dữ liệu quan hệ và Ứng dụng cơ sở dữ liệu
- 3 Ví dụ về Doanh nghiệp
- 4 Khởi động Microsoft Access
- 4.1 Đánh giá về việc Khởi động Microsoft Access
- 5 Tạo và Xem Bảng
- 5.1 Tạo Bảng bằng Dạng xem Thiết kế
- 5.2 Bài tập:Tạo Bảng
- 5.3 Xem và thêm dữ liệu vào bảng
- 5.4 Bài tập:Thêm dữ liệu vào bảng
- 5.5 Tạo mối quan hệ giữa các bảng
- 5.6 Xem lại việc tạo và xem bảng
- 6 Tạo và Chạy Truy vấn
- 6.1 Truy vấn bảng đơn
- 6.2 Bài tập:Truy vấn bảng đơn
- 6.3 Truy vấn Nhiều Bảng
- 6.4 Bài tập:Nhiều Truy vấn Bảng
- 6.5 Đánh giá về việc tạo và chạy các truy vấn
- 7 Tạo và Chạy Biểu mẫu Nhập Dữ liệu
- 7.1 Tạo một Biểu mẫu Bảng Đơn bằng Trình hướng dẫn
- 7.2 Bài tập:Tạo một biểu mẫu bảng duy nhất
- 7.3 Đánh giá về việc tạo và chạy biểu mẫu nhập dữ liệu
- 8 Tạo và Chạy Báo cáo
- 8.1 Tạo Báo cáo Bảng Đơn bằng trình hướng dẫn
- 8.2 Bài tập:Tạo Báo cáo Bảng Đơn
- 8.3 Đánh giá về việc tạo và chạy báo cáo
- 9 Tạo và chạy một Biểu mẫu chính / Chi tiết (Biểu mẫu có Biểu mẫu con)
- 10 Tạo và Chạy Bảng chuyển mạch
- 11 Tạo và Chạy Biểu mẫu Điều hướng
- 11.1 Bài tập:Sửa đổi Biểu mẫu Điều hướng
- 11.2 Đặt Biểu mẫu Điều hướng làm Mặc định
- 12 Tóm tắt Hướng dẫn và Chủ đề Nâng cao
Trang tiếp theo giới thiệu ngắn gọn về Cơ sở dữ liệu quan hệ.
2 Tổng quan ngắn gọn về Cơ sở dữ liệu quan hệ và Ứng dụng cơ sở dữ liệu
Các cơ sở dữ liệu đầu tiên được triển khai trong những năm 1960 và 1970 dựa trên các tệp dữ liệu phẳng hoặc các mô hình dữ liệu phân cấp hoặc mạng. Các phương pháp lưu trữ dữ liệu này tương đối không linh hoạt do cấu trúc cứng nhắc và phụ thuộc nhiều vào các chương trình ứng dụng để thực hiện ngay cả những xử lý thông thường nhất.
Vào cuối những năm 1970, mô hình cơ sở dữ liệu quan hệ vốn bắt nguồn từ cộng đồng nghiên cứu hàn lâm đã trở nên sẵn có trong các triển khai thương mại như IBM DB2 và Oracle. Mô hình dữ liệu quan hệ chỉ định dữ liệu được lưu trữ trong quan hệ có một số mối quan hệ trong số đó (do đó có tên là quan hệ ).
Trong cơ sở dữ liệu quan hệ như Sybase, MySQL, Oracle, IBM DB2, MS SQL Server và MS Access, dữ liệu được lưu trữ trong bảng được tạo thành từ một hoặc nhiều cột (Access gọi một cột là trường ). Dữ liệu được lưu trữ trong mỗi cột phải thuộc một kiểu dữ liệu duy nhất chẳng hạn như Ký tự (đôi khi được gọi là “chuỗi”), Số hoặc Ngày. Tập hợp các giá trị từ mỗi cột của bảng được gọi là bản ghi hoặc một hàng trong bảng.
Các bảng khác nhau có thể có chung một cột. Tính năng này được sử dụng để chỉ định rõ ràng mối quan hệ giữa hai bảng. Các giá trị xuất hiện trong cột A trong một bảng được chia sẻ với một bảng khác.
Dưới đây là hai ví dụ về các bảng trong cơ sở dữ liệu quan hệ cho một ngân hàng cục bộ:
Bảng khách hàng
| CustomerID | Tên | Họ | Địa chỉ đường phố | Thành phố | Bang | Zip |
|---|---|---|---|---|---|---|
| Số | Nhân vật | Nhân vật | Nhân vật | Nhân vật | Nhân vật | Nhân vật |
| 1001 | Joseph | Smith | 123 Lexington | Smithville | KỲ | 91232 |
| 1002 | Alberta | Jones | 12 Đại lộ Davis | Smithville | KỲ | 91232 |
| 1003 | Nathanial | Rìu | 443 Máy mài Ln. | Broadville | GA | 81992 |
| 1004 | Paulina | Người xây dựng | 661 Parker Rd. | Streetville | GA | 81990 |
Bảng tài khoản
| CustomerID | Số tài khoản | Loại tài khoản | DateOpened | Số dư |
|---|---|---|---|---|
| Số | Số | Nhân vật | Ngày | Số |
| 1001 | 9987 | Kiểm tra | 10/12/1989 | 4000,00 |
| 1001 | 9980 | Tiết kiệm | 10/12/1989 | 2000,00 |
| 1002 | 8811 | Tiết kiệm | 01/05/1992 | 1000,00 |
| 1003 | 4422 | Kiểm tra | 12/01/1994 | 6000,00 |
| 1003 | 4433 | Tiết kiệm | 12/01/1994 | 9000,00 |
| 1004 | 3322 | Tiết kiệm | 22/08/1994 | 500,00 |
| 1004 | 1122 | Kiểm tra | 13/11/1988 | 800,00 |
Bảng Khách hàng có 7 cột (ID Khách hàng, Tên, Họ, Địa chỉ Đường phố, Thành phố, Tiểu bang và Mã zip) và 4 hàng (hoặc bản ghi) dữ liệu. Bảng Tài khoản có 5 cột (CustomerID, AccountNumber, AccountType, DateOpened và Balance) với 7 hàng dữ liệu.
Mỗi cột tuân theo một trong ba kiểu dữ liệu cơ bản :Ký tự, Số hoặc Ngày. Kiểu dữ liệu cho một cột cho biết loại giá trị dữ liệu có thể được lưu trữ trong cột đó.
- Số - chỉ có thể lưu trữ số, có thể có dấu thập phân. Có thể tích cực hoặc tiêu cực.
- Ký tự - có thể lưu trữ số, chữ cái và dấu câu. Access gọi kiểu dữ liệu này là Văn bản .
- Ngày - chỉ có thể lưu trữ dữ liệu ngày và giờ.
Trong một số triển khai cơ sở dữ liệu tồn tại các kiểu dữ liệu khác như Hình ảnh (cho ảnh hoặc dữ liệu khác). Tuy nhiên, ba kiểu dữ liệu trên được sử dụng phổ biến nhất.
Lưu ý rằng hai bảng chia sẻ cột CustomerID và các giá trị của cột CustomerID trong bảng Khách hàng giống với các giá trị trong cột CustomerID trong bảng Tài khoản. Mối quan hệ này cho phép chúng tôi chỉ định rằng Khách hàng Nathanial Axe có cả tài khoản séc và tài khoản tiết kiệm được mở vào cùng một ngày:1 tháng 12 năm 1994.
Một tên khác được đặt cho mối quan hệ như vậy là Chính / Chi tiết . Trong mối quan hệ tổng thể / chi tiết, một bản ghi chính duy nhất (chẳng hạn như Khách hàng 1003, Nathanial Axe) có thể có nhiều bản ghi chi tiết (hai tài khoản) được liên kết với nó.
Trong mối quan hệ Chính / Chi tiết, bản ghi Chính có thể tồn tại mà không có bất kỳ Chi tiết nào. Tuy nhiên, không thể có bản ghi Chi tiết nếu không có bản ghi Chính phù hợp. Ví dụ:một Khách hàng có thể không nhất thiết phải có bất kỳ thông tin tài khoản nào. Tuy nhiên, bất kỳ thông tin tài khoản nào phải được liên kết với một Khách hàng.
Mỗi bảng cũng phải có một cột đặc biệt được gọi là Khóa được sử dụng để xác định duy nhất các hàng hoặc bản ghi trong bảng. Các giá trị trong một cột chính (hoặc các cột) không bao giờ được trùng lặp. Trong các bảng trên, ID Khách hàng là khóa cho bảng Khách hàng trong khi Số tài khoản là khóa cho bảng Tài khoản.
3 Một ví dụ kinh doanh
Trong phần này, chúng tôi sẽ phác thảo một ví dụ kinh doanh sẽ được sử dụng làm cơ sở cho các ví dụ trong suốt hướng dẫn. Trong các tổ chức, công việc phân tích hoạt động kinh doanh và xác định cấu trúc cơ sở dữ liệu thích hợp (bảng và cột) thường được thực hiện bởi Nhà phân tích hệ thống . Nhà phân tích hệ thống sẽ thu thập thông tin về cách doanh nghiệp hoạt động và sẽ hình thành một mô hình yêu cầu lưu trữ dữ liệu. Từ mô hình này, một lập trình viên cơ sở dữ liệu sẽ tạo các bảng cơ sở dữ liệu và sau đó làm việc với các nhà phát triển ứng dụng để phát triển phần còn lại của ứng dụng cơ sở dữ liệu.
Đối với hướng dẫn này, chúng tôi sẽ xem xét một doanh nghiệp ngân hàng đơn giản. Ngân hàng có nhiều khách hàng mở và duy trì một hoặc nhiều tài khoản. Đối với mỗi Khách hàng, chúng tôi lưu giữ hồ sơ về tên và địa chỉ của họ. Chúng tôi cũng chỉ định cho họ một ID khách hàng duy nhất. Chúng tôi chỉ định số nhận dạng duy nhất này để thuận tiện và chính xác. Việc xác định một khách hàng bằng cách sử dụng CustomerID của họ sẽ dễ dàng hơn nhiều so với việc tra cứu tên đầy đủ và địa chỉ của họ. Ngoài ra, ngân hàng có thể có hai khách hàng trùng tên (ví dụ:Bill Smith). Trong những trường hợp như vậy, CustomerID duy nhất luôn có thể được sử dụng để phân biệt chúng.
Theo cách tương tự, tất cả các tài khoản được chỉ định một số tài khoản duy nhất. Tài khoản có thể là tài khoản séc hoặc tài khoản tiết kiệm. Tài khoản tiết kiệm được hưởng lãi suất nhưng các giao dịch duy nhất được phép là gửi và rút tiền. Tài khoản séc không được hưởng lãi suất. Chúng tôi duy trì ngày tài khoản được mở. Điều này giúp chúng tôi theo dõi khách hàng của mình và có thể hữu ích cho các mục đích tiếp thị. Cuối cùng, chúng tôi duy trì số dư hiện tại của tài khoản.
Trong phần trước, chúng tôi đã đưa ra cấu trúc và một số dữ liệu mẫu cho bảng Khách hàng và bảng Tài khoản. Chúng sẽ được sử dụng để hỗ trợ phần lưu trữ dữ liệu trong ứng dụng Ngân hàng của chúng tôi.
Ứng dụng cơ sở dữ liệu
Trong bất kỳ ứng dụng cơ sở dữ liệu nào, mỗi bảng yêu cầu một phương tiện để đưa dữ liệu vào chúng và truy xuất và sửa đổi dữ liệu sau đó. Cách chính để lấy dữ liệu vào bảng là sử dụng các biểu mẫu nhập dữ liệu. Các cách chính để lấy lại dữ liệu ra khỏi bảng hoặc hiển thị dữ liệu trong bảng là sử dụng truy vấn hoặc báo cáo. Trong một ứng dụng cơ sở dữ liệu hoàn chỉnh, tất cả các biểu mẫu và báo cáo được liên kết với nhau trong một Biểu mẫu Điều hướng - một trang duy nhất sẽ có các liên kết đến từng phần của ứng dụng. Một ứng dụng cơ sở dữ liệu lớn có thể có hàng chục biểu mẫu và báo cáo nhập dữ liệu.
Đối với hướng dẫn này, chúng tôi sẽ tạo biểu mẫu nhập dữ liệu cho mỗi bảng, truy vấn cho mỗi bảng và báo cáo cho mỗi bảng.
Trong các phần tiếp theo, trước tiên chúng tôi sẽ giới thiệu cách khởi động Access và cách tạo cơ sở dữ liệu mới.
4 Khởi động Microsoft Access
Như với hầu hết các chương trình Windows, Access có thể được thực thi bằng cách điều hướng menu Bắt đầu ở góc dưới bên trái của Màn hình Windows.
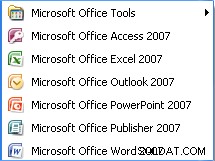
Để bắt đầu Access, hãy bấm vào nút Bắt đầu, sau đó là menu Chương trình, sau đó chuyển đến menu Microsoft Office và cuối cùng bấm vào mục menu Microsoft Access. Menu MS Office Professional được hiển thị bên dưới.
Lưu ý rằng cách sắp xếp menu này có thể khác nhau tùy thuộc vào cách MS Office được cài đặt trên PC bạn đang sử dụng.
Khi Access đang chạy, màn hình ban đầu sẽ được hiển thị:
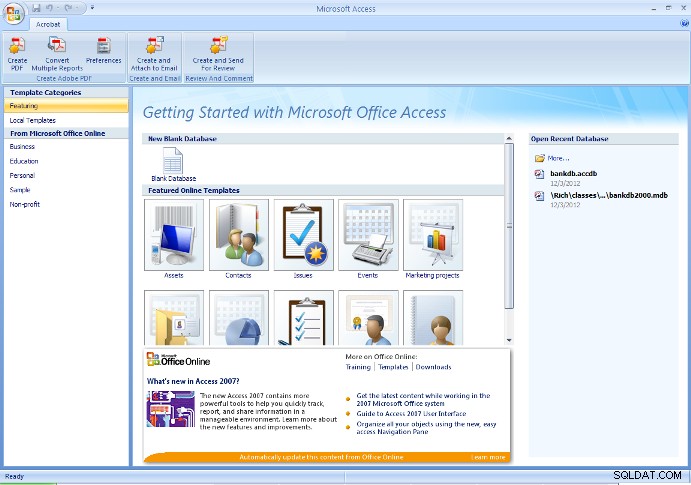
Từ màn hình ban đầu này, người dùng có thể tạo cơ sở dữ liệu mới (trống hoặc với một số bảng được tạo bằng trình hướng dẫn cơ sở dữ liệu) hoặc mở cơ sở dữ liệu hiện có.
Nói chung, lần đầu tiên bắt đầu một dự án, một cơ sở dữ liệu trống mới sẽ được tạo. Sau thời điểm đó, hãy sử dụng Mở cơ sở dữ liệu hiện có để mở lại cơ sở dữ liệu đã tạo trước đó.
Cảnh báo - Nếu trước đó bạn đã tạo cơ sở dữ liệu, sau đó tạo lại bằng cách sử dụng cùng tên, bạn sẽ ghi đè lên bất kỳ công việc nào bạn đã làm.
Theo mục đích của hướng dẫn này, nếu bạn đang thực hiện các bước này lần đầu tiên, hãy chọn tùy chọn để tạo một cơ sở dữ liệu trống, mới như thể hiện trong hình trên.
Trong Access 2007, nhấp vào nút Office tròn ở góc trên bên trái và chọn Mới từ trình đơn thả xuống. Điền vào Tên tệp dưới dạng bankdb.accdb và nhấp vào nút Tạo để tạo cơ sở dữ liệu như trong hình bên dưới.
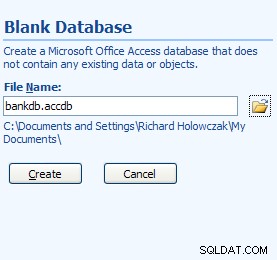
Màn hình cơ sở dữ liệu mới cho Access 2007
Trong tên tệp ở trên, bankdb là tên được chọn cho cơ sở dữ liệu cụ thể này và .accdb là phần mở rộng tên tệp được cung cấp cho Microsoft DataBase 2007, Tệp 2010 và 2013.
Bạn nên giữ tên của cơ sở dữ liệu (bankdb trong ví dụ trên) tương đối ngắn và không sử dụng dấu cách hoặc dấu chấm câu khác trong tên của cơ sở dữ liệu. Ngoài ra, tên của cơ sở dữ liệu phải phản ánh nội dung của cơ sở dữ liệu.
Sau khi cơ sở dữ liệu mới được tạo, màn hình Access chính sau sẽ xuất hiện:
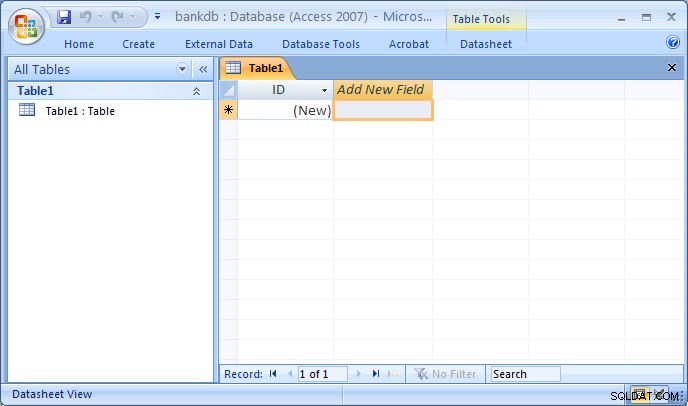
Bố cục màn hình cho MS Access 2007 khác đáng kể so với các phiên bản trước đây. Hầu hết các tab dọc theo đầu màn hình đã được sắp xếp lại. Ngoài ra, màn hình chính mặc định sau khi tạo cơ sở dữ liệu mới sẽ tự động chuyển sang dạng xem Thiết kế để tạo bảng mới.
Các tab sau sẽ xuất hiện ở đầu màn hình:
- Tab Trang chủ - Kiểm soát thay đổi phông chữ, thực hiện truy vấn, sao chép / dán / cắt dữ liệu, v.v.
- Tạo tab - Kiểm soát để tạo bảng, biểu mẫu, báo cáo, v.v.
- Tab Dữ liệu Bên ngoài - Kiểm soát tải dữ liệu từ các nguồn dữ liệu khác vào MS Access.
- Tab Công cụ Cơ sở dữ liệu - Kiểm soát quản lý cơ sở dữ liệu (bảo mật, tổng đài, v.v.)
- Tab thiết kế - Điều này sẽ xuất hiện khi thiết kế một bảng, biểu mẫu, báo cáo mới, v.v.
Lưu ý rằng các giao diện cho Access 2007, 2010 và 2013 đều giống nhau mặc dù phiên bản bạn sử dụng có thể hơi khác so với các hình ảnh trong hướng dẫn này.
4.1 Đánh giá về việc Khởi động Microsoft Access
Để bắt đầu Microsoft Access:
- Sử dụng nút Bắt đầu trên thanh tác vụ để mở:Chương trình -> MS Office -> Microsoft Access
- Để tạo cơ sở dữ liệu mới, hãy chọn Cơ sở dữ liệu trống và chỉ định một tên tệp mới cho cơ sở dữ liệu. Đảm bảo sử dụng tên mô tả cho cơ sở dữ liệu mới. Nhấp vào nút OK để tạo cơ sở dữ liệu mới.
- Để mở cơ sở dữ liệu hiện có, hãy chọn Mở cơ sở dữ liệu hiện có , đánh dấu Thêm tệp… và nhấp vào nút OK. Sau đó, điều hướng đến ổ đĩa, đánh dấu tệp cơ sở dữ liệu hiện có trên đĩa cứng hoặc ổ USB và nhấp lại vào nút OK để mở cơ sở dữ liệu.
Để thoát khỏi Access, hãy kéo xuống menu Tệp (hoặc menu Office) và chọn mục menu Thoát.
5 Tạo và xem bảng
Bảng là đơn vị lưu trữ dữ liệu chính trong Access. Nhớ lại rằng một bảng được tạo thành từ một hoặc nhiều cột (hoặc trường ) và một cột nhất định có thể xuất hiện trong nhiều bảng để biểu thị mối quan hệ giữa các bảng.
Từ ví dụ kinh doanh được thảo luận trước đó, chúng tôi kết luận rằng hai bảng sẽ đủ để lưu trữ dữ liệu về Khách hàng và Tài khoản ngân hàng của họ . Bây giờ chúng tôi cung cấp hướng dẫn từng bước để tạo hai bảng này trong Access.
Có một số cách để tạo bảng trong Access. Access cung cấp thuật sĩ hướng dẫn người dùng tạo bảng bằng cách đề xuất tên cho bảng và cột. Cách chính khác để tạo bảng là sử dụng Chế độ xem thiết kế để xác định thủ công các cột (trường) và kiểu dữ liệu của chúng.
Trong khi sử dụng trình hướng dẫn là một cách nhanh chóng để tạo bảng, người dùng có ít quyền kiểm soát hơn đối với tên cột (trường) và kiểu dữ liệu. Trong hướng dẫn này, chúng tôi sẽ mô tả các bước để tạo bảng bằng Chế độ xem thiết kế . Học sinh được khuyến khích tự mình thử nghiệm bằng cách sử dụng trình hướng dẫn Tạo Bảng.
5.1 Tạo Bảng bằng Dạng xem Thiết kế
Để tạo bảng trong Access bằng Dạng xem Thiết kế, hãy thực hiện các bước sau:
- Trong Access 2007, 2010 và 2013, tab Tạo Bảng Mới sẽ được đánh dấu và một bảng mới có tên table1 đã được tạo. Nếu không đúng như vậy, hãy nhấp vào nút Tạo và nhấp vào Bảng biểu tượng. Sau đó kéo xuống Chế độ xem và chọn Chế độ xem thiết kế .

- Chế độ xem Thiết kế Bảng sẽ xuất hiện. Điền vào Tên trường , Loại dữ liệu và Mô tả cho mỗi cột / trường trong bảng. Trường CustomerID được điền vào bên dưới:
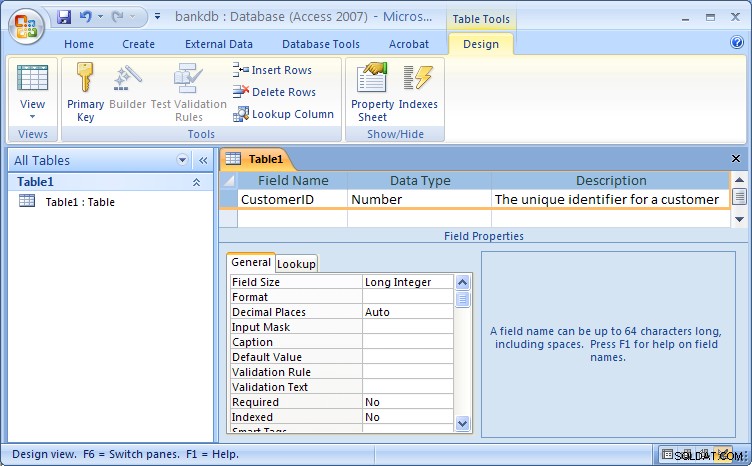
Chế độ xem thiết kế bảng cho Access 2007Lưu ý rằng tên mặc định được đặt cho bảng là Table1 . Trong bước sau, chúng tôi sẽ chỉ định một tên thích hợp cho bảng này.
Điền thông tin cho các trường như sau:
Tên trường Loại dữ liệu Mô tả ID khách hàng Số Số nhận dạng duy nhất cho khách hàng FirstName Văn bản Tên của Khách hàng LastName Văn bản Họ của Khách hàng StreetAddress Văn bản Địa chỉ đường phố của khách hàng Thành phố Văn bản Thành phố của Khách hàng Bang Văn bản Trạng thái quê hương của Khách hàng Zip Văn bản Mã Zip của Khách hàng Dưới đây là một hình thể hiện chế độ xem thiết kế với định nghĩa bảng mới được điền vào:

Bước tiếp theo là xác định Khóa cho bảng và lưu bảng.
- Bây giờ tất cả các trường đã được xác định cho bảng, một Khóa chính sẽ được xác định. Nhớ lại rằng Khóa chính sẽ được sử dụng để xác định duy nhất một bản ghi trong bảng (trong trường hợp này là Khách hàng). Đánh dấu ID khách hàng và nhấp vào nút Khóa chính trên thanh nút
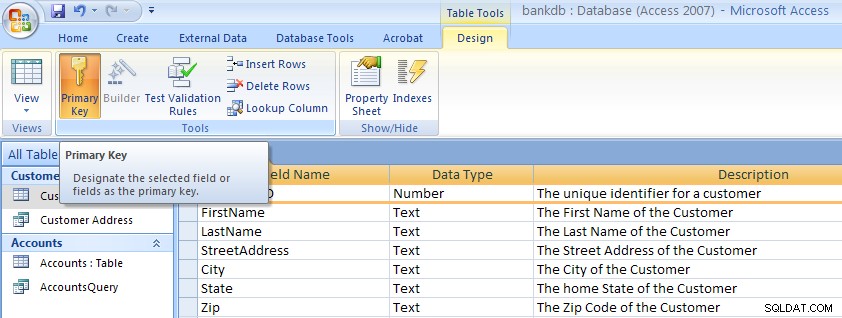 Lưu ý rằng một khóa nhỏ xuất hiện bên cạnh tên trường ở phía bên trái. Lưu ý:Để xóa khóa chính , chỉ cần lặp lại quy trình này để tắt khóa chính.
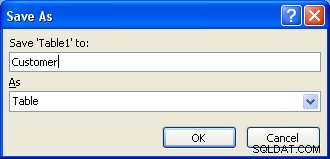
- Bước cuối cùng, bảng phải được lưu. Kéo menu Office xuống và chọn mục menu Lưu dưới dạng. Một hộp thoại sẽ xuất hiện trong đó tên của bảng mới sẽ được chỉ định. Lưu ý rằng Access đặt tên mặc định chẳng hạn như Table1 hoặc Table2 . Chỉ cần nhập tên mặc định này với tên của bảng. Đối với ví dụ này, hãy đặt tên cho bảng: Khách hàng Sau đó bấm vào nút OK.
Tại thời điểm này, bảng Khách hàng mới đã được tạo và lưu.
Lưu ý về cách đặt tên trường (Cột) trong MS Access
Khi xác định các trường (cột) cho một bảng, điều quan trọng là sử dụng các tên trường giúp hiểu rõ nội dung dữ liệu của cột. Ví dụ:trường CNO cho biết Số khách hàng hay Số vùng chứa?
Tên trường trong Access có thể dài tối đa 64 ký tự và có thể chứa khoảng trắng. Tuy nhiên, thực sự không khuyến khích việc sử dụng khoảng trắng trong tên trường và tên bảng . Nếu bạn muốn làm cho tên trường dễ đọc hơn, hãy cân nhắc sử dụng ký tự gạch dưới để phân tách các từ. Tuy nhiên, hãy chắc chắn rằng không có khoảng trắng nào xuất hiện trước hoặc sau dấu gạch dưới.
Bảng sau đây tóm tắt một số cách khác nhau để đặt tên trường:
| Mô tả | Xấu | Tốt |
|---|---|---|
| Mã định danh duy nhất cho khách hàng | CID | CustomerID hoặc Customer_ID |
| Mô tả sản phẩm | PDESC | Mô tả Sản phẩm |
| Số điện thoại nhà riêng của nhân viên | Employee_home_telephone_number | HomePhone |
| Số tài khoản ngân hàng | BA # | Số tài khoản |
5.2 Bài tập:Tạo bảng
Tạo Tài khoản bằng cách làm theo các bước tương tự được sử dụng để tạo bảng Khách hàng.
- Nhấp vào tab Tạo và sau đó nhấp vào Bảng cái nút.
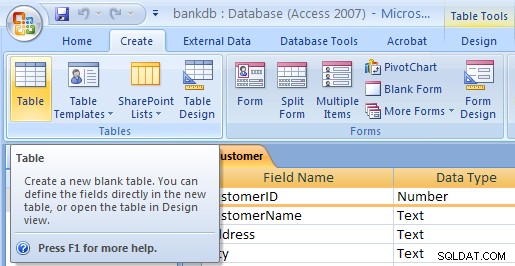
- Kéo menu View xuống và chọn Design. Chế độ xem Thiết kế Bảng sẽ xuất hiện. Điền vào Tên trường , Loại dữ liệu và Mô tả cho mỗi cột / trường trong bảng Tài khoản.
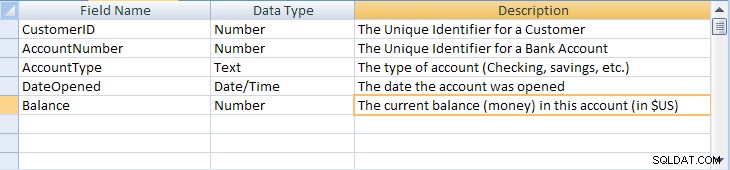
Tên trường Loại dữ liệu Mô tả ID khách hàng Số Số nhận dạng duy nhất cho khách hàng Số tài khoản Số Số nhận dạng duy nhất cho tài khoản ngân hàng Loại tài khoản Văn bản Loại tài khoản (Séc, tiết kiệm, v.v.) DateOpened Ngày Ngày mở tài khoản Số dư Số Số dư hiện tại (tiền) trong tài khoản này (bằng đô la Mỹ) Dưới đây là một hình thể hiện chế độ xem thiết kế với định nghĩa bảng mới được điền vào:
- Xác định Khóa Chính cho bảng Tài khoản. Nhấp vào Số tài khoản trường với Right nút chuột và chọn Khóa chính từ menu bật lên.
- Lưu bảng Tài khoản mới bằng cách kéo menu Tệp xuống và chọn mục menu Lưu. Điền vào tên của bảng: Tài khoản Sau đó nhấp vào nút OK.
Lưu ý rằng có một số bước bổ sung mà người ta có thể thực hiện để cải thiện và chỉnh trang các bảng trong MS Access bao gồm chỉ định giá trị mặc định, tạo giá trị tra cứu và che đầu vào dữ liệu để tuân theo một mẫu cụ thể. Các chi tiết không quan trọng đối với hướng dẫn hiện tại này nhưng nếu quan tâm, hãy xem trang Thiết kế Bảng MS Access Nâng cao được liên kết tại đây.
5.3 Xem và thêm dữ liệu vào bảng
Dữ liệu có thể được thêm, xóa hoặc sửa đổi trong bảng bằng cách sử dụng màn hình giống như bảng tính đơn giản. Để hiển thị chế độ xem dữ liệu của một bảng này, hãy đánh dấu tên của bảng và sau đó nhấp đúp vào tên của bảng.
Trong dạng xem này của bảng Khách hàng, được hiển thị trong hình bên dưới, các trường (cột) xuất hiện trên đầu cửa sổ và các hàng hoặc bản ghi xuất hiện bên dưới. Chế độ xem này tương tự như cách một bảng tính sẽ được thiết kế.
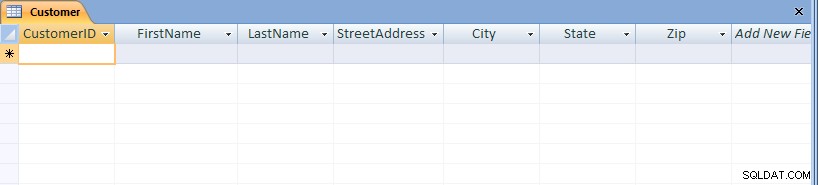
Lưu ý ở cuối cửa sổ số lượng bản ghi được hiển thị. Trong trường hợp này, vì bảng vừa được tạo nên chỉ có một bản ghi trống xuất hiện.
Để thêm dữ liệu vào bảng, chỉ cần nhập giá trị cho từng trường (cột). Nhấn phím Tab để di chuyển giữa các trường trong bản ghi. Sử dụng các phím mũi tên lên và xuống để di chuyển giữa các bản ghi. Nhập dữ liệu như dưới đây:
| CustomerID | FirstName | LastName | StreetAddress | Thành phố | Bang | Zip |
|---|---|---|---|---|---|---|
| 1001 | Joseph | Smith | 123 Lexington | Smithville | KỲ | 91232 |
| 1002 | Alberta | Jones | 12 Đại lộ Davis | Smithville | KỲ | 91232 |
| 1003 | Nathanial | Rìu | 443 Máy mài Ln. | Broadville | GA | 81992 |
| 1004 | Paulina | Người xây dựng | 661 Parker Rd. | Streetville | GA | 81990 |

Để lưu dữ liệu mới, hãy kéo menu Office xuống và chọn Lưu.
Để điều hướng đến các bản ghi khác trong bảng, hãy sử dụng thanh điều hướng ở cuối màn hình:
Để sửa đổi dữ liệu hiện có, chỉ cần điều hướng đến bản ghi quan tâm và chuyển tab đến trường thích hợp. Sử dụng các phím mũi tên và phím xóa hoặc phím xóa lùi để thay đổi dữ liệu hiện có.
Để xóa một bản ghi, trước tiên hãy điều hướng đến bản ghi quan tâm. Sau đó, kéo xuống menu Chỉnh sửa và chọn mục menu Xóa.
Để đóng bảng và quay lại màn hình chính Access, hãy kéo menu Tệp xuống và chọn mục menu Đóng.
5.4 Bài tập:Thêm dữ liệu vào bảng
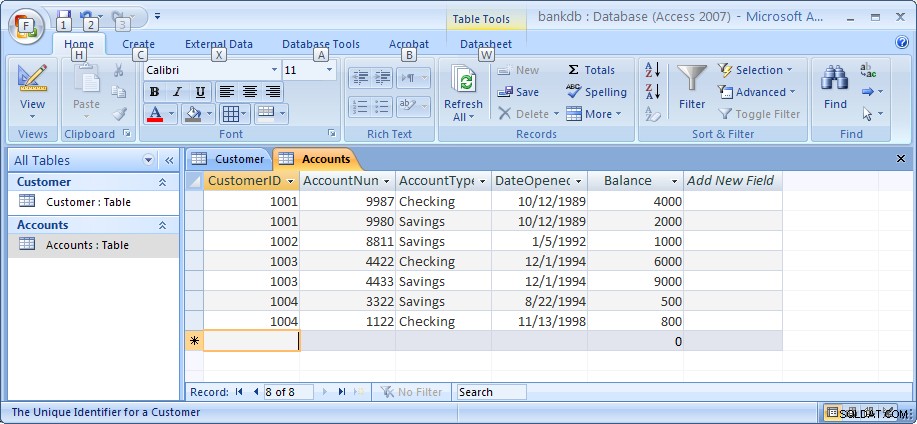
Đối với bài tập này, hãy mở bảng Tài khoản và thêm dữ liệu cho bảy tài khoản được hiển thị trong phần 2. Đảm bảo nhập dữ liệu chính xác như được hiển thị bao gồm cả cách viết hoa của dữ liệu trong trường Loại tài khoản. ví dụ:nhập Tiết kiệm thay vì Tiết kiệm hoặc TIẾT KIỆM.
Lưu ý rằng khi nhập ngày tháng, hãy nhập đầy đủ bốn chữ số cho năm. Theo mặc định, Access hiển thị tất cả 4 chữ số của năm (phiên bản Access cũ hơn chỉ hiển thị hai chữ số).
Đảm bảo lưu dữ liệu khi bạn hoàn tất. Hình bên dưới cho thấy bảng Tài khoản và dữ liệu sẽ xuất hiện khi bạn làm xong bài tập này.
Tại thời điểm này trong hướng dẫn, chúng tôi đã tạo hai bảng, Khách hàng và Tài khoản và thêm dữ liệu vào mỗi bảng. Trong các phần tiếp theo, chúng tôi sẽ trình bày cách truy vấn và báo cáo dữ liệu trong bảng cũng như cách tạo biểu mẫu nhập dữ liệu thân thiện với người dùng bằng trình hướng dẫn Access.
Lưu ý:Có thể tìm thấy hướng dẫn của tôi về Thiết kế Bảng Nâng cao MS Access trên liên kết này. Bạn có thể muốn kiểm tra điều đó sau khi hoàn thành phần còn lại của hướng dẫn này.
5.5 Tạo mối quan hệ giữa các bảng
Nhớ lại rằng một trong những đặc điểm chính của cơ sở dữ liệu quan hệ là tất cả các bảng đều có liên quan với nhau. Trong cơ sở dữ liệu Ngân hàng cho đến nay, bảng Khách hàng có liên quan đến bảng Tài khoản do trường CustomerID xuất hiện trong cả hai bảng. Access có một phương tiện để làm cho mối quan hệ này trở nên rõ ràng bằng cách sử dụng màn hình Mối quan hệ. Access sử dụng thông tin này khi thiết kế báo cáo, biểu mẫu và truy vấn yêu cầu nhiều hơn một bảng được hiển thị.
Để bắt đầu, hãy đảm bảo đóng cả bảng Tài khoản và bảng Khách hàng. Quyền truy cập sẽ tạm dừng tạo bất kỳ mối quan hệ nào nếu bảng hiện đang được mở. Để đóng bảng, hãy nhấp chuột phải vào tên bảng trong tab phía trên bảng và chọn mục trình đơn đóng hoặc nhấp vào dấu X nhỏ ở ngay phía trên bảng.

Tiếp theo, hiển thị màn hình Mối quan hệ bằng cách nhấp vào tab Công cụ cơ sở dữ liệu và sau đó nhấp vào nút Mối quan hệ như hình dưới đây. 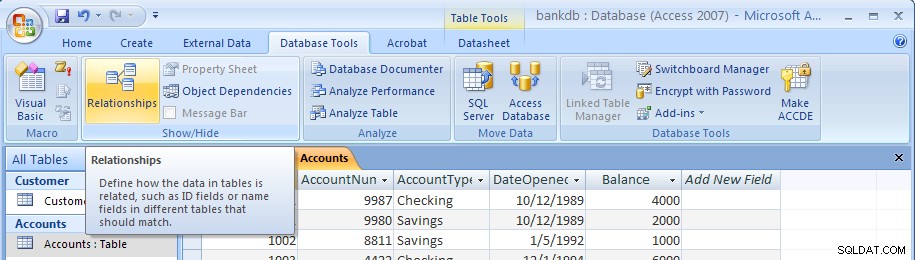
Màn hình Mối quan hệ trống sẽ xuất hiện như sau:
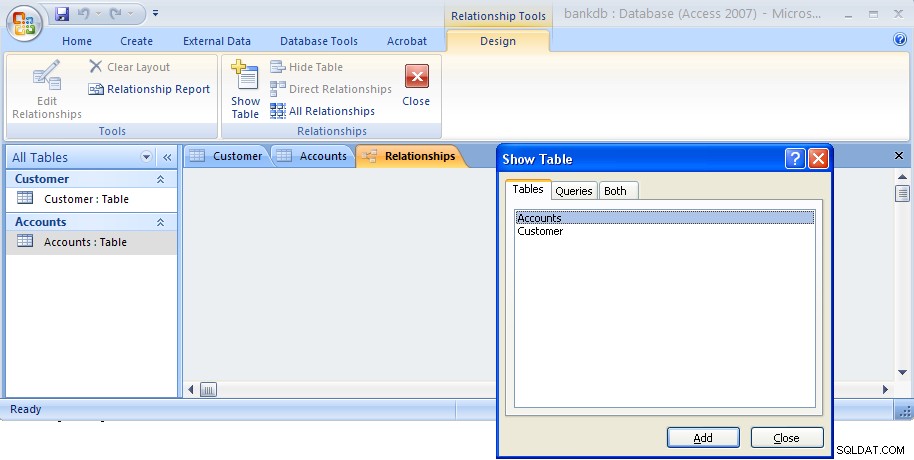
Hộp thoại Hiển thị Bảng sẽ xuất hiện theo mặc định. Đánh dấu cả bảng Khách hàng và bảng Tài khoản như hình dưới đây, sau đó nhấp vào nút Thêm.

Sau đó nhấp vào nút Close để đóng hộp thoại này. Màn hình Mối quan hệ bây giờ sẽ xuất hiện trở lại với hai bảng hiển thị như bên dưới:
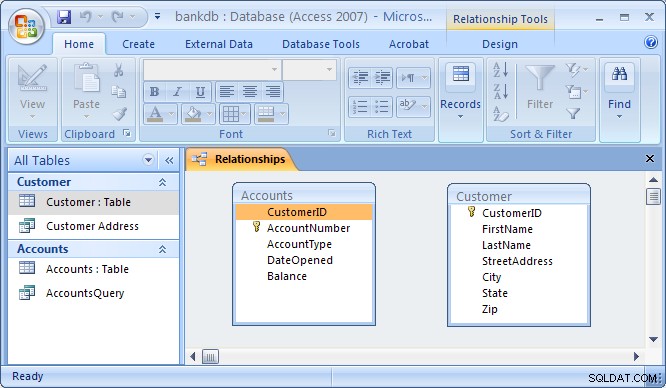
Để kết nối bảng Khách hàng với bảng Tài khoản để tạo mối quan hệ, hãy nhấp vào trường CustomerID trong bảng Khách hàng và kéo nó lên trên đầu trường CustomerID trên bảng Tài khoản. Khi thả nút chuột, hộp thoại Chỉnh sửa mối quan hệ sẽ xuất hiện như bên dưới:
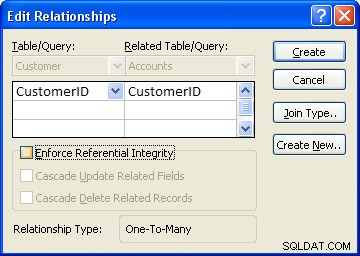
Access sẽ cố gắng hết sức để xác định Loại mối quan hệ (hầu như luôn luôn nó sẽ chọn Một-nhiều ). Đối với ví dụ này, Access biết rằng CustomerID là một khóa của bảng Khách hàng nên nó chọn trường này làm bên "Một". Điều này làm cho bảng Tài khoản trở thành bên “Nhiều” là Một khách hàng có thể có Nhiều accounts.
One additional step to be taken is the check off the box labeled “Enforce Referential Integrity”. This option puts constraints into effect such that an Accounts record can not be created without a valid Customer record, and Access will also prevent a user from deleting a Customer record if a related Accounts record exists. At this point, click on the Create button to create the relationship. The Relationships screen should reappear with the new relationship in place as follows:
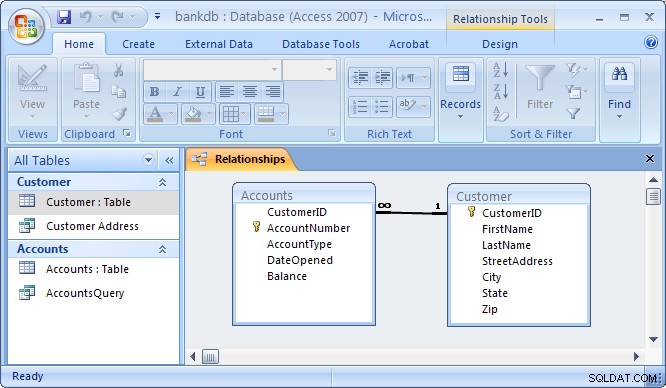
Note the symbols “1” (indicating the “One” side) and the infinity symbol (indicating the “Many” side) on the relationship. Close the relationships screen and select Yes to save the changes to the Relationships layout.
If the relationship does not appear in the above fashion, highlight it and press the delete key to delete it. Then go back to the table design view and make certain that the CustomerID field is designated as the key of the Customers table. Then go back to the Relationships screen and try to recreate the relationship.
5.6 Review of Creating and Viewing Tables
Creating a new table requires the following steps:
- Click on the Tables tab on the Access main screen
- Click on the New button.
- Choose the Design View and click the OK button.
- Fill in the name, data type and description of each of the fields in the table.
- Designate a primary key by clicking on one of the fields with the right mouse button and then choose Primary Key from the pop-up menu.
- Save the table by pulling down the File menu and choosing Save.
- Close the new table by pulling down the File menu and choosing Close.
To change the design of an existing table (e.g., to add, change or delete a field):
- Click on the Tables tab on the Access main screen
- Highlight the name of the table to be modified and click on the Design button.
- Make the necessary changes.
- Save the table by pulling down the File menu and choosing Save.
- Close the table by pulling down the File menu and choosing Close.
To add, delete or change data in an existing table:
- Click on the Tables tab on the Access main screen
- Highlight the name of the table to be modified and click on the Open button.
- Make the necessary changes to the data.
- Save the table data by pulling down the File menu and choosing Save.
- Close the table by pulling down the File menu and choosing Close.
To create or edit relationships between tables:
- Pull down the Tools menu and select the Relationships menu item.
- To display tables, right click and choose Add Tables
- To create new relationships, drag a key field from one table and drop it on the associated field in another table
- To edit an existing relationship, double click on the relationship line.
- To delete an existing relationship, click on the relationship line and press the delete key.
6 Creating and Running Queries
Queries are a fundamental means of accessing and displaying data from tables. Queries can access a single table or multiple tables. Examples of queries for our bank database might include:
- Which Customers live in Georgia ?
- Which Accounts have less than a $500 balance ?
- What is the total amount of money deposited by each Cusomter?
- Which Checking account has the largest balance?
Queries can be used to carry out other tasks such as for creating formatted reports and data entry forms, and for exporting subsets of data to Excel or another software program.
In this section, we show how to use the Access Wizards to create queries for a single table and for multiple tables.
6.1 Single Table Queries
In this section, we demonstrate how to query a single table. Single table queries are useful to gain a view of the data in a table that:
- only displays certain fields (columns) in the output
- sorts the records in a particular order
- performs some statistics on the records such as calculating the sum of data values in a column or counting the number of records, or
- filters the records by showing only those records that match some criteria. For example, show only those bank customers living in GA.
Creating a query can be accomplished by using either the query design view or the Query wizard. In the following example, we will use the query wizard to create a query.
To create a new query, click on the Create tab. Then click on the Query wizard button.
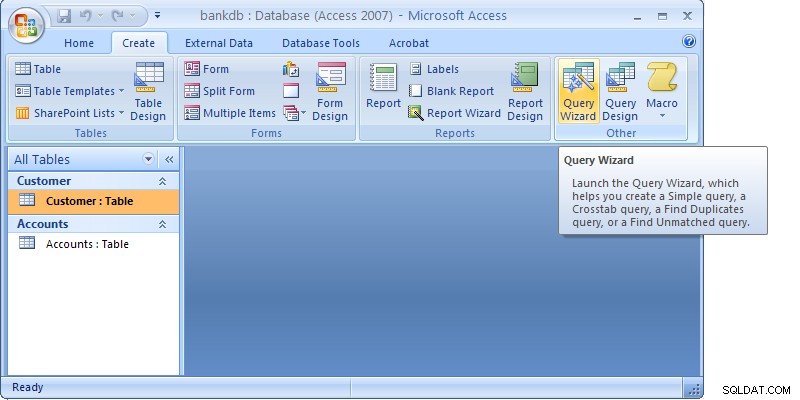
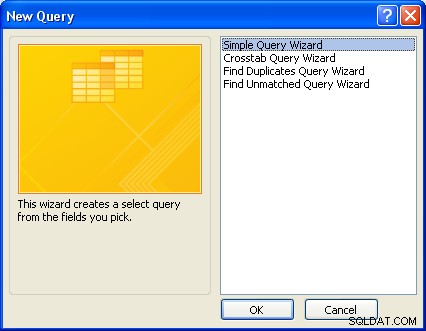
When the Query wizard appears, highlight the Simple Query Wizard selection and click on the OK button.
The first step in the Simple Query wizard is to specify the table for the query and which fields (columns) should be displayed in the query output. Three main sections of this step are:
- Tables/Queries – A pick list of tables or queries you have created.
- Available Fields – Those fields from the table that can be displayed.
- Selected Fields – Those fields from the table that will be displayed.
For this example, pull down the Tables/Queries list and choose the Customer table. Notice that the available fields change to list only those fields in the Customer table. This step is shown below:

From the list of Available fields on the left, move the FirstName, LastName, StreetAddress, City and State fields over to the Selected Fields area on the right. Highlight one of the fields and then click on the right arrow button  in the center between the two areas. Repeat this for each of the four fields to be displayed. When done with this step, the wizard should appear as below:
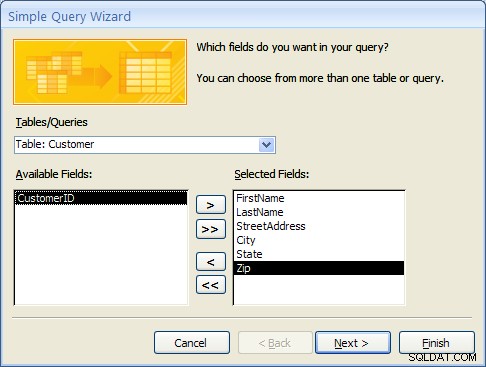
Click on the Next button to move to the next and final step in the Simple Query wizard.
In the final step, give your new query a name. For this example, name the query:Customer Address
At this point, the wizard will create the new query with the option to either:
- Open the query to view information – that is, the wizard will execute the query and show the data.
- Modify the query design – the wizard will switch to the Design View to allow further modification of the query.
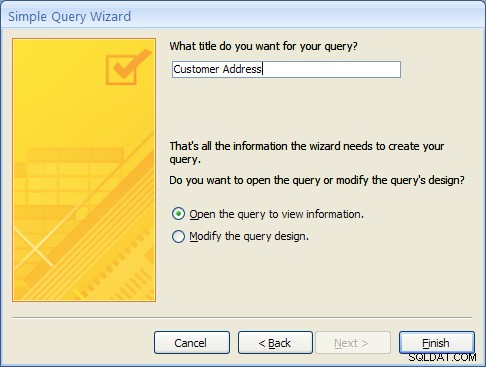
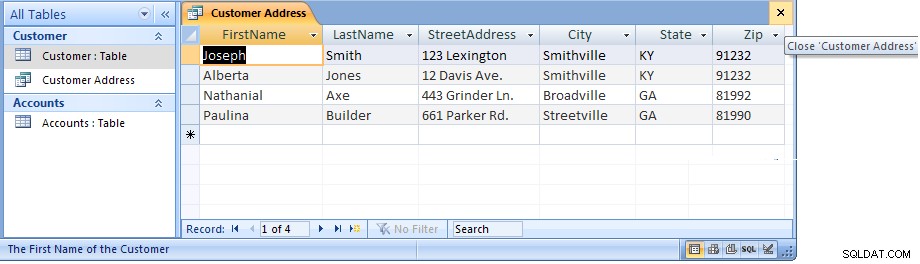
For this example, choose Open the query to view information and click on the Finish button. When this query executes, only the customer’s name, address, city and state fields appear, however, all of the rows appear as shown in the figure below:

Close this query by clicking on the X in the upper right corner of the query results as shown in the figure below:
The Access main screen showing the Queries tab should appear. Note the new query Customer Address appears under the Customers table.
6.1 Single Table Queries (Continued)
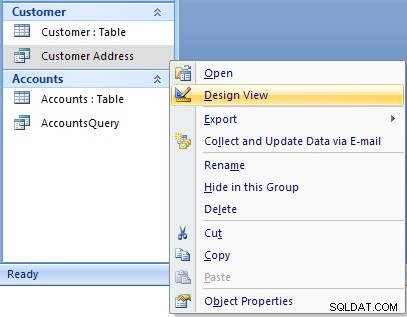
In the following example, we will modify the Customer Address query to only display customers in a certain state. To accomplish this, we will make use of the Query Design View.
Open up the Customer Address query in the design view by right-clicking on the name of the query. Then select the Design View menu item as shown below.
The design view will appear as in the figure below:
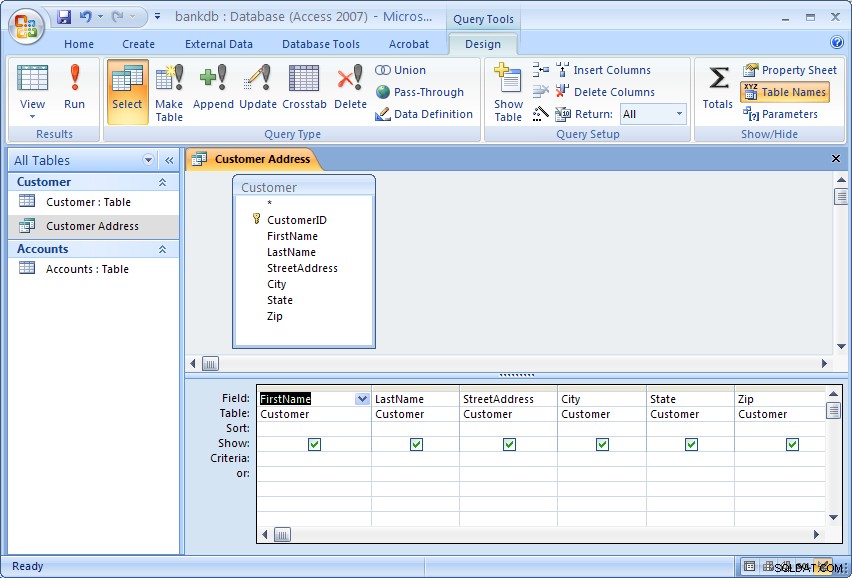
The Query Design view has two major sections. In the top section, the table(s) used for the query are displayed along with the available fields. In the bottom section, those fields that have been selected for use in the query are displayed.
Each field has several options associated with it:
- Field – The name of the field from the table
- Table – The table the field comes from
- Sort – The order in which to sort on this field (Ascending, Descending or Not Sorted)
- Show – Whether or not to display this field in the query output
- Criteria – Indicates how to filter the records in the query output.
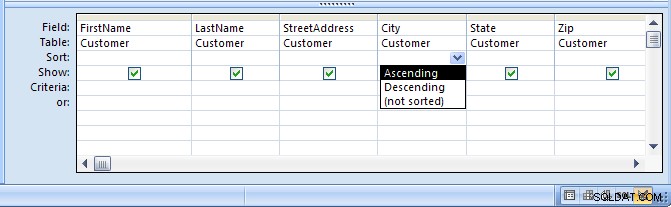
For this example, we will filter the records to only display those customers living in the State of Georgia (GA). We will also sort the records on the City field.
To sort the records on the City field, click in the Sort area beneath the City đồng ruộng. Choose Ascending from the list as shown in the figure below:
To filter the output to only display Customers in Georgia, click in the Criteria area beneath the State field and type the following statement: ='GA'
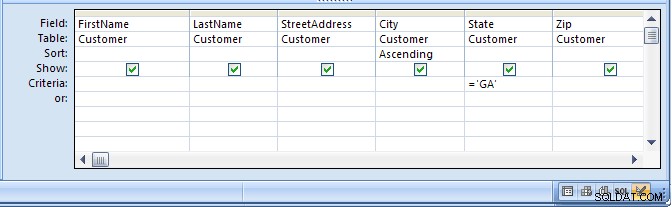
The ='GA' statement tells Access to only show those records where the value of the State field is equal to ‘GA’. Note the use of single quotes to surround the characters.
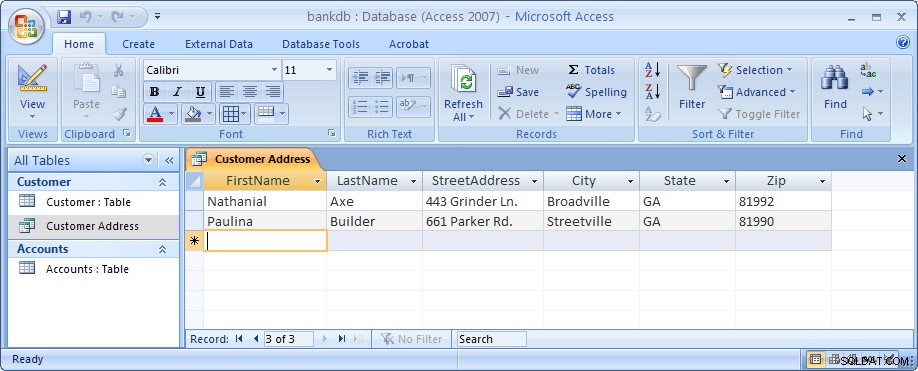
Run the query by clicking on the Run button (with the large red exclamation point). The output is shown in the figure below:
Finally, save and close this query to return to the Access main screen.
6.2 Exercise:Single Table Queries
For this exercise, use the Simple Query wizard to create a query on the Accounts table showing just the AccountNumber, AccountType and Balance fields.
- From the Access main screen, click on the Create tab. Then click on the Query Wizard button.
- Choose the Simple Query wizard option and click on the OK button.
- Under Table/Queries:choose the Accounts table. Then move the AccountNumber, AccountType and Balance fields over to the Selected fields area. Then click the Next button.
- In the next panel, you will be asked to choose between a detail or summary query. Choose detailed query and click on the Next button.
- Name the new Query :AccountsQuery and click on the Finish button.
The output is shown below:

Close this query by pulling down the Office menu and choosing Close.
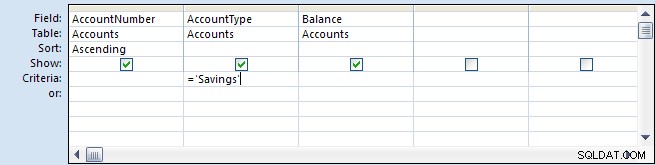
In the next part of the exercise, we will modify the query to sort the output on the account number and only display the Savings accounts.
- From the Queries tab on the Access main screen, highlight the AccountsQuery and click on the Design button.
- Change the Sort order for the AccountNumber field to Ascending.Add the following statement to the Criteria:are under the AccountType field:=‘Savings’
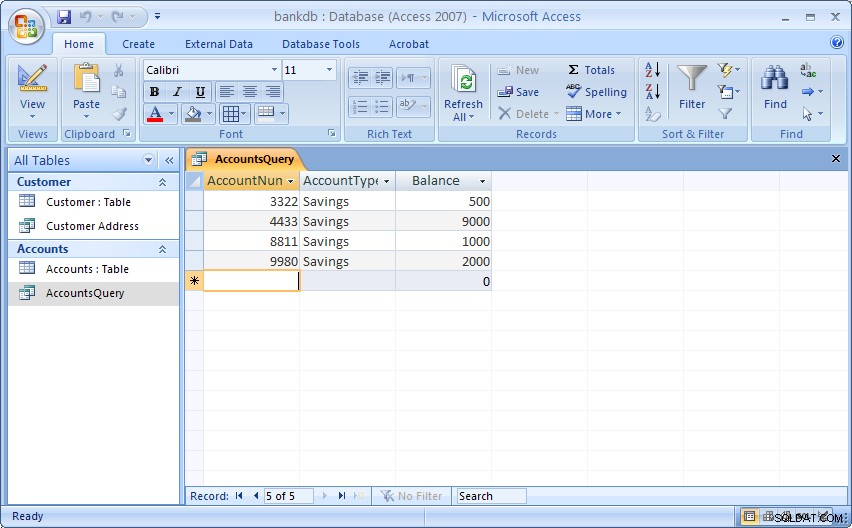
- Run the query by double-clicking on the AccountsQuery name. The output is shown below:
- Finally, save and close the query to return to the Access main screen.
6.3 Multiple Table Queries
Up to this point, queries involving only one table have been demonstrated. It is almost a given that queries will need to involve more than one table. For this example, assume that a manager would like to see a list of all of the customers and the type of account(s) that each one maintains at the bank. Such a query requires data from both the Customers table as well as the Accounts table. In such queries, Access will rely on the Relationships established between tables to guide how the data will be assembled to satisfy the query.
Before proceeding with these next instructions, make certain the One-to-Many relationship between the Customers and Accounts table has been created (see section 5.5 Creating Relationships for a review of this process).
To start the process of creating a multiple table query, highlight the Create tab and click on the Query Wizard button to create a new query. Select the “Simple Query Wizard” option as was done previously.
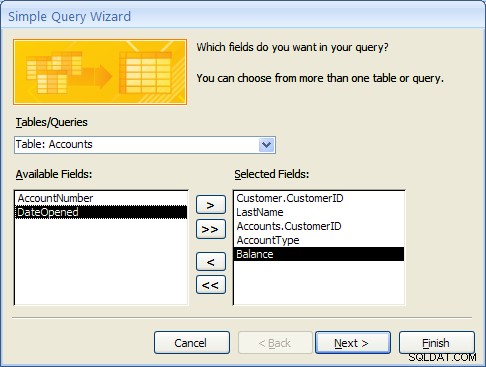
When the simple query wizard appears, select the CustomerID and LastName fields from the Customers table, then switch the Tables/Queries selection to the Accounts table and select the CustomerID, AccountType and Balance fields from the Accounts table. The result from this step is down below:
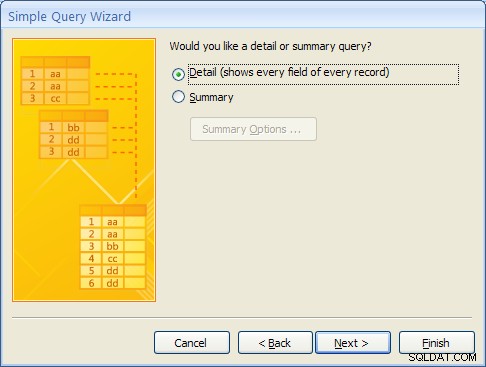
Click the Next button to continue. In the next step of the wizard, an option will appear to provide some level of Summary. For this example, leave the default at “Detail …” as shown below and then click on the Next button.
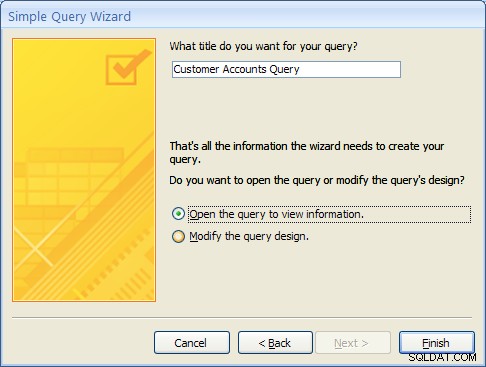
In the final step of the wizard, name the query “Customer Accounts Query” and click on the Finish button. The multiple table query results should appear as follows:
MS Access knows how to line up (or “join”) the accounts table to the Customer table for this query due to the relationship that was created when the tables were first defined.
As with single table queries demonstrated previously, one can change the query definition in design view by adding filters (e.g., show account information for all customers in ‘GA’).
6.4 Exercise:Multiple Table Queries
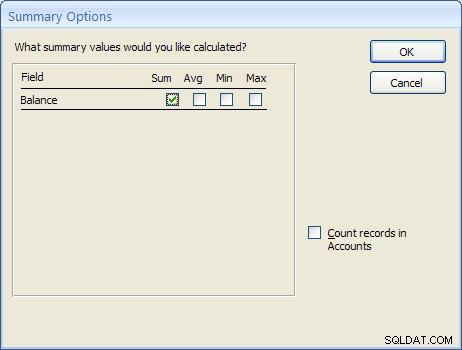
For this exercise, create a new query called “Accounts Summary Query” that joins the Customers table (include the CustomerID and LastName fields) with the Accounts table (include the Balance field only). In the second step of the wizard, click on the Summary choice (instead of Details) and then click on the Summary Options… button. Check off all of the Summary option boxes such as Sum , AVG , Min and Max as shown in the figure below:
The resulting query should appear as follows:
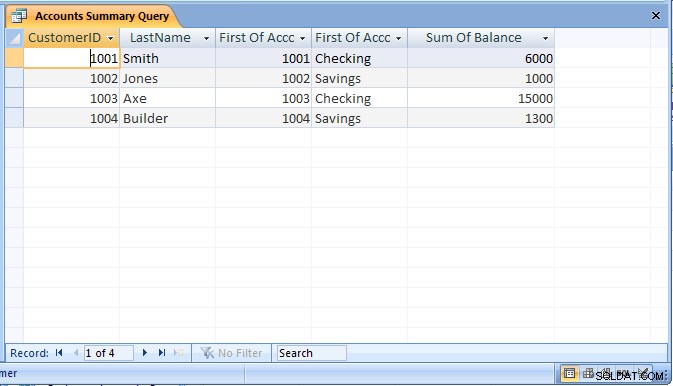
Be sure to save the query as “Accounts Summary Query”.
6.5 Review of Creating and Running Queries
In this section, the basic steps for creating and running queries were introduced. The query wizard can be used to create simple queries that access a single table. It is also possible to then modify the query to sort or filter the records.
Creating a query using the query wizard:
- From the Access main screen, click on the Queries tab. Then click on the New button.
- From the Queries tab on the main Access screen, click on the New button and choose the Simple Query wizard option.
- Under Table/Queries:choose the appropriate table for the query and then indicate which fields in the table will appear in the query output.If querying more than one table, change the Table/Queries:selection to display additional tables and select the necessary fields.
- If the table contains numeric fields, either detailed or summary information may be specified for the query.
- Finally, name the new query and click on the Finish button.
As a final note, Forms and Reports can be created based on existing queries.
7 Creating and Running a Data Entry Form
Data entry forms are the primary means of entering data into tables in the database. In a previous section, we described how to add data to a table using a spreadsheet-like view of the data. Data entry forms offer a more user-friendly interface by adding labels for each field and other helpful information.
Access provides several different ways of creating data entry forms. These include:
- Creating the forms by hand using a Design View
- Creating a default form based on all of the fields available in a table or a query
- Creating a form based on a number of different wizards that walk the user through the forms creation process.
As with queries, a data entry form can be based on a single table or it can work on multiple tables at the same time.
In this section, we cover the basic steps for using a wizard to create a data entry form based on a single table. After this exercise, a multiple-table form is demonstrated.
7.1 Creating a Single Table Form using the Wizard
In this example, we will create a simple data entry form for the Customer table. To begin the process, click on the Create tab on the Access main screen. As with the other components in Access, there are buttons for creating a New form, Open an existing form and Design an existing form. For this example, click on the New button to create a new form.
Several buttons for creating a new form will appear. For this tutorial, choose the Form wizard.
In the first step of the Form wizard, we need to specify the fields from the Customer table that will appear on the form. In this case, we want all of the fields to appear. Move each of the fields from the Available Fields side over to the Selected Fields side as in the following figure. Then click on the Next button.

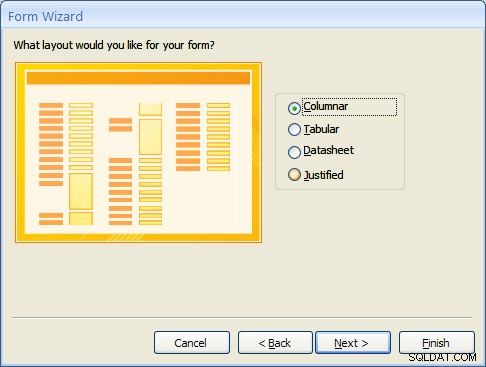
Forms can have several different layouts or arrangement of the labels and fields on the screen.
- Columnar – Places the labels to the left of each field. This is similar to a paper form. This layout is suitable for viewing data one record at a time.
- Tabular – Places the field labels at the top of the screen and the records are displayed below. This is similar to how a spreadsheet would display the data and is suitable for displaying multiple records of data at a time.
- Datasheet – The data appears in the same fashion as when viewing or adding data to a table.
- Justified – Places the labels above each field with the fields spread out on the form. This is suitable for viewing a single record at a time as with the columnar layout.
For this example, choose the columnar layout as shown in the figure below and click on the Next button.
At this point, MS Access 2007 and 2010/2013 versions are a bit different. Access 2007 will show several sample display styles that determine how the form will appear, including elements such as fonts, colors and the background used in the form. Access 2010 and 2013 skips this step in this wizard and provides styles that can be applied to the form in Design mode. For this example, for MS Access 2007, select the Office style as shown below and click on the Next button.

As a final step, give this new form the name:CustomerDataEntry and then click on the Finish button as shown below:
The new form will be created by the wizard and then opened. It should appear as in the figure below:
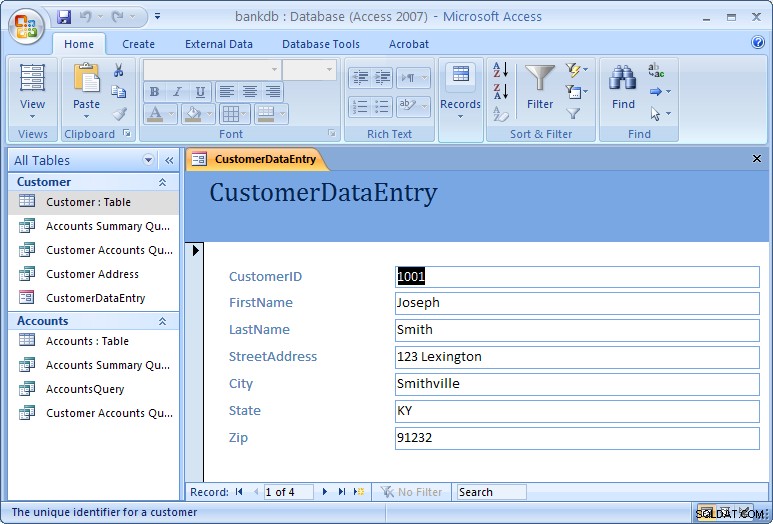
Use the tab key to navigate between fields in the form. To move to the next or previous record, use the record navigation bar at the bottom of the form:
The buttons on the navigation bar perform the following functions:
 | Go to the first record. |
 | Go to the previous record. |
 | Go to the next record. |
 | Go to the last record.  Go past the last record to add a new record. Go past the last record to add a new record. |
To close the form and return to the Access main screen, pull down the File menu and choose Close.
To open the form at any time, highlight the form name under the Forms tab on the Access main screen and click on the Open button.
One quick final note on forms. When the form is created, MS Access looks at how the table is designed and creates the form based on the properties of the table. If you make any changes to the table, you will need to re-create the form again in order to see those table changes reflected in the form. One example where this might happen is is if you change a column in your table from a text box to a combo box, or if you add or remove any columns from your table.
7.2 Exercise:Creating a Single Table Form
For this exercise, we will create a data entry form for the Accounts table created in a previous exercise.
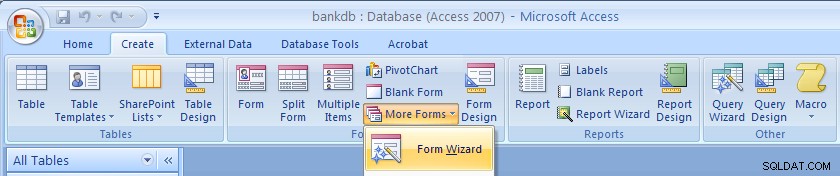
- Click on the Create tab on the Access main screen and then click on the More Forms… button and the “Forms Wizard” to create a new form.
- Select the Accounts table and all of the available fields and click on the Next button.
- Choose a Tabular layout and click on the Next button.
- For Access 2007 choose the Office style and click on the Next button.
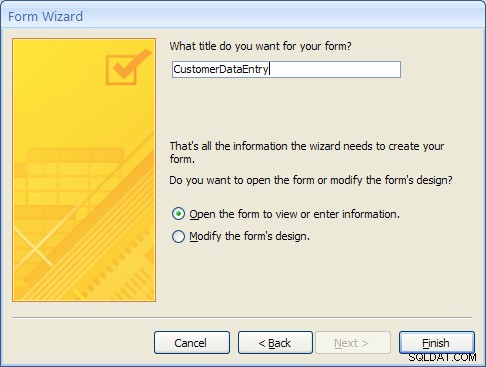
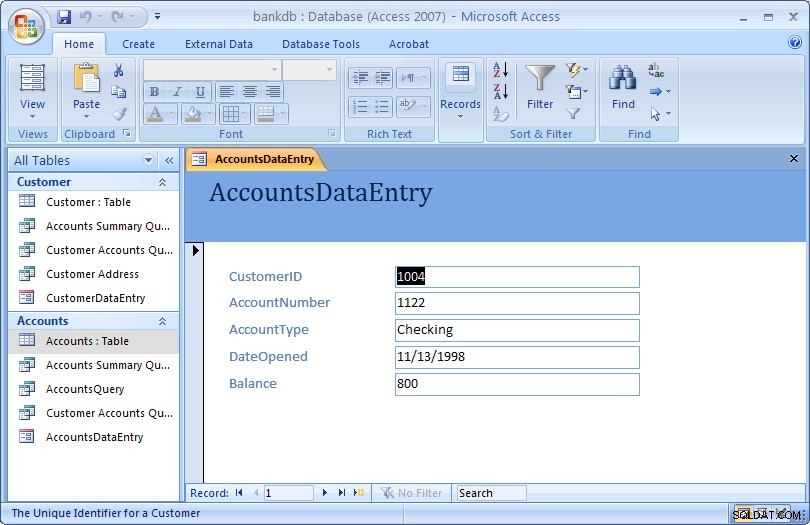
- Name the form:AccountsDataEntry Then click on the Finish button to create, save and view the new form.
The new form is shown in the figure below:
Close the form and return to the Access main screen, by pulling down the File (or Office) menu and choosing Close.
7.3 Review of Creating and Running a Data Entry Form
The basic steps for creating a simple data entry form are:
- Choose a table and a form wizard
- Specify the fields (columns) that will appear in the form
- Specify the layout for the form
- Specify the style (fonts/colors, etc.) for the form
- Save, create and run the new form
In this section we covered the basic steps required to create and run a data entry form. Access provides wizards which are adept at building simple forms with a minimal amount of work. More advanced work on forms would concentrate on using the Design View to change a form’s appearance and to add or remove fields and labels once a form is created. A more advanced tutorial on MS Access Forms Design is linked here.
8 Creating and Running a Report
Reports are similar to queries in that they retrieve data from one or more tables and display the records. Unlike queries, however, reports add formatting to the output including fonts, colors, backgrounds and other features. Reports are often printed out on paper rather than just viewed on the screen. They can also be attached to e-mail and exported and posted as web pages.
As with data entry forms, there are a number of ways to create reports in MS Access:
- A report can be created “by hand” in Design view
- A default report can be created automatically based on all of the firleds for a given table.
- A report can be created using the Create Report wizard.
In this section, we cover how to create simple reports using the Report wizard.
8.1 Creating a Single Table Report using the Wizard
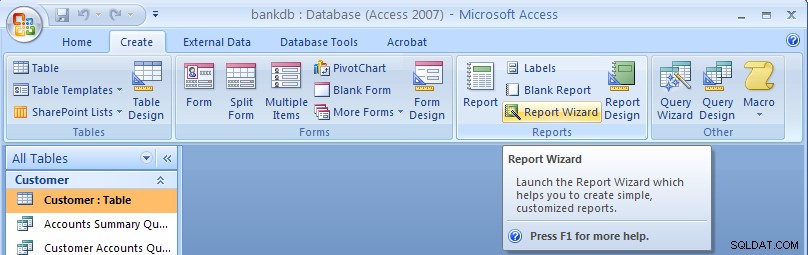
In this example, we will create a simple report for a single table using the Report wizard. As with the Queries and Forms, we begin by selecting the Create tab from the Access main screen.
To create a new report, click on the Report Wizard button.
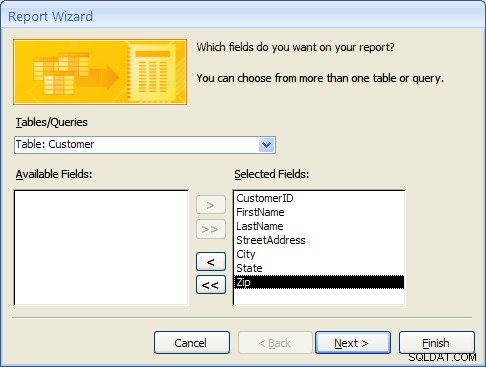
In the next step of the Report wizard, is used to specify the fields from the Customer table that will appear on the report. In this case, we want all of the fields to appear. Move each of the fields from the Available Fields side over to the Selected Fields side as in the following figure. Then click on the Next button.
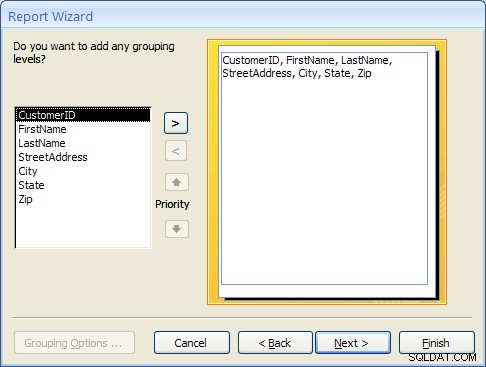
In the next step, we have the opportunity to add Grouping Levels to the report. A grouping level is where several records have the same value for a given field and we only display the value for the first records. In this case, we will not use any grouping levels so simply click on the Next button as shown below.
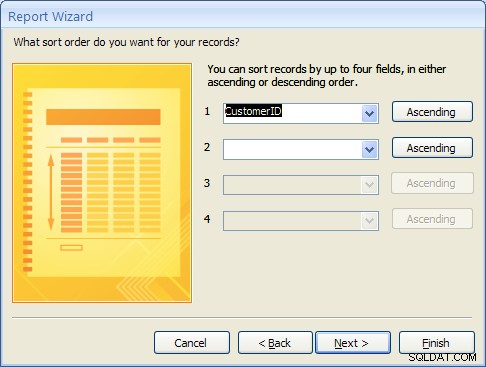
In the next step, the sorting order of the report can be specified. For this example, we will sort the records on the CustomerID field. To achieve this, pull down the list box next to the number 1:and choose the CustomerID field as shown in the figure below. Then click on the Next button.
8.1 Creating a Single Table Report using the Wizard (Continued)
The next step is to specify the layout of the report. The three options are:
- Columnar – Places the labels to the left of each field. This is similar to a paper form.
- Tabular – Places the field labels at the top of the report page and the records are displayed below. This is similar to how a spreadsheet would display the data.
- Justified – Places the labels above each field with the fields spread out on the report page.
Generally, reports use the tabular layout. For this example, choose Tabular layout and set the page Orientation to Landscape so that all of the fields will fit across one page. This is shown in the figure below. Click on the Next button to continue.

In the next step, the style of the report can be selected. For this example, choose the Office style and click on the Next button to continue.

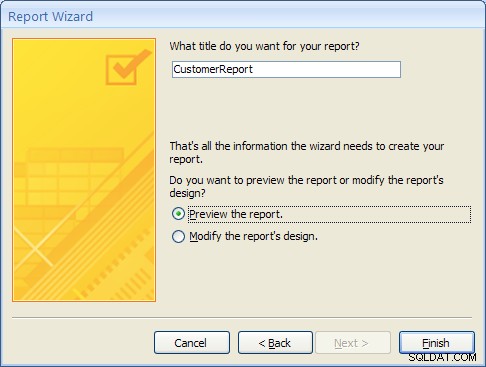
Finally, give a name for the new report:CustomerReport and then click on the Finish button to create, save and display the new report.
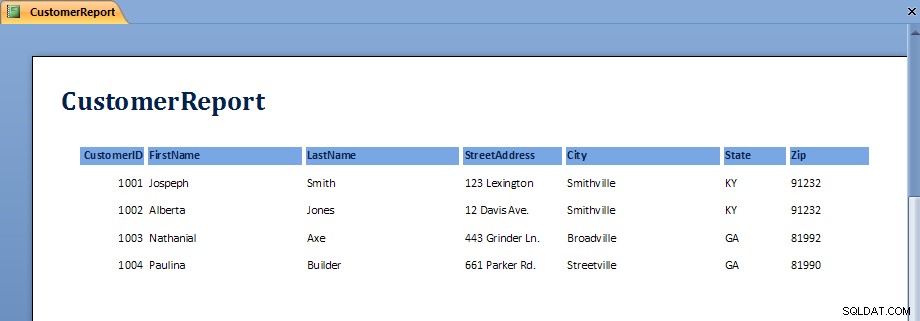
The output from the report is shown in the figure below. Note that on some screens, the last field, Zip, may not display without scrolling over to the right.
Once the report is displayed, it can be viewed, printed or transferred into Microsoft Word or Microsoft Excel. The button bar across the top of the screen has the following functions:
 | Print the report |
 | Zoom into a region of the report |
 | Display the report as one, two or multiple pages |
 | Zoom into or out of the report |
 | Transfer the report into MS Word |
 | Close the report |
To close the report and return to the Access main screen, click on the Close button.
8.2 Exercise:Creating a Single Table Report
For this exercise, we will create a report showing all of the Accounts information.
- From the Access main screen, click on the Create tab and Click on the Report wizard.
- Select all of the fields in the Accounts table by moving them all over to the Selected Fields side and then click Next
- Group the report by CustomerID by clicking on the CustomerID field and then clicking on the right arrow button. This is shown in the following figure:
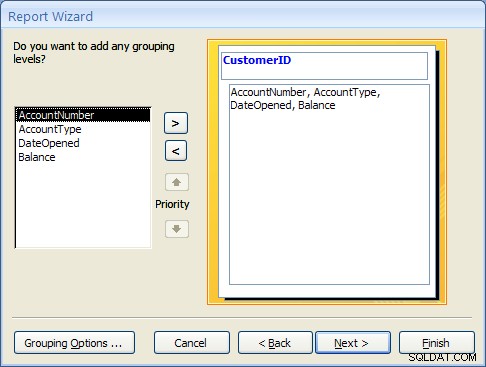
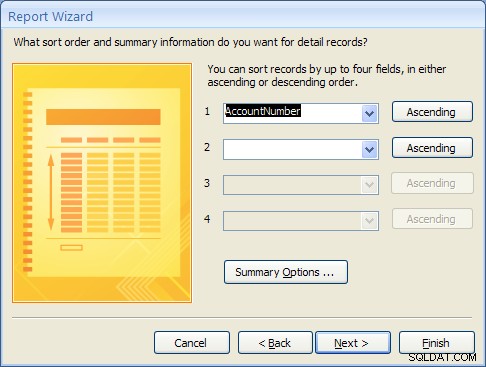
Click on the Next button to continue. - Choose to sort the report on the AccountNumber đồng ruộng. Note that a new button will appear called Summary Options.
Click on the Summary Options button. Choose the Balance field and select the Sum option. Choose the option to show both Detail and Summary data. Then click on the OK button.

Click on the Next button. - Choose a Block layout and click on the Next button.
- Choose the Corporate style and the click on the Next button.
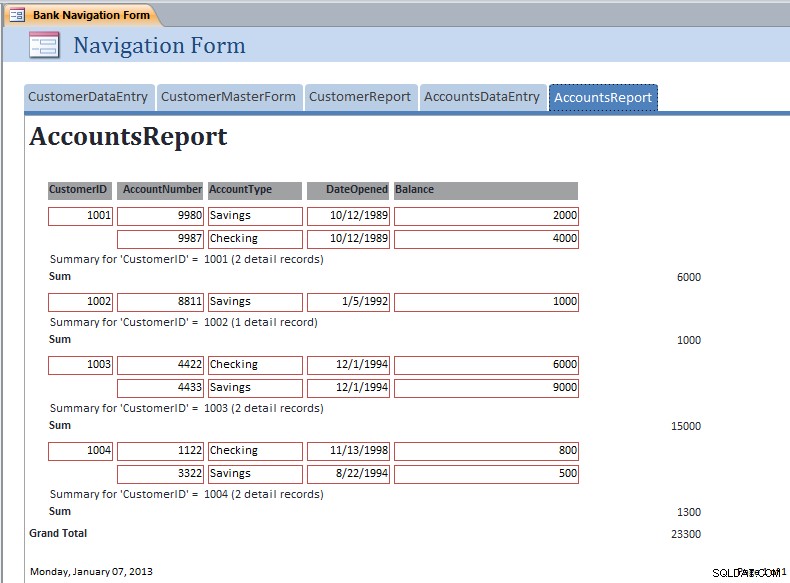
- Finally, name the report:AccountsReport and click on the Finish button to create, save and run the report.
The output from the AccountsReport is shown below:
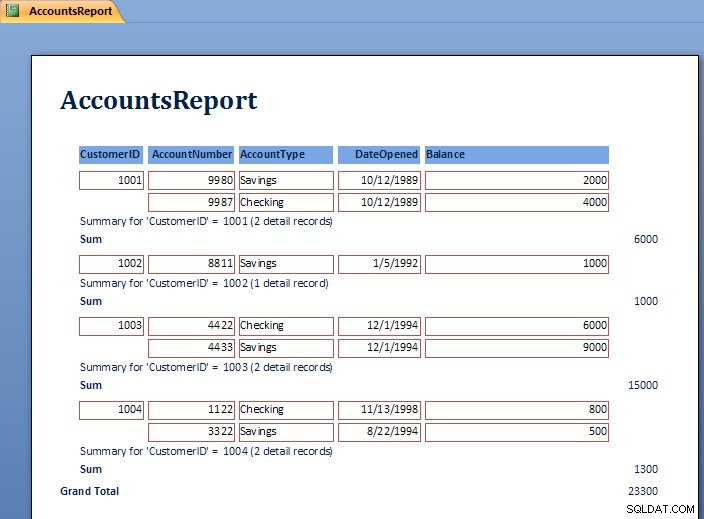
Note the Grouping at the level of the CustomerID and the Sum for each customer’s balances.
To close the report and return to the Access main screen, pull down the File menu and choose Close.
8.3 Review of Creating and Running a Report
As can be seen in the report exercise, there are many ways to create reports to show summation, sorting and layout of the data. Further study of Reports will show how to modify the layout using the Design View. Students are encouraged to work with the Report wizards to create different styles and types of reports.
9 Creating and Running a Master/Detail Form
Master/Detail forms are used to display data from two tables at the same time. MS Access calls the “details” a “subform”. The forms are linked according to the relationship between the tables. Recall that in the example database, the CustomerID is used to link the Customer table (Master) to the Accounts table (Detail). In this section a master / detail form for the Customer and Accounts tables will be created.
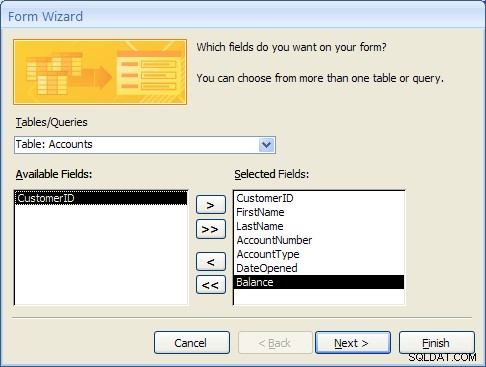
- From the Access main screen, click on the Create tab and Click on the “More Forms…” section and finally the “Forms Wizard”.Select the Customer table first and move the CustomerID, FirstName and LastName fields to the Selected Fields list.Next, select the Accounts table and move the AccountNumber, AccountType, DateOpened and Balance fields to the Selected Fields list as shown below.
Click the Next… button to move to the next step. - At this point MS Access detects that this form will involve data from two different tables. The first prompt asks how the form should be organized at the top or “Master” level. The “by Customer” selection should be highlighted.The second prompt asks how the forms should be created. For this example, select “Form with Subform(s)” as shown below and click the Next… button to move to the next step.
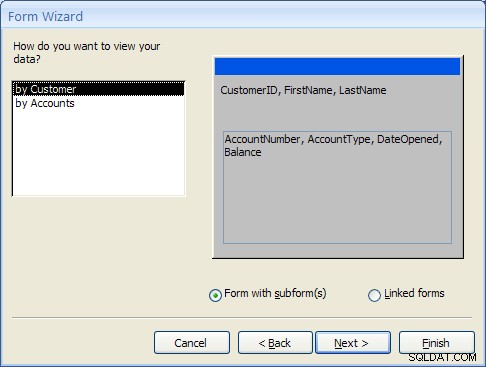
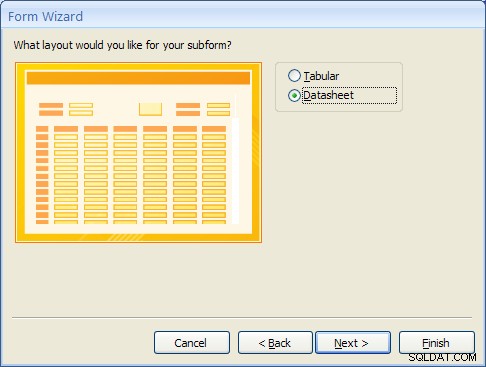
- The Subform is the form that will display the detailed data from the Accounts table. Selecting the “Datasheet” layout will make it easy for the user to view the multiple accounts a Customer may have. Select “Datasheet” and click the Next… button to move to the next step.
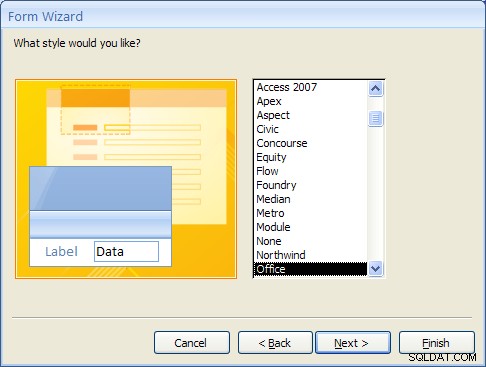
- For Access 2007, select the Office style and click the Next… button to move to the next step. (This step will not appear in MS Access 2010 or 2013).
- Finally, give the main form the name “CustomerMasterForm” and the Subform the name “Accounts Subform”.
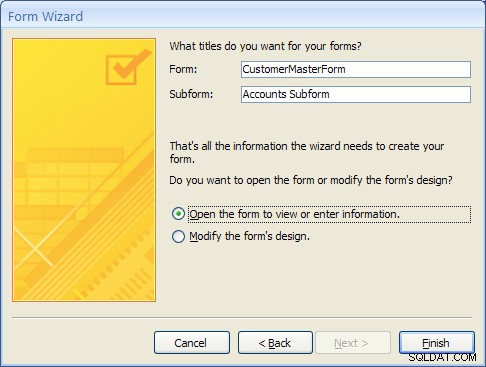
- After clicking on the Finish button the new Master/Detail form will appear as shown below.
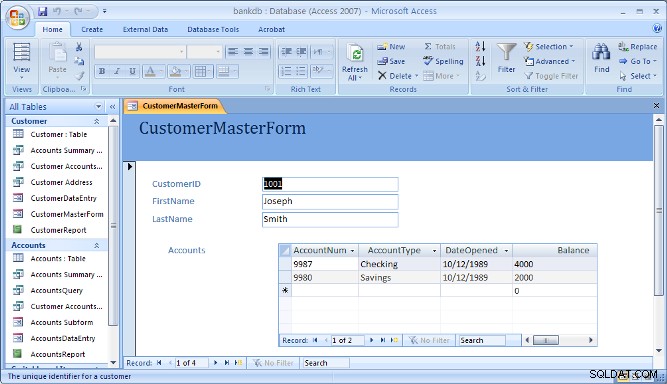
Note that the navigation bar at the bottom of the form is used to navigate through the records in the Master (or top) part of the form.
10 Creating and Running a Switchboard
A Switchboard is a type of form that displays a menu of items that a user can click on to launch data entry forms, reports, queries and other actions in the database. A switchboard is typically created after all of the forms and reports for a database application have been completed. It can be used to guide the user to an appropriate set of forms and reports.
Note that starting with Access 2010, Switchboards are not available by default (you will need to add this to the ribbon bar manually using the Options). Access 2010 and 2013 make use of the Navigation Forms.
In this section, a default switchboard will be created.
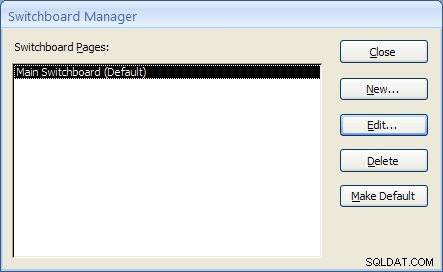
- From the Access main screen, click on the Database Tools tab and Click on the Switchboard Manager as shown in the figure below.

If this is the first switchboard made for this database, you will be prompted to create a new one as shown below. Click the Yes button.

- The Switchboard manager will appear as shown below:
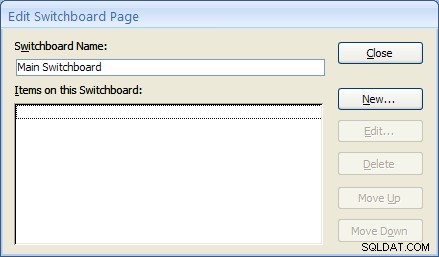
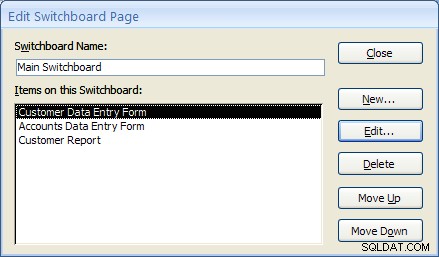
- Click on the Edit menu to edit the “Main Switchboard”. The Edit Switchboard Page will appear as shown below:
- Add a new switchboard item by clicking on the New… button. The Edit Switchboard Item form will appear as shown below. Fill in the fields as follows:
Text: Customer Data Entry Form Command: Select Open Form in Edit Mode from the drop down list. Form: Select the “CustomerDataEntry” form from the drop down list. 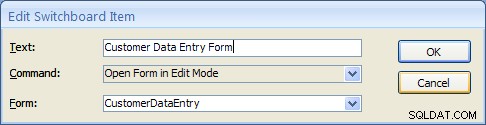
Click on the OK button to save this new Switchboard item.
- Repeat the above step two more times to add Switchboard items for the Accounts DataEntry form and the Customer Report.
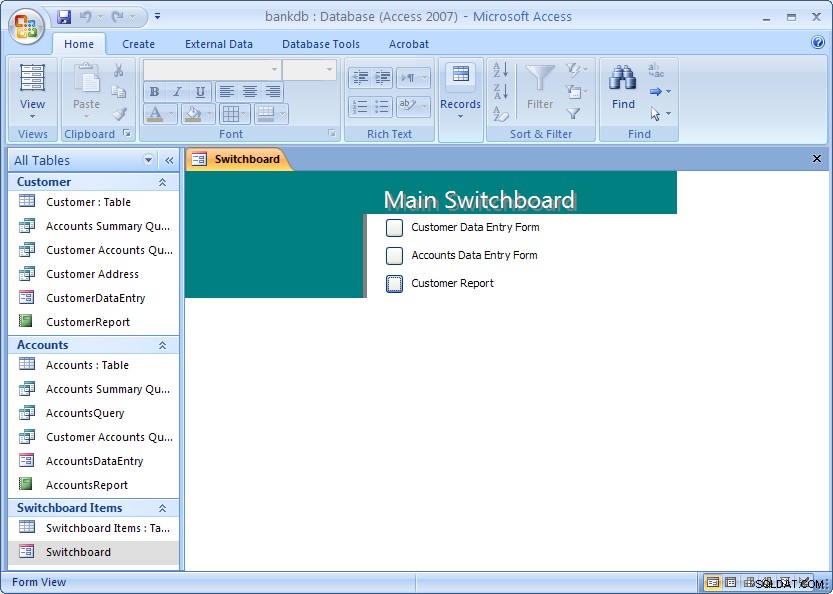
Once completed, click the Close button. Then click the Close button once more to close the Switchboard manager. - From the main MS Access screen look for a new section labeled Switchboard items. To view the switchboard, double-click on name “Switchboard”.
The next section covers creating a Navigation Form which is the recommended navigation screen for MS Access 2007, 2010 and newer versions.
11 Creating and Running a Navigation Form
MS Access 2010 introduced a new form called a Navigation Form. Navigation forms take the place of Switchboards but provide much the same functionality. Namely, they are designed to give the user the ability to run forms and reports without having to hunt through all of the different menus and lists objects. Typically a database application will have one main Navigation form that will appear when the database is opened.
In this section, the basic steps for creating and running a Navigation Form in MS Access 2010 will be demonstrated.
A Navigation Form is another type of form in MS Access 2010 and 2013
- To get started, click on the Create tab on the Access 2010 or 2013 ribbon bar. Under the section for Forms look for the item labeled Navigation Form. Note that this may be located on the button labeled Other Forms.
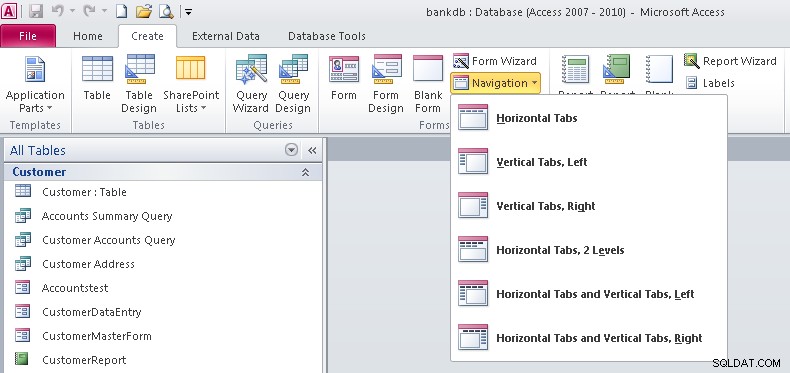
- Note that there are 6 different default styles of Navigation Forms. Each one places the buttons in a different configuration on the screem. Buttons can be aligned across the top, either side or some combination.For this tutorial select the Horizontal Tabs configuration which appears as the first item on the list.
- At this point a new Navigation Form will be created with a row of tabs across the top. The first tab will be labeled [Add New]
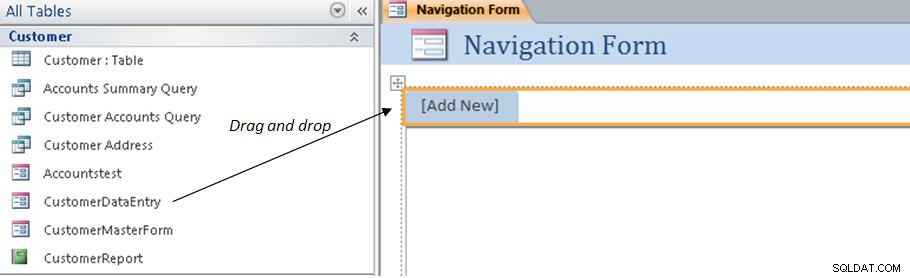
- To add items to the Navigation form, drag the items from the list on the left over to the spot on the Navigation Form labeled [Add New]. This is shown by the arrow in the above figure. For example, drag over the CustomerDataEntry form to the Navigation Form. The result is shown below.
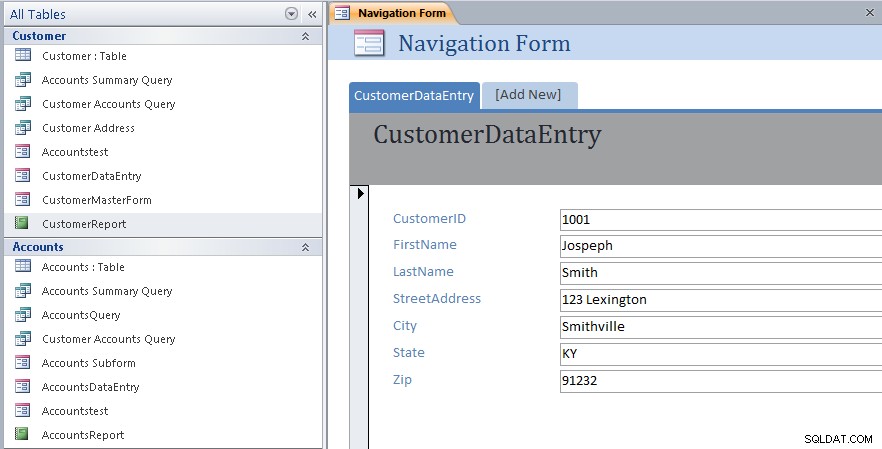
- Next drag and drop the CustomerMasterForm as shown below.

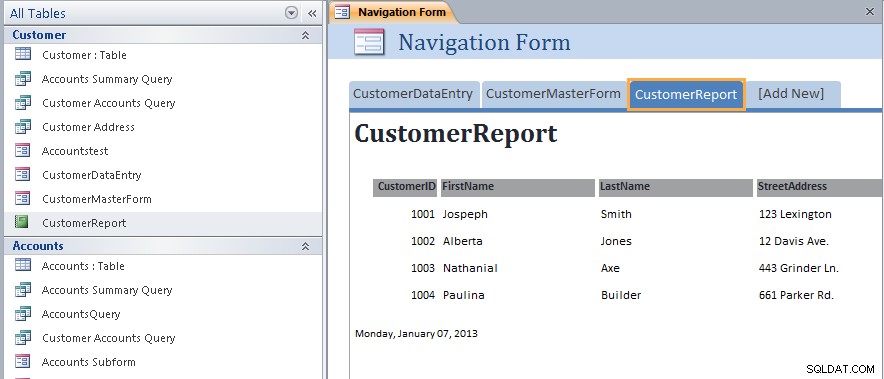
- Next drag and drop the CustomerReport as shown below.
- At this point we have created a new navigation Form and added three items along the top of the page. Save the Navigation Form by right-clicking on the name of the form and choosing Save as shown below:
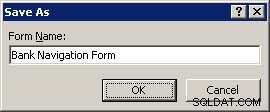
- Name the Navigation Form:Bank Navigation Form and click the OK button.
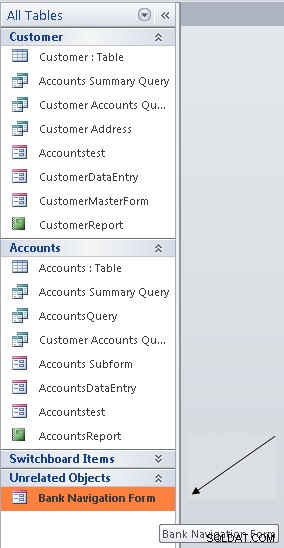
- Close up the Navigation Form by right-clicking again on the name of the form and choosing Close menu item.At this point the new Navigation Form has been created and saved. The next step will be to view the Navigation Form and navigate the different forms and reports linked to it.
- To view the Navigation Form, look for the Unrelated Objects group on the left side of the screen. Double click on the Bank Navigation Form item as shown below:
The Navigation Form will appear: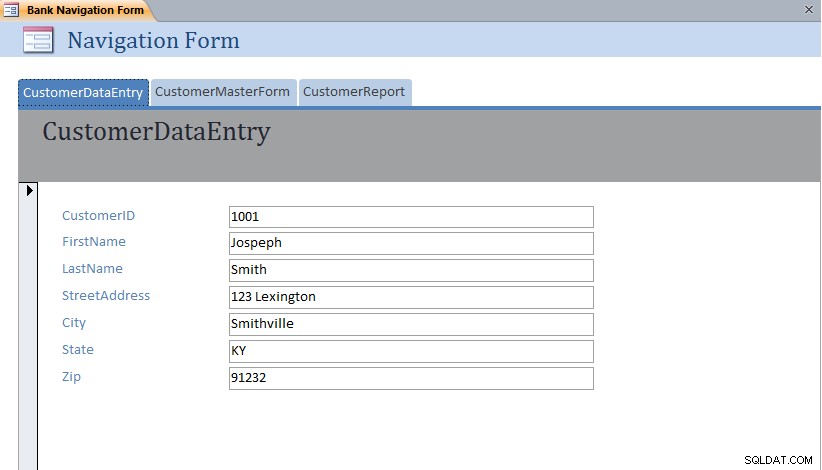 Note that each form or report can be displayed simply by clicking on the different tabs across the top of the Navigation Form.
11.1 Exercise:Modifying a Navigation Form
For this exercise, edit the Bank Navigation Form in Layout View and add the following new items to the Navigation Form:
- AccountsDataEntry
- AccountsReport
The resulting Navigation Form should appear as below with the AccountsReport opened:
11.2 Setting the Navigation Form as the Default
MS Access 2007 and 2010 (as well as earlier versions) have the ability to set a default form that will open up automatically once the MS Access data file is opened. This is especially useful for end users so that they always see the same form when they open up the database.
To set the Default Form, pull down the File menu and select the Options menu item.

The Database Options form will appear. Click on the Current Database item on the left hand side.
Under the Application Options heading, look for the Display Form:prompt and set this to the Bank Navigation Form as shown below:
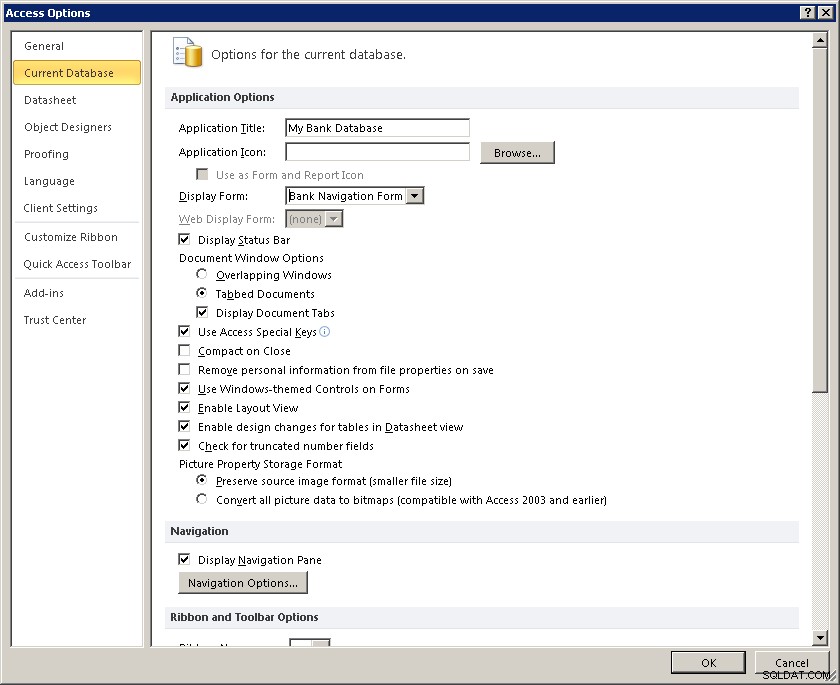
Click on the OK button to close up the Database Options screen.
The next time this database (bankdb.accdb) is opened, the Bank Navigation Form will open up.
12 Tutorial Summary
In this tutorial, we have covered the basics for creating an Access database including tables with data, queries to retrieve data, forms to enter data and reports to display and summarize data.
Students are encouraged to further their Access knowledge and skills by working through more advanced tutorials such as Advanced Access Database Table Design and Advanced Access Forms Design, and by reading the on-line help and Access documentation.
You may also be interested in this tutorial that covers up-sizing the Access database to Microsoft SQL Server using the Microsoft SQL Server Migration Assistant.